Have you used Canvas before but never at UWGB? Are you a returning instructor looking to use Canvas beyond the basics of modules and pages? Please join us in this overview of some Canvas features included in the UWGB digital learning environment.
Research has long supported the effectiveness of active learning strategies. What is active learning? It is an umbrella term used to describe classroom techniques in which students must participate in a tangible way in their own learning, as opposed to passively attending to a lecture or other presented material. Sometimes it involves groups of students working together (e.g., think, pair, share); in other cases they work individually to engage with the material (e.g., minute papers).
Overwhelming Evidence Supports Active Learning in the Classroom
You may be very familiar with the idea of active learning, but perhaps you are less well-acquainted with the research that supports its use. As recently noted by Davidson and Katopodis (2022) in Inside Higher Ed, according to “an often-referenced meta-study of more than 225 separate studies, active learning is more effective for every kind of student, in every discipline, than the traditional lecture model or the question-and-answer guided discussion method” (para. 1). Want to review some of the evidence yourself? Freeman et al. (2014) published the meta-analysis just referenced. More recently, Dewsbury and colleagues (2022) reported that active and inclusive learning techniques improved grades and reduced equity gaps in introductory biology courses, supporting previous findings by Theobold, Hill, Tran, and Freeman (2020) with STEM majors. Finally, Deslauriers et al. (2019) offered this interesting study that tackled resistance to active learning. They discovered that students in their research objectively learned more with active strategies but perceived that they learned less. Thus, instructors may wish to explain why they use these teaching approaches and what evidence tells us about the benefits for students.
Practical Implementation of Active Learning across Classes and Disciplines
As with any teaching approach, gradual implementation at a pace comfortable to the instructor and students is often wise. There are dozens and dozens of active learning strategies you can try, so there are opportunities to use these across disciplines and whether your classes are large or small, introductory level or advanced. Using active learning also does not mean abandoning lecture – in fact, it can be interspersed between shorter stretches of lecture that fit better with our typical attention span (e.g., about 10 minutes). What follows are links to practical resources to get you started.
The logo for Hypothesis (stylized as “hypothes.is”).
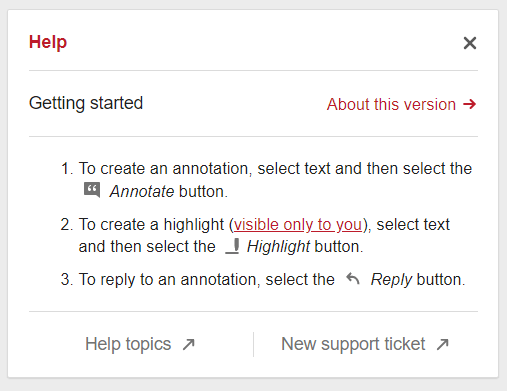
Hypothesis, a “social annotation tool” that integrates with Canvas, is a digital and social take on the classic practice of physically writing in the margins of a text. It is an annotation overlay that you can add to any PDF or website reading assigned in your Canvas course. Adding an annotation to a passage is as simple as selecting a word or phrase and then typing the annotation in the Hypothesis overlay. Students and instructors can view and reply to each other’s annotations to ask and answer questions and build upon each other’s ideas. This post contains ideas for using Hypothesis in your course and instructions for creating activities with the Hypothesis Canvas integration, which is available in all UWGB courses.
Hypothesis Use Cases
The Hypothesis overlay being used to annotate a New York Times article on a reptile fossil.
Annotation with Hypothesis can facilitate many types of class activities. Here are a few example activities:
Assign a reading and ask students to leave questions as annotations on passages they find difficult. Instructors can reply to annotations to answer these questions, use the questions to inform lessons and follow-up resources, or assign students to review and answer their peers’ questions.
Instructors can add their own annotations to a reading before assigning it to students to create a guided reading experience that signals areas of importance and offers clarification at potential sticking points. Instructor annotations can include questions for discussion that students can reply to right “in the margins” of the reading, placing discussions in context.
Task students with developing a glossary layer on an assigned text by adding annotations to difficult words, passages, or allusions. Encourage students to include definitions, contextual research, and possible interpretations in their annotations.
Present an example of an essay, lab write-up, or proof that intentionally has errors. Ask students to identify and correct these missteps by adding annotations to the document either as a group or as an entire class.
Providing these resources to your students can help them understand how to use Hypothesis and how to write quality annotations. The insights in these articles are valuable for anyone new to Hypothesis and digital annotation, so we also encourage instructors to review them!
Technical support for Hypothesis is available by contacting the vendor’s support team through their simple Help Request web form and additional user guides are available on Hypothesis’s Help website. As always, CATL staff are available to provide consultations to discuss how to best leverage Hypothesis in your courses! Request a CATL consultation online or email your questions to us at catl@uwgb.edu.
Using audio and video in a Canvas course can open the door to many possibilities, including multimedia discussion boards, recorded student presentations, using a flipped classroom model, and more. Still, instructors must make a number of choices regarding what tools to use and how to use them, from picking a webcam recorder to figuring out the best way to share videos in Canvas.
In this article you’ll find our recommendations on what tools and methods to use to support audio and video in your Canvas course, including:
Kaltura Capture, Kaltura webcam recorder, and Kaltura (My Media), the university’s supported solutions for recording, storing, and sharing media. Both tools are available to you and your students for free. We will also discuss the recording features in PowerPoint and how you turn your PowerPoints into lecture videos.
YouTube, Vimeo, and other third-party video platforms. Though the university doesn’t support these platforms, we will cover recommendations on how to embed or link to these sources.
PlayPosit, a powerful tool for making your audio and video content more interactive.
Recording Audio and Video
Kaltura Capture
When you or your students need to record audio or video content, Kaltura Capture will suit your needs in most instances. The app is simple to use and offers screen recording and webcam recording capability, making it an ideal tool for video lectures or prerecorded student presentations. After downloading and installing it on your device, you can use Kaltura Capture to:
Record the content on your computer screen. If you have a second monitor connected to your computer, you can choose which display to record.
Record video of yourself with your computer’s built-in or external webcam.
Record audio of yourself speaking with your computer’s built-in or external microphone.
On Windows, you can also record the audio from your computer system, such as when playing a video during a screen recording. (You must enable this feature in the application settings first.)
Kaltura Webcam Recorder
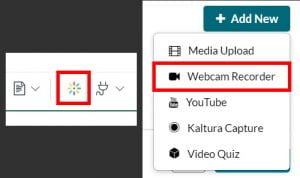
If you don’t need Kaltura Capture’s screen recording features, you can use Kaltura webcam recorder to record audio and video of yourself instead. It can be launched from your browser without downloading any software. Simply open the app from My Media in Canvas or within the Rich Content Editor while editing a Canvas page, discussion, assignment, quiz, or announcement. The webcam recorder is a quick and easy option for providing video feedback or recording a video introduction for a discussion board.
To launch the webcam recorder while editing an item in Canvas, click on the Kaltura icon (rainbow flower) in the toolbar of the Rich Content Editor. In the pop-up menu, click the “Add New” button and select “Webcam Recorder” from the dropdown menu.
Microsoft PowerPoint
If you already use PowerPoint to develop your lecture materials, consider using its built-in audio and video recording capabilities to create your pre-recorded lecture videos. Audio narrations can be recorded within PowerPoint slide by slide. Additionally, you can enable your webcam and record video footage of yourself during your narrations. To make your presentations mobile-friendly and more accessible, we recommend exporting your narrated PowerPoints as video files (guide for Mac users and guide for Windows users), uploading them to Kaltura (My Media), and then embedding the videos in Canvas. This LinkedIn Learning video is a great resource for getting started with recording narrations in PowerPoint.
Other Tools for Recording Audio and Video
Kaltura Capture and the Kaltura webcam recorder are not the only means of recording audio and video out there, and they may not work for every situation. You are welcome to explore other recording software, but know that if you use a tool that is not provided by the university, it also means that you will be on your own in terms of finding support if you need help.
It’s worth mentioning that there is one recording method we would discourage instructors from using: the “Record/Upload Media” option in the Rich Content Editor. First, Canvas has a limit on file size for media recorded with this feature. And second, captions (both machine-generated and professional) cannot be added to recordings made with this tool. To maximize accessibility and save yourself a potential headache, use a different recording software and store your recordings in Kaltura.
Storing and Sharing Your Media
Kaltura (My Media)
Whether you choose to record with Kaltura Capture or another application, we highly recommend uploading your recordings to Kaltura. One of the biggest advantages is that Kaltura provides unlimited long-term cloud video and audio storage at no additional cost. Once an audio or video file is in Kaltura, it is also incredibly easy to add a link to the media file or embed it anywhere in a Canvas course.
Kaltura makes it easy to manage your media as well. You can apply tags and add descriptions to help organize your content, sort and filter by a variety of attributes, and even make simple edits to your media with the Kaltura video editor, such as trimming out unwanted sections at the beginning or end of a screen capture recording.
The Kaltura video editor is great for when you need to cut out sections of a video clip, trim the beginning or end of a clip, or create a short clip from a longer video.
Using Kaltura is also best practice for accessibility. When you upload your media, machine-generated English captions are automatically applied. When a student makes a formal disability accommodation request for captions through Student Accessibility Services, professional captions can be easily ordered and applied to your Kaltura media as well.
Quick Tip: Uploading Media from a Smartphone to Kaltura
What do you do if you want to have students create audio or video content, but they don’t all have access to a computer with a webcam? Fortunately, an Apple or Android smartphone can do the trick in these situations. First, students can record their media with the camera application on their phone. To upload a recording from your phone to Kaltura, download the Kaltura MediaSpace GO application for iOS or Android and then follow the instructions in the linked knowledgebase guide to configure the app’s setup. Once the app is configured, you can upload to Kaltura (My Media) in just a few taps. See the iOS app user guide or the Android app user guide for more info.
Other Tools for Storing and Sharing Your Media
Since video and audio files can be large, it is best to pick a storage solution in which your videos are saved to a cloud or hosted on a website. YouTube, while not a technology supported by the university, is still an option that supports both share links and embed codes. If you are comfortable with using OneDrive, you can also store recordings in your UWGB OneDrive cloud and share links to those recordings, though there is not currently a supported method for embedding these recordings in Canvas.
Please note that it is not advisable to upload media to your Canvas course’s files area. Video and audio files will quickly take up your course’s limited file storage space. Using a cloud storage system for your media helps solve this issue, as media embedded from platforms like Kaltura or YouTube do not count against this quota.
The “Files” area in Canvas is good for storing documents and images that are linked or embedded in your course, however it is not ideal for larger files like audio and video.
Sharing Media from External Sources
For media that you do not own and that is hosted outside Kaltura, such as YouTube videos and TED Talks, you have a few options for sharing. Depending on the source, you might be able to search for and embed the content from within Canvas’s Rich Content Editor. For the rest, you can use an embed code or a simple hyperlink.
Canvas Integrations
Films on Demand, TED-Ed, Vimeo, and YouTube all have Canvas integrations that you can access from the Rich Content Editor. While editing a page or post, click on Apps (the plug icon) in the toolbar of the Rich Content Editor and then “View All” to select a tool. Use the tool’s interface to search for and embed your video.
The YouTube Canvas integration lets you search for and embed media from within the Canvas Rich Content Editor.
Embed Codes
If your video source is not listed above, check to see if there is an embed code available on the website where the media is hosted (often this will be an option when you click to “share” a video). If you have the embed code, you can add the media to a Canvas page, discussion, etc. by going to Insert > Embed in the Rich Content Editor and pasting the embed code.
Hyperlinks
If all else fails, you can add a hyperlink to the media using the Links button in the Rich Content Editor and then “External Links.” Make sure to give the hyperlink a descriptive name, rather than just pasting the whole URL on the page. This is not only best practice for accessibility, but it also helps contextualize the links before a student clicks on them.
Enhancing Audio and Video Activities
Want to bring your audio and video content to the next level? Tools like PlayPosit can help by adding interactions for students to engage with while they watch. PlayPosit bulbs can include content from Kaltura, YouTube, and Vimeo, so you can mix and match content you’ve created yourself with other videos you’ve found online. Adding a few simple interactions to a video takes just a few minutes of setup. You can learn more about this powerful media tool in this PlayPosit overview guide and guide on potential PlayPosit use cases.
Questions?
Using audio and video in a course can seem intimidating at first, but with the right tools and training, it can also be harnessed for effective teaching. As always, we also welcome you to request a CATL consultation if you’d like to learn more about developing learning materials or activities with audio and video. As you explore your media options, you may also find the resources below useful.