Canvas Discussions Redesign Arrives May 13, 2024 

In Summer 2024, Canvas will officially roll out its “Discussions Redesign,” which will bring a visual refresh to Canvas Discussions while adding some new features. UW-Green Bay will be turning on the redesign between the Spring and Summer terms on Monday, May 13, 2024. On this date, all discussions will automatically upgrade to the redesign with no action needed from instructors. Read this post to learn about the new features coming to Discussions and where to look for familiar buttons that have changed locations within the Discussions Redesign.

New Features

The Discussions Redesign adds the following new ways for students and instructors to interact and to view discussion activity:

Anonymous Discussions

Screenshot of the Anonymous Discussion settings seen while creating or editing a Canvas discussion

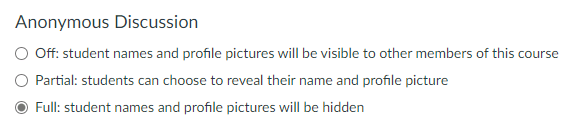
With the Discussions Redesign, the options shown when creating a new discussion in a Canvas course remain largely unchanged except for the addition of a setting that allows instructors to enable full or partial anonymity while setting up an ungraded discussion. With “full” anonymity, all student replies will appear anonymously without the student’s name and profile picture. With “partial” anonymity, students can choose whether to reveal their name and profile picture while making a reply. Anonymity only applies to students; instructor posts and replies are always shown with names and profile pictures. If you allow students to create their own discussion topics, a new setting in the discussion options for your course allows you to choose whether students can create anonymous discussions.

@ Mentions

Screenshot of two discussion replies with @ mentions. The mentions each include a student's name and are highlighted in purple.

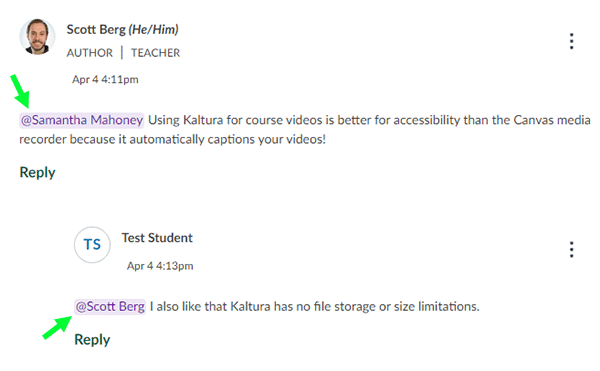
With the Discussions Redesign, discussion participants can mention an instructor or student in their replies by typing “@” and the beginning of a person’s name and then selecting the full name from a list of matches from the class roster that appears. Mentioned names are highlighted in the post and will trigger a notification for the mentioned person if they have the “New Mention” notification type enabled in their Canvas Notifications settings. Students and instructors can use this feature to more clearly identify who they are responding to in a discussion thread and get their attention.

Quote Reply

Screenshot of the Quote Reply option on a reply. The options menu icon and Quote Reply option are highlighted.

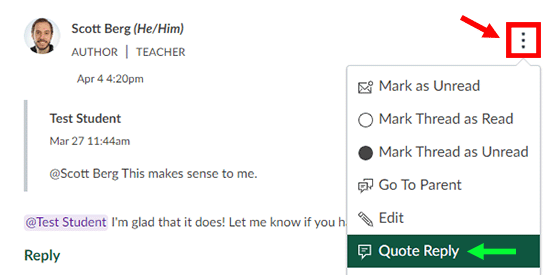
The Discussions Redesign has a new “Quote Reply” action which lets you include the contents of the post you are replying to within your reply. Using this feature will help add clarity to long discussion threads when replying to a post that is higher up in the thread. You can find the Quote Reply option within the options menu (the three vertical dots icon) of any discussion reply.

Multiple Viewing Options for Discussion Threads

A Canvas discussion reply. The link that can be selected to reveal threaded replies is highlighted and reads, "9 Replies, 2 Unread"

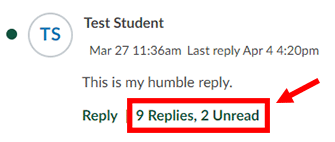
The Discussions Redesign offers a more condensed initial view where only the top-level replies to the topic are visible after opening a discussion. If a reply to the main topic has threaded replies (i.e., replies to the reply) “underneath” it, they are initially hidden, and the post will have a link under its contents which reports the number of threaded replies that are “underneath” that post. You can select that link to reveal the threaded replies in either an “Inline View,” which shows all replies underneath one another with varying indentation (like the older discussions design does), or a “Split View,” which shows threaded replies in a side panel that flies in from the right side of the screen.

A screenshot of the search bar and buttons found at the top of a Canvas discussion. The "View Split Screen" and "Expand Threads" buttons are highlighted.

You can switch between using the Inline and Split view modes with the View Inline / View Split Screen button at the top of the discussion page. When using Inline View, you can select the Expand Threads button at the top of the discussion to quickly reveal all threaded replies at once.

Edit History

A screenshot of a Canvas discussion reply that has been edited. The reply's "View History" link is highlighted.

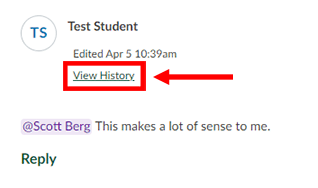
If a student edits a reply after posting it, Canvas will now keep each version of that reply in an “edit history” that is available to instructors. Instructors will see a “view history” link on any reply that a student edited after posting and can select it to view that reply’s previous versions. Students can only view the edit history of their own replies.

Coming Soon: Discussion Checkpoints!

Canvas will soon (finally) be adding the oft-requested feature for supporting multiple due dates in a discussion. This feature may not yet be available when we enable the Discussions Redesign in May, but Canvas plans to add it during Summer 2024. With this feature, instructors will be able to easily set separate due dates for initial posts and for replies to peers’ posts within the same discussion, which will help automate reminders for students by adding calendar and to-do list items for each “checkpoint.” Watch for more information on this feature as it gets closer to release!

New Locations for Important Buttons

Don’t get lost within the Discussions Redesign by taking note of the following new locations for some often-used buttons:

Edit Button

A screenshot of the options menu for a Canvas discussion topic as seen by an instructor. The "options" icon and "Edit" menu item are highlighted.

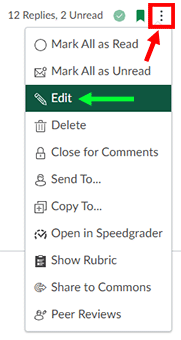
The Edit button is moving from its prominent position at the top of the discussion page to being tucked within the options (three dots) menu found in the top-right corner of the discussion topic. Look for the Edit link in that options menu whenever you want to adjust an existing discussion’s settings.

Group Discussion Navigation

A screenshot of a Canvas group discussion with the groups icon highlighted in the top-left corner.

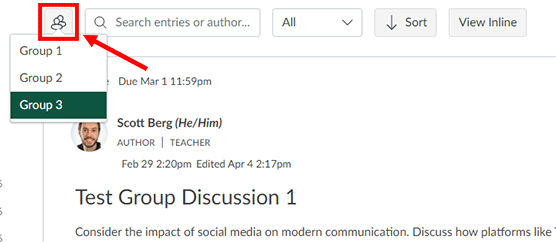
Group discussions will no longer show a blue box at the top of the page with the links for accessing each individual discussion. Instead, a group discussion will have a button with the “groups” icon in the top-left corner which you can select to switch between the discussions of each group.

Publishing and Subscribing

Two screenshots of the publish and subscribe icons of a discussion topic. The first screenshot shows the unpublished and unsubscribed icon states; the second screenshot shows the published and subscribed icon states.

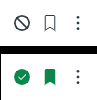
The buttons for publishing a discussion and subscribing to it (for notifications) have shrunk into smaller icons that can be found next to the options (three dots) menu in the top-right corner of the discussion topic. You can select these smaller publish and subscribe icons to publish or unpublish a discussion and subscribe or unsubscribe to a discussion.

Ready, Set, Discuss!

Knowledge of these new features and interface changes is all you need for a smooth transition to using the Discussions Redesign in your courses. Your existing discussions will automatically upgrade on May 13 with all existing topics and replies retained. We hope that the fresh look and new features will facilitate more robust interactions within your courses! If you want to discuss ideas for using Canvas discussions in your course with a member of our team, we encourage you to request a CATL Consultation or reach out to us at catl@uwgb.edu.

Sandbox Courses: A Time-Saving Tool for Course Design and Collaboration

Decorative image of sandbox with a toy truck.

The University of Wisconsin – Green Bay uses Canvas as its Learning Management System (LMS). When instructors participate in professional development opportunities offered by the Center for the Advancement of Teaching and Learning (CATL), they often encounter information about creating a Canvas Sandbox course. But what exactly is a sandbox course? This blog post will define what a sandbox course is, what the differences are between a sandbox course and an instructional course, and some different use cases for sandbox courses that will help save you time in the long run.

What is a sandbox course?

A sandbox course is an empty Canvas course shell that can be used for a wide variety of purposes. These courses are not linked to the UWGB course registrar the way instructional courses are. Therefore, Sandbox courses can be used as a testing field or playground within the Canvas environment. Sandbox courses can be used by instructors as a tool to engage with Canvas content and teaching materials with other faculty or staff.

How is a sandbox course different from an instructional course?

  • Sandbox course: A sandbox course can be manually created at any time. These courses are not linked to a specific term within Canvas and do not have term start or end dates. Sandbox courses are not linked to the Registrar or SIS, so they do not have automatic enrollments and do not have any students.
  • Instructional course: An instructional course is created 75 days before the start date of the course as it is listed in the Schedule of Classes. These courses are linked to the UWGB student information system (SIS) which automatically enrolls students. This same system also automatically updates student enrollments as students add and drop courses at the beginning of a term to keep your course enrollments up to date. Both the instructor and students within a Canvas instructional course are added with SIS system sync. Therefore, the only Teachers within an instructional course are those listed as an instructor of record by the Registrar’s Office and only students who officially enroll in a course are added to an instructional course shell.

What are the limitations and benefits of a sandbox course?

Sandbox courses do not have the option to add someone to the course as a “Student.” This is a setting enforced by the University of Wisconsin System. Instructors can, however, utilize the “Student View” option in Canvas to view content in their Sandbox courses as a student would see it. To do so, any modules and content of interest must be published.

Canvas sandbox courses also allow for multiple individuals to have the role of “Teacher” at the same time. As sandbox courses are not linked to the SIS system, these roles can be granted by anyone within the course who has the role of “Teacher”. This allows for multiple instructors to contribute collaboratively to learning materials and activities to a course, or to allow instructors to share content with each other without worry that students will have access to those resources.

How can you utilize a sandbox course (instructors and staff)?

  • Sharing course content with other instructors or staff members while being mindful of FERPA. This is the safest way to share course content between instructors.
  • Preemptively building out your course content prior to the creation of your Instructional Canvas courses (these show up 75 days before the listed course start date). Content built in a sandbox course prior to the creation of an instructional course can be moved into the live instructional course using the Canvas Course Import tool.
  • Make “live” revisions to course content during an active teaching term without impacting the instructional course your students are engaging in. The best way to do this is to build a sandbox course and then copy the course content from your instructional course into the sandbox course. Then you can make reflective edits to that content in the sandbox course without impacting the activities that students have engaged with.
  • Collaborative course design and course building with a co-instructor or designers.
  • Creation of departmental or program trainings for instructors, staff, graduate students, and/or student employees. If you would like to create a course shell for training and development purposes and need to add users with the “Student” role, please reach out to dle@uwgb.edu and a Canvas admin can copy your sandbox into a course shell that supports the Student role.
  • Testing and experimenting to build new activities or assessments using different integrations (LTIs) such as PlayPosit and Hypothesis that are available within in the UWGB Canvas instance.

How do I create a sandbox course?

To create a Canvas sandbox course, you can follow the directions listed in this UWGB Knowledge Base article. There are, however, a few caveats for the creation of a sandbox course in the UWGB instance of Canvas. These conditions are listed below:

Global Navigation how to create a Sandbox


  • You must be enrolled in at least one existing Canvas course as a Teacher. If you are not enrolled in any Canvas courses as a Teacher yet, you can email DLE@uwgb.edu to have a Canvas admin create a sandbox for you.
  • You must access the Sandbox course creation tool, located under the Help menu within the Canvas Global Navigation Menu, from the University of Wisconsin – Green Bay instance website (https://uwgby.instructure.com).


Session Recording: “Getting Starting with Canvas: Building Your First Module” (Aug. 25, 2023)

Session Description

New to Canvas and not sure where to start? In this one-hour workshop, we will walk you through the essentials for building your first module! Learn about the features you might need to prepare your class including pages, assignments, discussions, and quizzes.

Session Recording: “Creating and Sharing Video Recordings with Kaltura My Media” (Aug. 31, 2023) 

Session Recording

Instructors at UWGB can use Kaltura My Media to create, upload, and share videos in Canvas courses. Join us for a one-hour session where we will cover how to create and share engaging instructional videos with Kaltura’s easy-to-use media tools and unlimited storage space.

Session Recording: “Getting Your Canvas Gradebook Going” (Aug. 30, 2023)

Session Description

Maintaining an accurate gradebook in Canvas benefits students in any class modality. Bring your questions to this session as we explore the ins and outs of using the feature-rich Canvas gradebook.