Raising Student Evaluation Response Rates

Student evaluations of teaching play a crucial role in professional and course development and in the personnel review process. If they are to be useful, it is important that the data they provide be as accurate as possible. Unfortunately, students are not always motivated to complete them, perhaps because they don’t realize their voice is valued in this process. It is also well-documented that response rates for online evaluations are lower than for in-person administration. There are concrete strategies available to increase participation; however, and research points to creating a positive classroom culture and having explicit discussions of evaluations and specific ways they have been/will be used to inform courses as particularly effective (Chapman & Joines, 2017). A summary of some additional techniques is included below.

  • Make an announcement about evaluations in person (if possible) and in your Canvas course. Do this at the beginning and near the end of the survey period. Be sure to explain why student feedback is important and give specific examples of how you have used it in the past to revise classes. If you are teaching online, you could accomplish this with a short video.
  • Provide some time in class or a space online for students to ask questions about evaluations and their uses at UWGB.
  • Allow students time in class to complete their surveys, making sure to leave the “room” when you do. You should not be present when students complete evaluations. If you do provide time, note that ending class early to do so may only result in students leaving. In online courses, you might factor additional time for evaluations into your calculations of workload for the week and let students know that.
  • Assure students that the surveys are anonymous. Reinforce the point by leaving the physical or Zoom room when the students take them.
  • Include the direct link or QR code for your specific course evaluation in the Canvas announcement. You might also attach this helpful Knowledge Base article so students know how to locate the surveys for all their classes or even show in-person students where to find the necessary information.
  • Put “Complete Course Evaluation” as a task in your Canvas shell and include it on the calendar so it shows up on students’ “To Do” list for the class.
  • Bring the topic of the evaluations up several times during the period they are open, so they remain top of mind for students, even if you’ve already allowed time to complete them in class.
  • Monitor overall response rates for your classes during the open period. Ethically, you cannot award credit for completing an evaluation, and remember they are anonymous. You can, though, make classes aware of response rates and even create a contest between course sections to see who can achieve the highest overall response rate by a specific date. Offer a non-tangible prize to the winning class, such as bragging rights or a choice on a final assignment.
  • Throughout the semester, foster an environment of open communication and respect with students, which may motivate them to see their feedback as valued and worth taking the time to provide for you.

Chapman, D.D., & Joines, J.A. (2017). Strategies for increasing response rates for online end-of-course evaluations. International Journal of Teaching and Learning in Higher Education, 29(1), 47-60. http://www.isetl.org/ijtlhe/

Strategies for Creating “Generative AI-Resistant” Assessments

The use of generative-AI tools in education has recently garnered significant attention, placing educators in a unique position to consider their roles in higher education and how students engage with such tools. In a previous blog post, we introduced AI technologies and their endless capabilities, as well as potential implications for higher education. Additionally, we provided advice on considerations, precautions, and ethical concerns for using generative-AI in the classroom.

While some educators are excited about integrating AI collaboration into their teaching practices, others are apprehensive about its potential misuse by students. To address these concerns, this blog post presents assignment strategies that can be more “generative AI-resistant.” There are no “AI-proof” assessments, but these suggestions should serve as starting points for creating authentic assignments and/or ones that require demonstration of original and critical thinking.

Assessment Strategies

Be specific and personal

Consider creating assessments that involve tasks ChatGPT struggles to do such as referring to personal anecdotes or student reflections, referencing current events and recent field developments, or administering interviews or making references to specific course materials. Asking students to connect specific details from course materials (readings, lectures, experiments, etc.) to their personal lives or career paths can also help students see relevance in their course activities and engage with them on a deeper level.

Go beyond research papers

Instead of asking students to create a research paper that ChatGPT could do for them, ask students to create an annotated reference list that demonstrates their ability to apply proper research methods and analysis of resources collected. Alternatively, consider asking students to write a paper analyzing a case study that you’ve created yourself.

Mix up the medium

Incorporate assignments that make use of multimedia content such as creating, writing, recording, and producing a podcast episode relevant to course content and ideas.

Flip your classroom

Consider using in-class time for activities like classroom debates and/or peer-to-peer feedback on projects. Grade those efforts that are happening in real-time and under your observation (without generative AI). Note that a flipped classroom approach also allows students to practice higher order thinking and application of the content they’ve learned through homework.

Look at grading

Consider reviewing your course grading criteria and use growth-oriented rubrics that prioritize process over product.

Ask students to show their process

Consider adding assignment elements that ask students to think about the process of their work. This could be done by requiring students to submit notes they took on sources to prepare for their papers or presentations. You could also ask students to show their work in progress as they move toward a final draft (e.g., require submission of a project outline or proposal, annotated bibliography, and multiple drafts).

Allow for growth and resubmission

Consider adding in some flexibility when students fall short of an objective by allowing for revisions or resubmissions on certain assignments. This can reduce the “high stakes” nature of assessments and associated pressures.

Make adjustments to current assessments

Review your existing assignments to see if there are areas where you can have students demonstrate their holistic growth and development. For exams, you could add supplemental reflection questions or even consider adopting oral exams.

A Note on Academic Honesty

It can be easy or tempting to spend a lot of effort trying to catch instances of academic dishonesty using tools like ChatGPT. Although there are detection tools available, such as Turnitin, the effectiveness of AI detection reports remains uncertain due to insufficient data. Please review our blog on Considerations for Using Generative AI Tools to learn more and remember how important it is to communicate explicitly with students about if, when, and how they may use AI in your class.

Learn More

Explore even more CATL resources related to AI in education:

If you have questions, concerns, or ideas specific to generative AI tools in education and the classroom, please email us at catl@uwgb.edu or set up a consultation!

Considerations for Using Generative AI Tools

Staying updated on the rapidly evolving generative-AI tools can be challenging, and educators may hold divergent (and strong!) views about them. In a previous article, we introduced generative-AI technologies, their capabilities, and implications for higher education. While some educators are enthusiastic about incorporating AI into their teaching methodologies, others may harbor doubts, apprehensions, or simply lack interest in exploring these tools. Regardless of one’s stance, understanding the disruptive impact of these technologies is crucial as we grapple with their ethical and pedagogical implications as educators.

In this article, we will explore some considerations for using generative-AI tools in the classroom, including preliminary precautions and ethical concerns. The more we understand these technologies, the better we can adapt to maximize their potential benefits while minimizing their negative impact.

Things to Consider When Using AI-Powered Tools in your Courses

Understand the inevitability of advancing AI technology.

AI, like many other recent technologies (e.g., personal computers or the internet), will continue to advance and not go away. In fact, they will progress and become better than previous models. This is not something we can “outrun.”

Encourage dialogue on the impact of AI in education

Consider discussing AI technology and its implications with your department, colleagues, and students. In what ways will generative-AI tools change the nature of learning outcomes and even careers in your discipline? How are other instructors responding? In what ways can instructors support each other as they each grapple with these questions?

Provide clear communication with your students on expectations

Whichever camp or situation you may fall into, it is always important to provide students with clear expectations for their use of AI in the classroom. Be specific in your syllabi and assignment descriptions about where and when you will allow or prohibit the use of these tools. You should also make sure whatever guidance you provide is also consistent with UWS Chapter 14 and the communications from our Provost Office. For example statements, view our Syllabus Snippets related to generative-AI

Use generative-AI tools with caution

Exercise caution when using generative-AI tools because the information provided by them may not always be accurate. AI creators, like OpenAI, are upfront about the fact that ChatGPT’s answers aren’t always correct. Due to their ability to hallucinate facts and resources, it’s best to avoid using these tool as a primary source. Be sure to also watch out for potential bias that can appear in outputs by these tools as they are trained on human-generated data.

Offer alternatives for privacy-minded students

If you are asking students to complete an assignment using generative-AI technology, you will also want to provide an opt-out or alternative assignment because students may legitimately not want to provide personal information to sign-up and use certain AI technologies. Many tools openly state they will sell that information.

AI detection tools are not perfect

When using Turnitin’s AI writing detection indicator, it is important to note that there is currently insufficient data to validate its effectiveness. Therefore, results from such reports should be treated as signals that additional review may be necessary. If you suspect academic misconduct, be prepared to support the claim with additional information beyond the detection tool’s report.

Consider ethical and legal issues when using AI tools

As instructors, it is also important to consider the potential ethical, legal, and security risks of AI technologies. Many generative-AI tools are “trained” on the data we put into them, so we must exercise caution when providing prompts to the tools. For example, never put students’ personal information into an AI-powered tool, as this may violate FERPA. Asking students to submit their work (or doing it yourself) to get feedback from ChatGPT or a similar resource puts their intellectual property into the public domain. This should not be done without their explicit consent.

Prepare students to use AI effectively

If you assign tasks that require students to use AI technology, it is important to provide clear instructions about how to do so and not assume students already know. Consider incorporating a discussion on the benefits, limitations, cautions, and ethics of using generative-AI. This could be a valuable in-class activity.

Don’t get caught up in the smoke

Although the capabilities of generative-AI can be scary or worrying at this point, it is best to not get bogged down in the negatives of AI or focus on how to detect cheating through AI use. Are you worried about what AI tools mean for your course materials? Schedule a consultation with us. CATL is here to help!

Learn More

Explore even more CATL resources related to AI in education:

If you have questions, concerns, or ideas specific to generative AI tools in education and the classroom, please email us at catl@uwgb.edu or set up a consultation!

Scaffolding for Online Learning

As the end of the semester approaches and you begin to review the curricular structure of your courses in the near future, you may recognize the need for more robust scaffolding in content design regarding the online modality. Before reviewing and modifying your course in this capacity, it is important to know what scaffolding is, and why it is important for student learning. Scaffolding, as EdGlossary defines it in education, refers to ‘a variety of instructional techniques used to move students progressively toward stronger understanding and, ultimately, greater independence in the learning process’. Ultimately, the goal of scaffolding is to give students building blocks of learning that lead to better retention and acquisition of knowledge.

The most common place to start with scaffolding that can provide a significant impact is in larger assignments or assessments. A good ‘rule of thumb’ is to begin with the tasks that take a significant portion of time and energy. Breaking an assessment into smaller subtasks creates natural checkpoints for the students to gauge their understanding. This also allows you as the teacher to gain insight into how their knowledge acquisition is going and allows you to slightly alter course if the learning is not going as first imagined – check out CATL’s blog post on ‘small teaching’ for more information on that topic.

For example, if you are requiring students to ultimately create a final essay project, you could create a scaffolded or sequenced set of checkpoints to build towards the final assignment’s conclusion. The University of Michigan’s Center for Writing has a comprehensive breakdown of this sequencing:

  1. Pre-Writing: including proposals, work-in-progress presentations, and research summaries
  2. Writing: including counterarguments, notes, and drafts
  3. Revision: including peer reviews, conferences, and revision plans

The introduction of any of these concepts in an online environment requires intentionality and planning, while ensuring the students remain highly engaged throughout the process. As the students revise their papers, scheduling individual conferences, peer reviews (via online conferences, social annotations via Hypothesis, or via Canvas), and revision plans can all provide beneficial steps for a scaffolded approach to a final essay project. To ensure that the students are understanding what is required of them, be certain that you answer such critical questions as:

  • How are students able to know that they completed the steps required, and how will they know they have completed it satisfactorily?
  • How will you make the connections between the scaffolded activities and the end product clear as students progress systematically through the courses?
  • Have you clearly identified opportunities for students, particularly in the online modality, to get together remotely for feedback, thought-partnering, and/or review?

Another version of scaffolding in the online modality has to do with the structuring of how students gain an understanding of the content. The University of Buffalo’s Office of Curriculum, Assessment, and Teaching Transformation takes the Gradual Release of Responsibility (GRR) model and utilizes it in both a standard classroom, as well as a ‘flipped classroom’ environment. The GRR model focuses on an ‘I Do’, ‘We Do’, ‘You Do’ framework that is very popular in educational scaffolding. This framework for scaffolding could be centered around a larger assignment or exam, but it does not necessarily need to be. The GRR model of scaffolding could also be utilized when breaking down a larger concept for students. See how this model could potentially be utilized in a chemistry lesson surrounding intramolecular forces:

  1. “I Do” – The instructor creates an introductory lesson introducing intramolecular forces, and discusses the types of bonds that atoms can form (ionic, covalent, etc.). The instructor then shows examples of these types of bonds utilizing different atom types via medium of choice.
  2. “We Do” – This portion of the scaffolding could take place between students, working in pairs or small groups identifying the different types of bonds, and providing examples of each. This scaffolding could also include meeting with the instructor, via Teams or Zoom, or through a discussion that provides more of a ‘guided’ approach to the concepts.
  3. “You Do” – Students work on their own to display the learning that they have gathered on the topic. This could be done with a written assignment, discussion board post, low-stake quiz, or any way that the instructor chooses to assess students’ acquisition of knowledge.

These are just a couple of examples how you can integrate scaffolding into your course content for online learning. The critical aspect of scaffolding is purposeful chunking and segmenting of complex concepts and activities for comprehensive knowledge acquisition. It is important to keep in mind that any scaffolding should continue to be aligned to course expectations and learning outcomes as students will be more successful when it is done with consistency in a holistic sense.

If you would like to learn more about how to use scaffolding for online learning in your own course or have examples of how you are already using it, we’d love to hear from you! Feel free to contact the CATL office by email (CATL@uwgb.edu) to let us know where you’ve found success with these strategies, or to schedule a consultation with us.

10 Dos and Don’ts of Digital Accessibility

Accessibility involves designing materials so that as many people as possible can engage with them, regardless of users’ physical or cognitive abilities. Meeting baseline accessibility standards is key to inclusive course design, and the digital age has made it faster and easier than ever to create accessible materials. Small changes to a document, like using a clear font and appropriately-sized text, can significantly improve the user experience. To get you started, we have assembled a list of some critical “dos and don’ts” of digital accessibility, along with guides from Microsoft Word, Microsoft PowerPoint, and Canvas for each category.

Contents

Text Styles

Screenshot of black text displayed on a white background that reads, ‘Your video submission must be in MP4 format.’ The words ‘MP4 format’ are emphasized in red text font and yellow highlight.

Don’t… ❌

Use underlining, highlighting, or text color alone to denote emphasis or create meaning.

Screenshot of black text on a white background that reads, Important: Your video submission must be in MP4 format. The words Important and MP4 format are emphasized in bold.

Do… ✅

Use bold or italic styling sparingly to emphasize words or short phrases within the body of a text. To call attention to an entire sentence or section, consider writing “Important” before the content.

Use underlining only for hyperlinks to assist people who are color blind in differentiating them from regular text. Similarly, avoid using text color and highlighting alone for emphasis as they may be challenging to distinguish. Some screen readers do not announce bold or italicized text, so refrain from using text styles alone to create meaning.

Headings & Document Structure

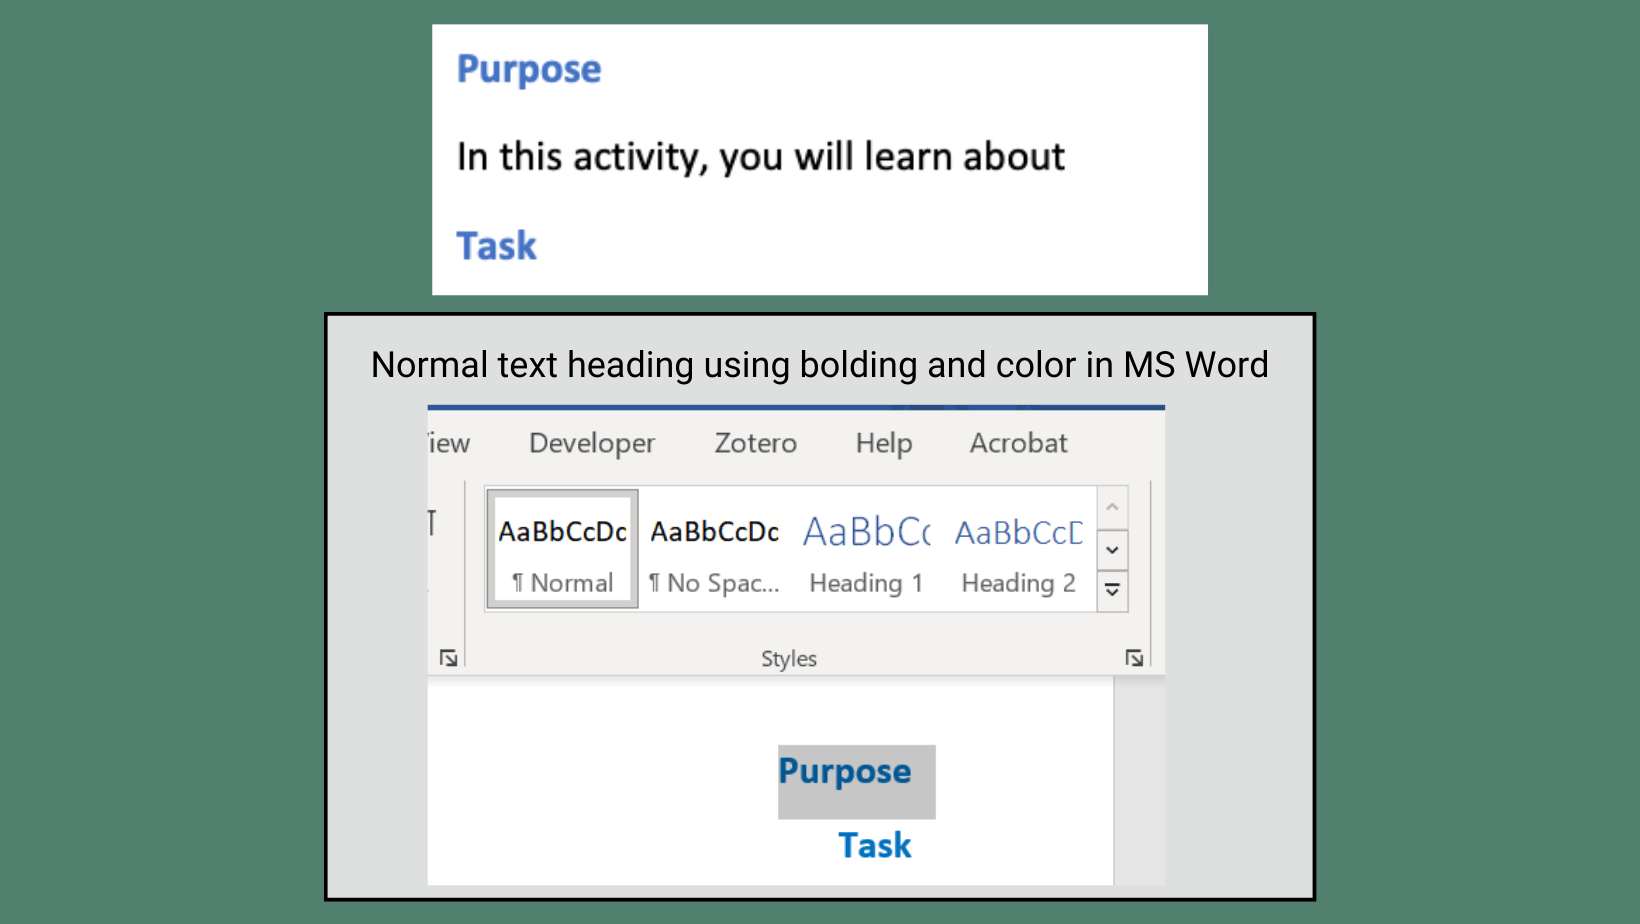
Image containing two screenshots. The first screenshot shows a document with the word ‘Purpose’ emphasized in blue and bolded text. Below ‘Purpose’ is plain black text that reads, ‘In this activity, you will learn about.’ The document ends with the word ‘Task’ also emphasized in blue and bolded text. The second screenshot displays the text style pane in Microsoft Word. It indicates that the text in the screenshot is formatted with the ‘Normal’ text style.

Don’t… ❌

Create headings by manually adjusting text sizes, styles, or colors.

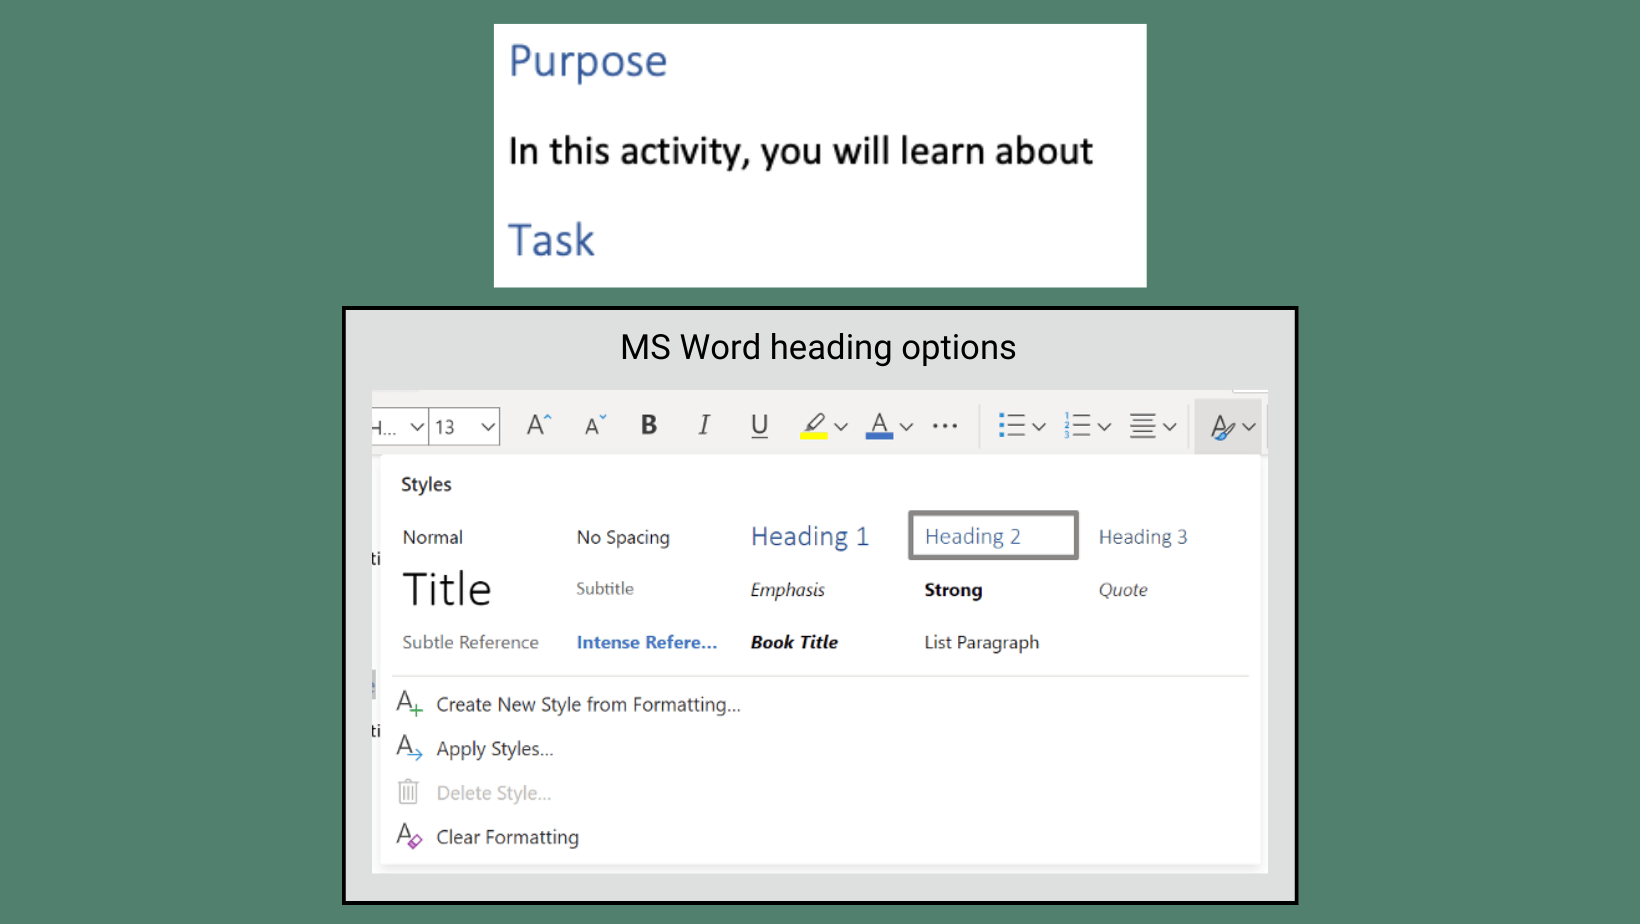
Image containing two screenshots from Microsoft Word. The first screenshot shows a document with the word ‘Purpose’ using the built-in Heading 2 style option. Below ‘Purpose’ is plain black text that reads, ‘In this activity, you will learn about.’ The document ends with the word ‘Task’ also using the Heading 2 style option. The second screenshot, positioned below the first, displays the Heading style panel in Microsoft Word.

Do… ✅

Use built-in heading styles in Word and the Canvas Rich Content Editor to organize content hierarchy. In PowerPoint, make sure to use an accessible template, add a title to every slide, and double-check slide reading order.

The built-in heading styles in these applications add special HTML code that makes it easier for people who use assistive tools to navigate a document.

Screenshot of a hyperlink formatted as a raw web URL, shown in blue underlined text. Below the URL, there is another hyperlink formatted in blue underlined text that reads ‘Click Here’.

Don’t… ❌

Use messy URLs or hyperlinks that do not make sense without context.

Screenshot of a hyperlink formatted in blue underlined text that reads ‘Spring 2023 TEG Call’. Below the text, there is another hyperlink formatted in blue underlined text that reads ‘uwgb.edu/catl’.

Do… ✅

Create concise hyperlinks with text that identifies or describes the link in a self-contained way.

Providing meaningful links helps people understand what to expect when they click the link. It also makes it easier for users who rely on assistive technology to navigate between links.

Images

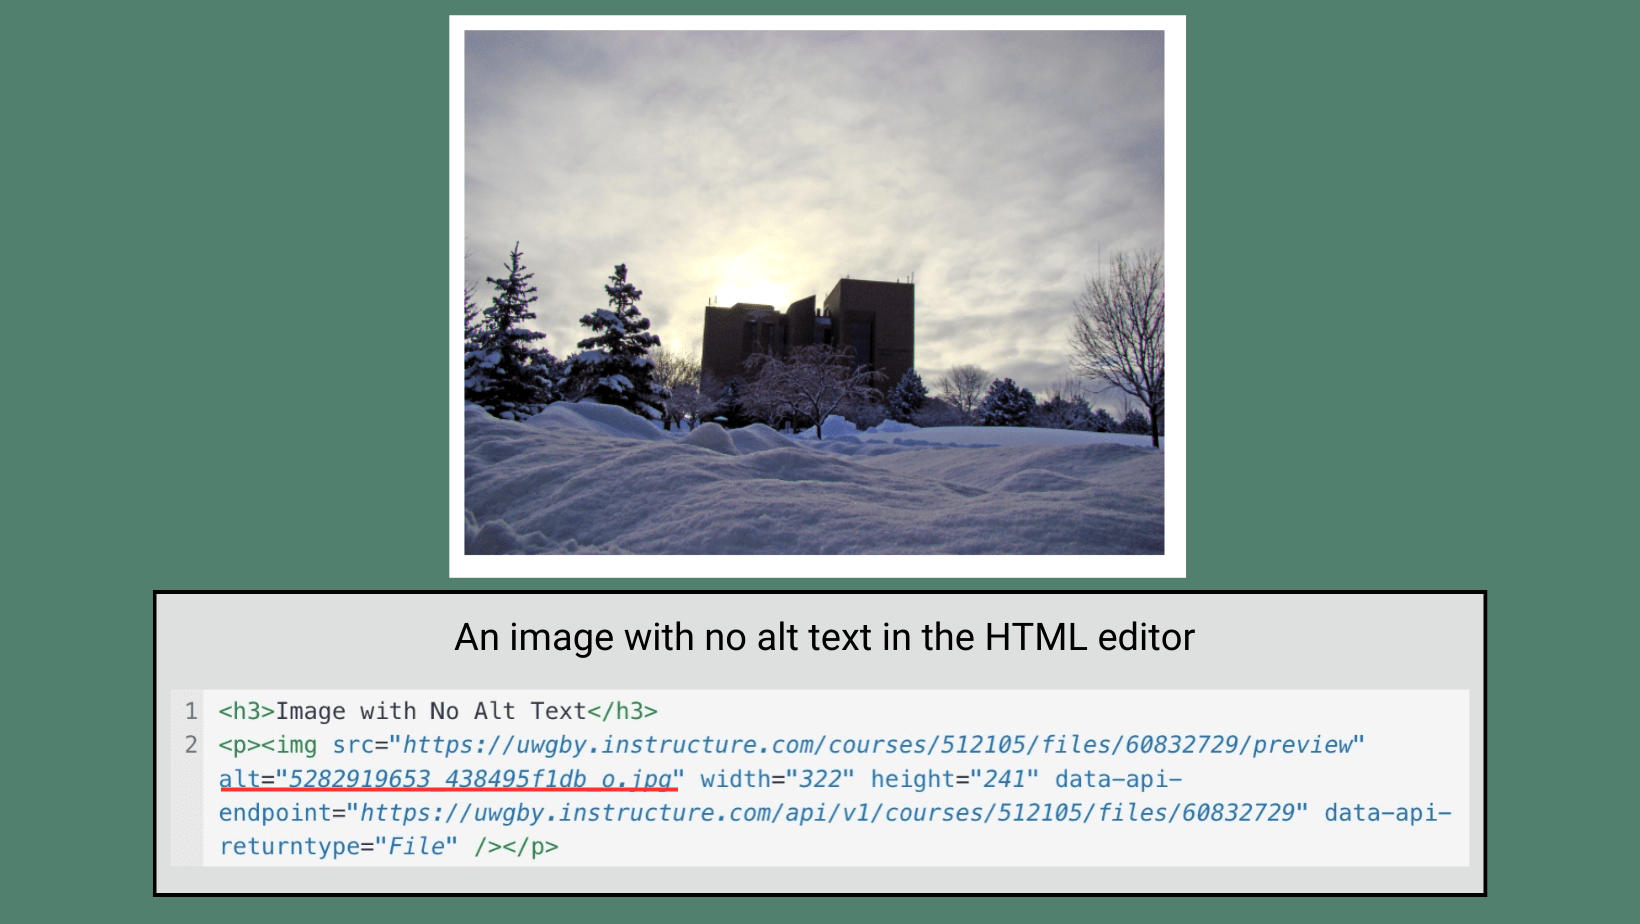
A screenshot showing an image of the Cofrin Library in the Canvas RCE (Rich Content Editor). A text box below the image displays the Canvas HTML editor view of the Cofrin Library image with no descriptive alt text. The image file name consisting of numbers is used as the alt text, and it is underlined in red to indicate that it is not a sufficient description.

Don’t… ❌

Use an image alone to provide information.

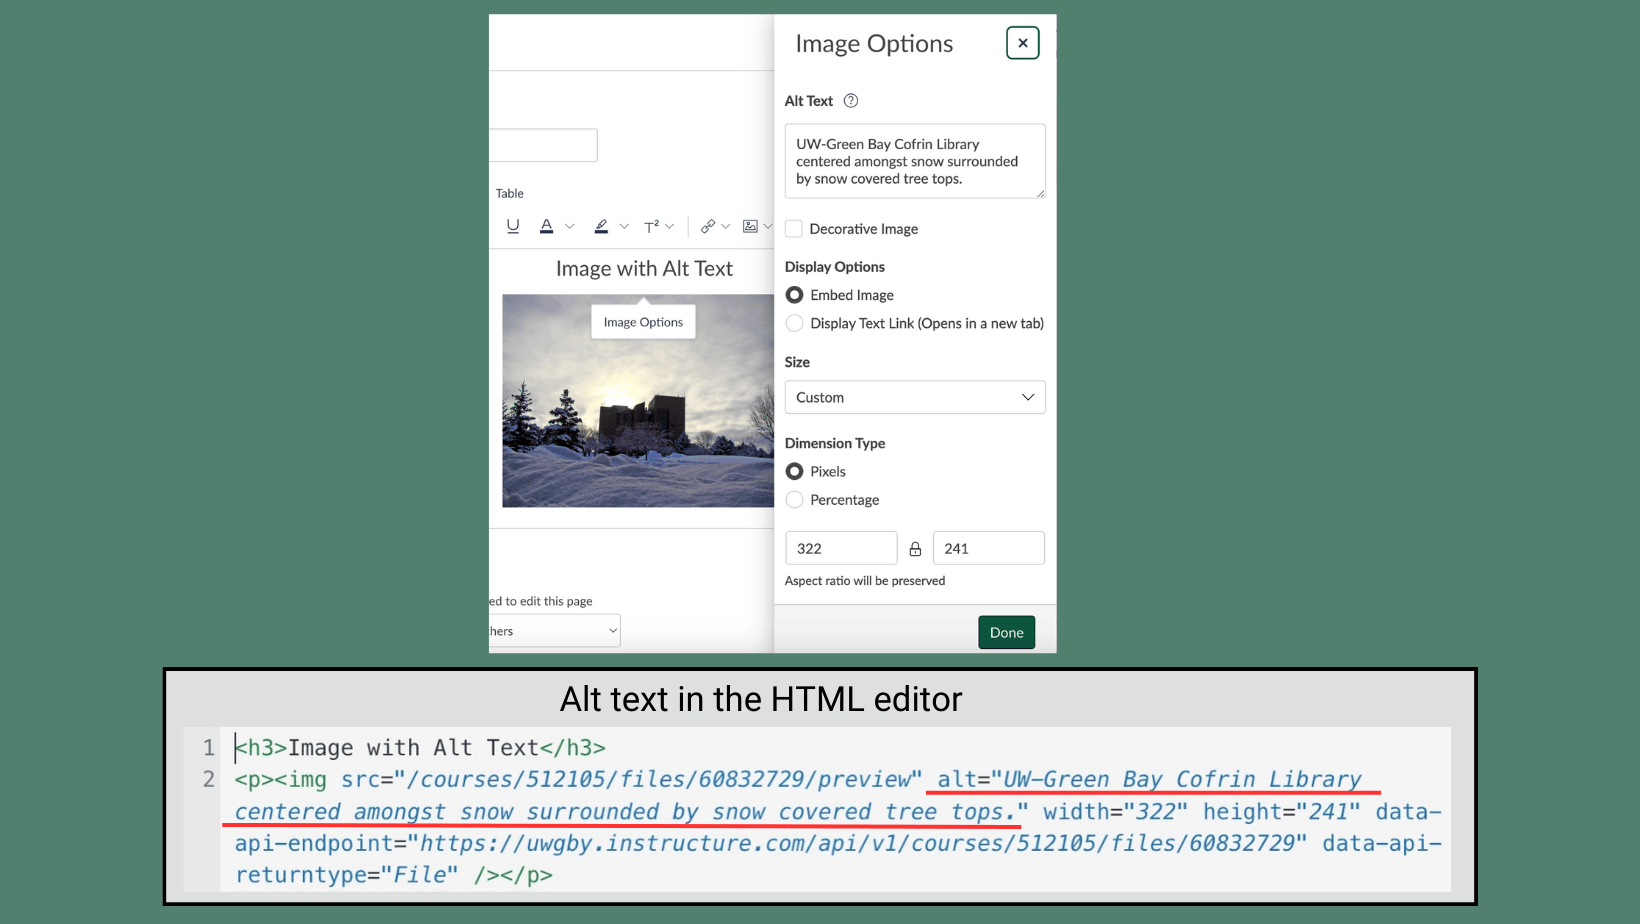
A screenshot of the Canvas RCE. On the left is an image of the Cofrin Library. To the right is the Image Options panel in the Canvas RCE, including a field for alt text. Below that is a screenshot of the Canvas HTML editor view. The alt text for the image is underlined in red and reads 'UW-Green Bay Cofrin Library Centered amongst snow surrounded by snow covered treetops.'

Do… ✅

Add alt text or captions to describe images that convey information in Word, PowerPoint, and Canvas. Mark other images as “decorative” so they are ignored by screen readers.

Providing alt text or a caption helps people with low or no vision understand images.

Audio & Video

Screenshot displaying text that reads ‘Video without CC and Transcript.’ Below the text is a video titled ‘The Kiss by Gustav Klimt: Great Art Explained.’ The video does not display an option to turn on closed captioning.

Don’t… ❌

Share audio or video without closed captioning or another text alternative.

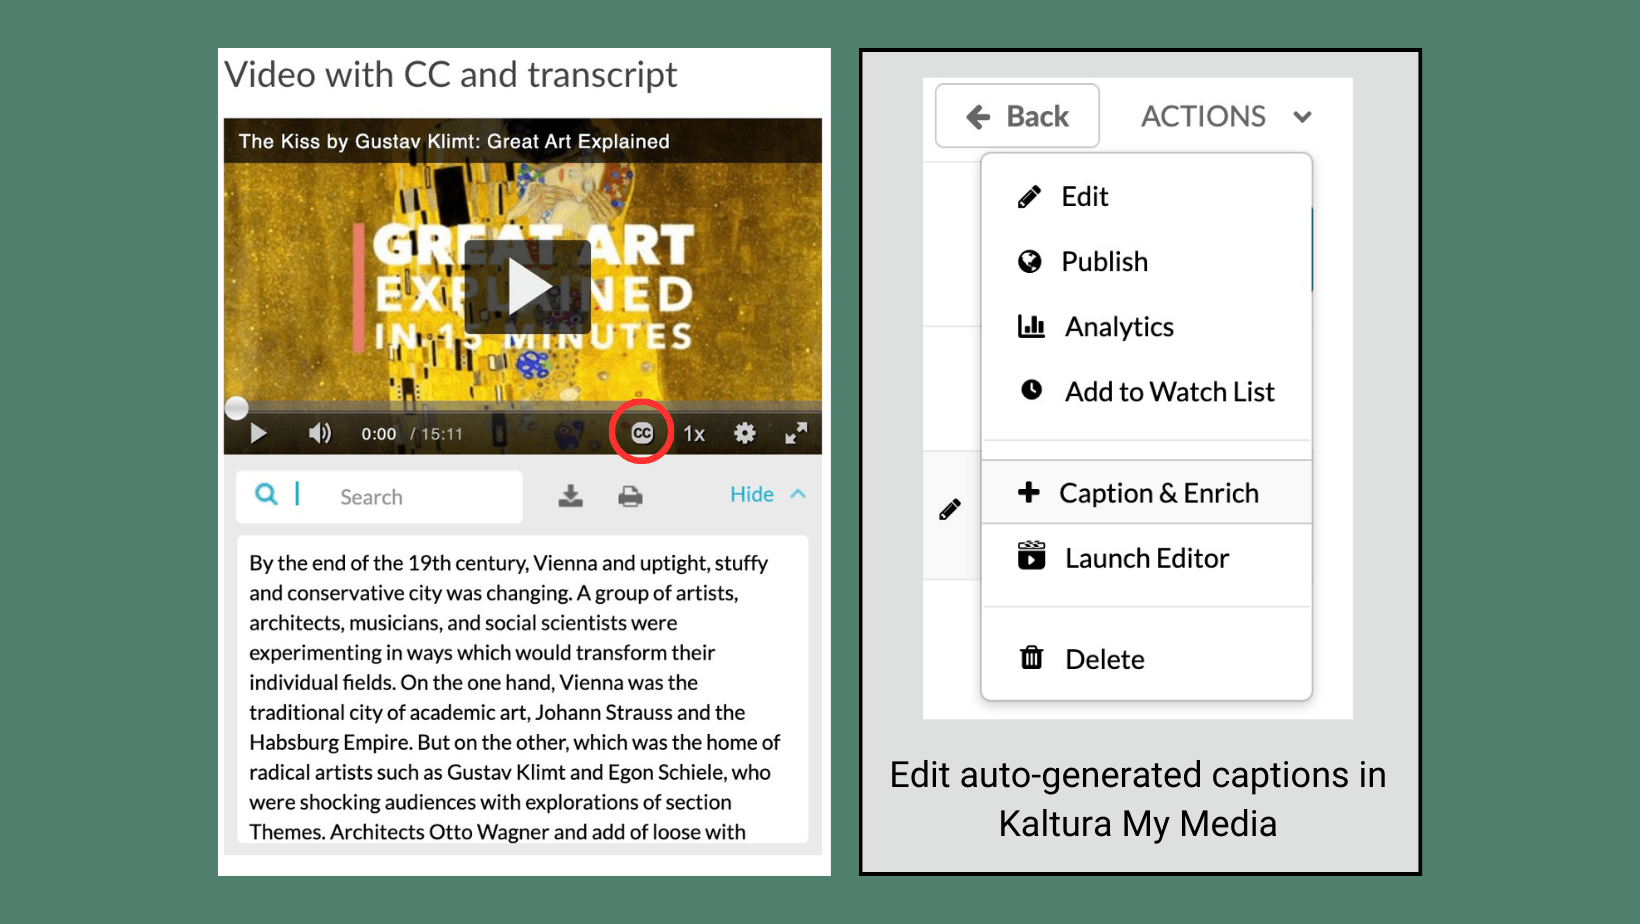
Image containing two screenshots side by side. The first screenshot displays text that reads ‘Video with CC and transcript.’ Below the text is a video titled ‘The Kiss by Gustav Klimt: Great Art Explained’ with a red circle positioned over the closed captioning button on the video player. Below the video is a transcription box. The second screenshot on the right displays the Kaltura My Media options, with the ‘Captions & Enrich’ option highlighted in grey. This option allows users to edit the auto-generated captions in Kaltura My Media.

Do… ✅

Upload your recordings into Kaltura (My Media) for automatic captions or search for media that is captioned. For spoken audio that does not have a visual component, such as a podcast stream, provide a transcript instead.

Captions and transcripts allow people with limited or no hearing to engage with audio and video media, plus they benefit those with other access barriers. Users can also benefit from having a searchable transcript.

Lists

Screenshot of the Canvas Rich Content Editor (RCE) displaying an unformatted numbered list titled ‘List with No Formatting.’ The list contains the items ‘1. Red, 2. Blue, 3. Yellow’ without proper formatting. A gray box outlines the HTML editor view of the Canvas RCE, showing the use of heading 3 tags for the page title and paragraph tags for the list of colors.

Don’t… ❌

Manually type numbers or bullets to create lists.

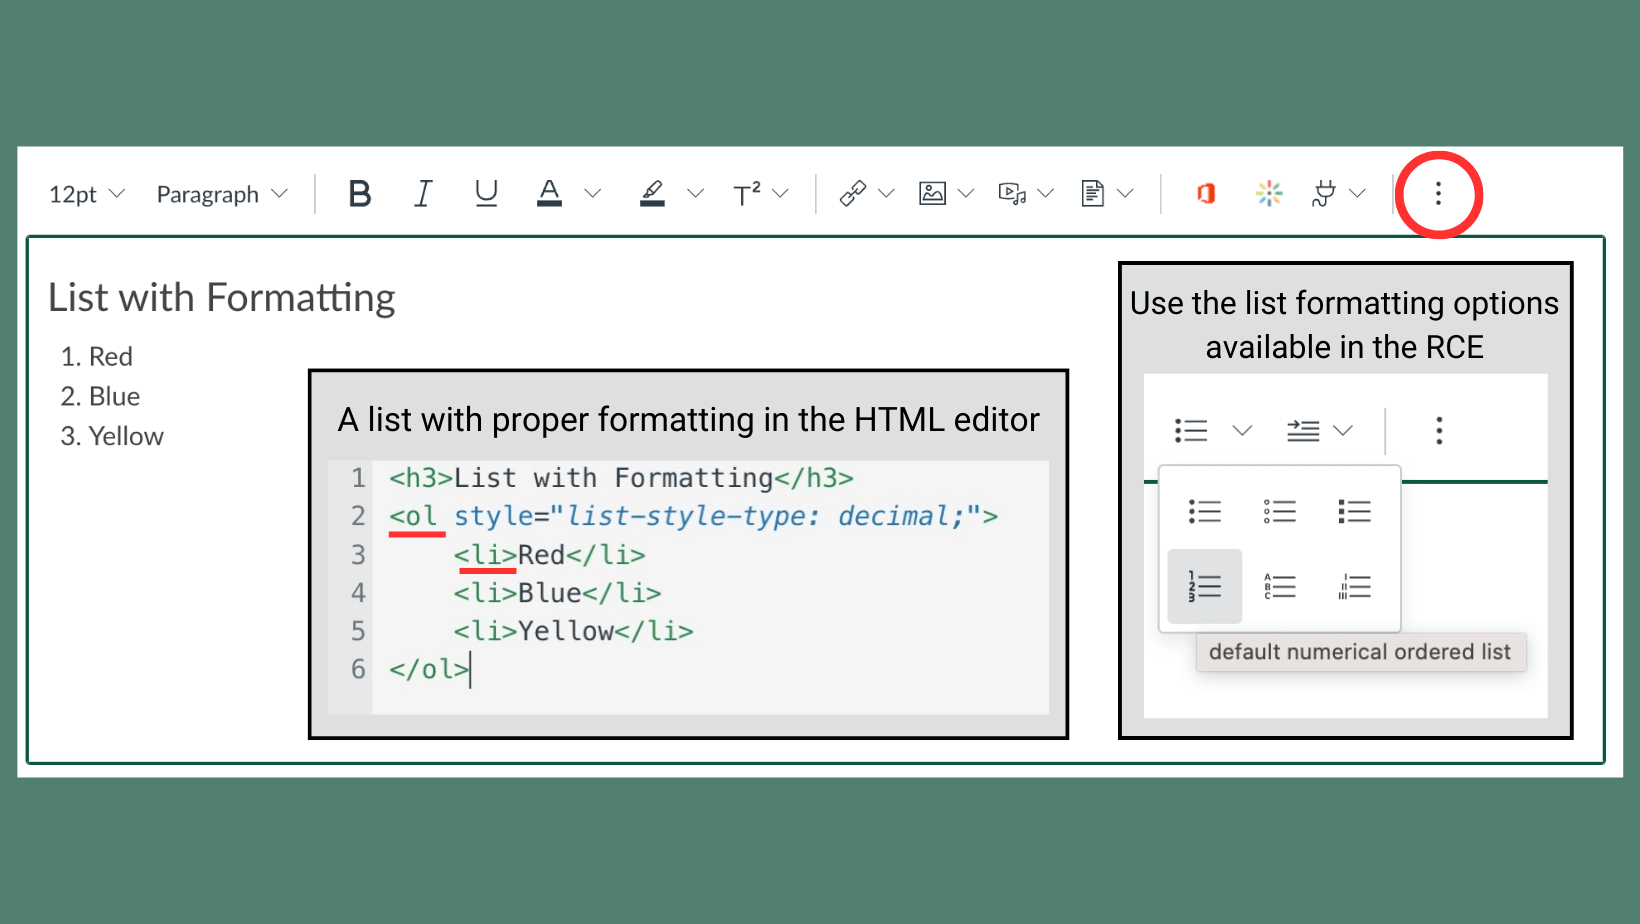
Screenshot of the Canvas Rich Content Editor (RCE) displaying a properly formatted numbered list titled ‘List with Formatting.’ The list contains the items ‘1. Red, 2. Blue, 3. Yellow’ with proper formatting. An inset screenshot shows the HTML editor view of the Canvas RCE, including the tags which give the list proper formatting. Another inset screenshot displays the list formatting options available in the 'more' menu of the RCE toolbar, which is circled in red.

Do… ✅

Use the bullet and numbering buttons in the toolbars of Word, PowerPoint, and the Canvas Rich Content Editor.

The built-in list formatting options in these applications add special HTML code that makes it easier for people who use assistive technologies to navigate a document.

Tables

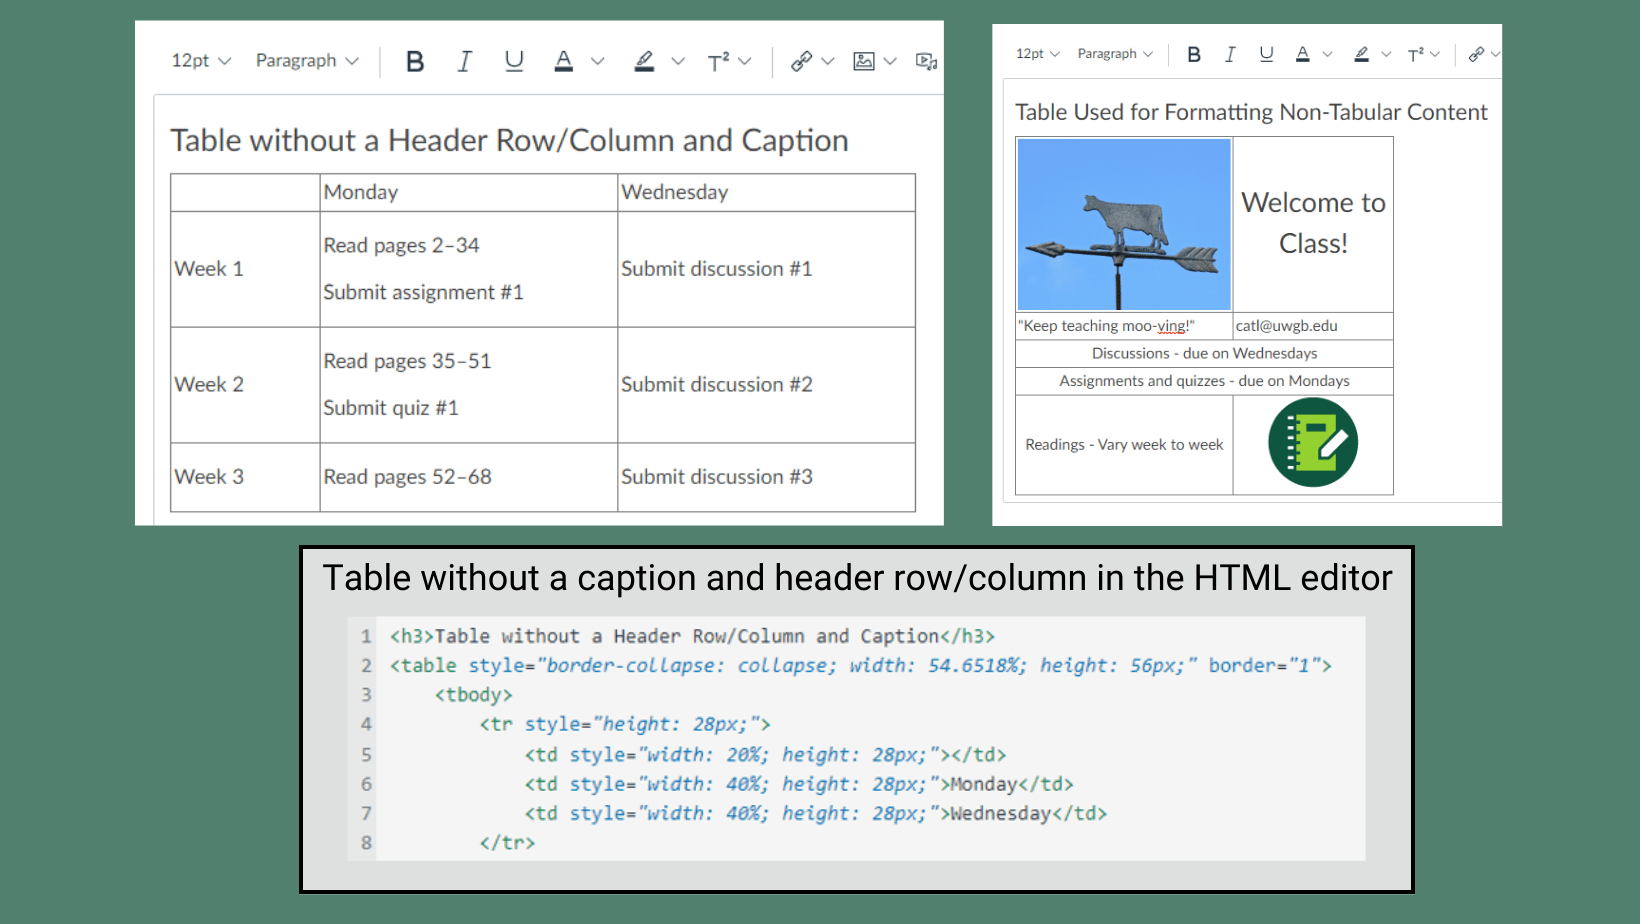
An image containing three screenshots. The first screenshot shows a table in the Canvas RCE. The text above the table reads ‘Table without a Header Row/Column and Caption.’ The table contains syllabus assignments with weeks labeled 1-2 in the right columns, and weekdays Monday and Wednesday in the first row of the table. The second screenshot displays a table in the Canvas RCE. The text above the table reads ‘Table Used for Formatting Non-Tabular Content.’ It seems that this table is intended for formatting purposes and not for displaying tabular data. The third screenshot, positioned below the first two, presents the HTML editor view of the Canvas RCE. The code illustrates a table that lacks a caption and header row/column.

Don’t… ❌

Subdivide and merge cells, omit captions and row/column headers, or use tables as a “hack” for formatting content.

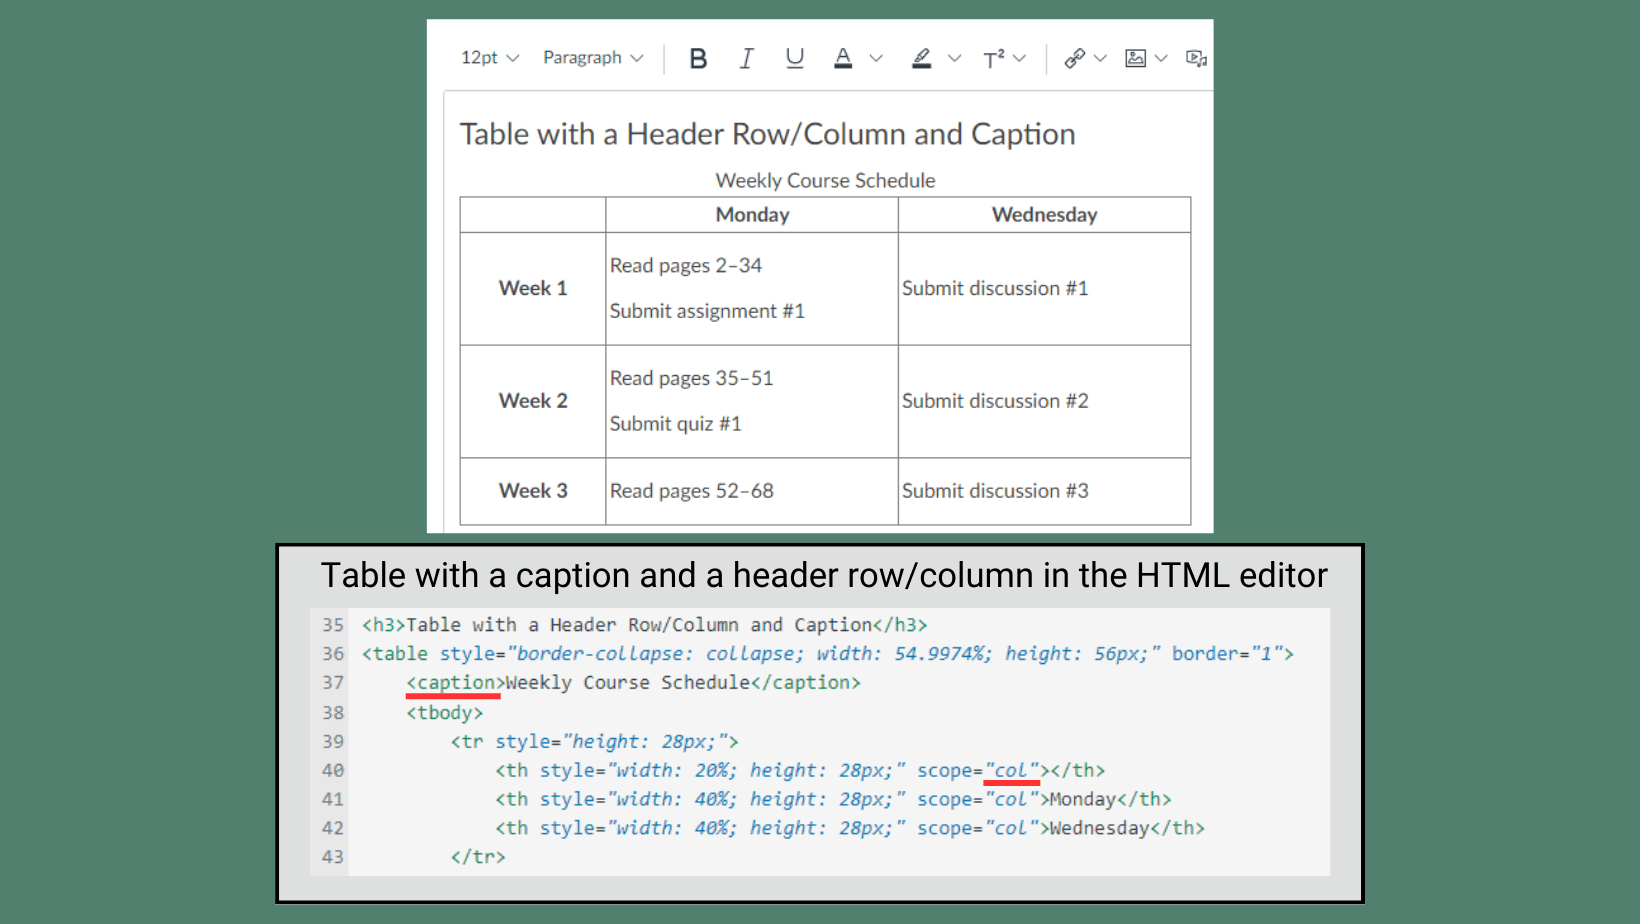
A screenshot depicting a properly formatted table in the Canvas RCE. The table is captioned ‘Weekly Course Schedule,’ with the header row displaying the weekdays Monday and Wednesday, while the header column includes weeks 1-3. A text box below the image displays the HTML editor view of the Canvas RCE. The words 'caption' and 'col' are underlined in the editor, indicating how a table with a caption and header columns are coded.

Do… ✅

Use tables to present data in rows and columns with a logical layout. Use the built-in tools in Word and the accessibility checker in the Canvas Rich Content Editor to include a caption and set a header row and/or header column for data tables. Avoid using tables in PowerPoint if possible, but if you do, follow these guidelines.

Adding a caption and setting a header row/column with the built-in formatting options adds special HTML code that helps users who rely on assistive technology understand and navigate the table. Screen readers may struggle to interpret the layout and hierarchy of the information presented when tables are used to format content other than data. Subdivided and merged cells also pose challenges for users that navigate with a keyboard or rely on screen readers.

Charts & Graphs

Screenshot of a pie graph titled Sales created in Microsoft Word. The pie graph consists of four slices of different colors, with blue being the largest, followed by orange, gray, and yellow. The legend positioned below the pie graph indicates the blue represents the 1st quarter, orange represents the 2nd quarter, gray represents the 3rd quarter, and yellow represents the 4th quarter.

Don’t… ❌

Use color alone to create meaning in charts and graphs.

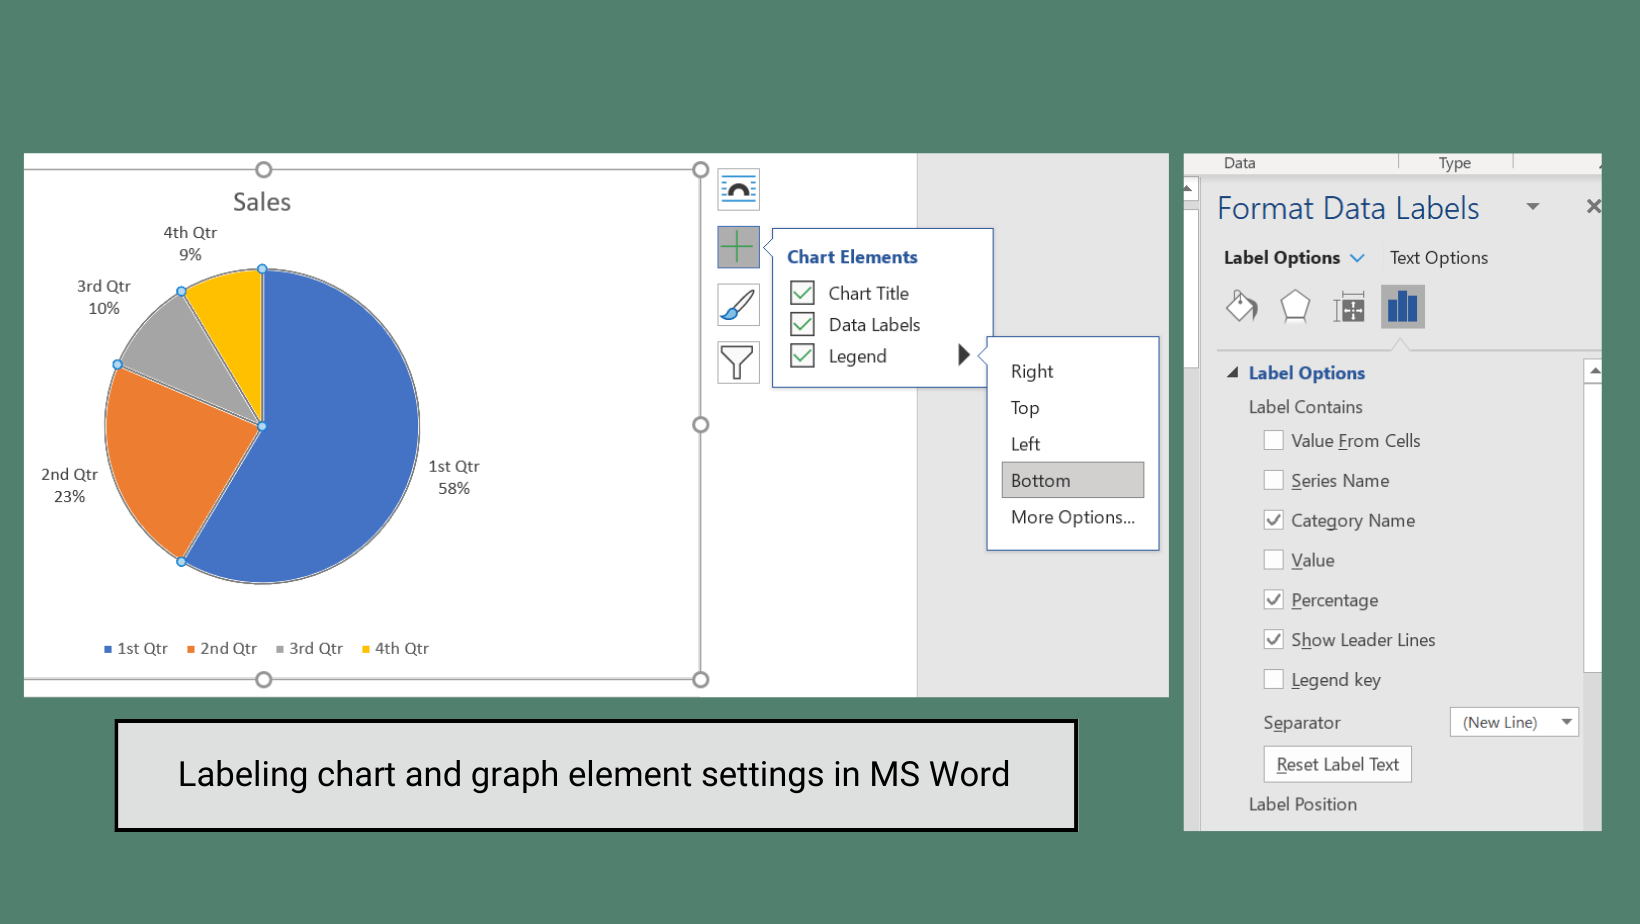
An image containing two screenshots. The first displays a pie chart titled 'Sales' created in Microsoft Word. The Chart Elements settings are displayed with the boxes for title, data labels, and legend all checked. The second screenshot, positioned on the right, displays the Format Data Labels panel, which presents additional label options. A text box below reads 'Labeling chart and graph element settings in MS Word.'

Do… ✅

Directly label elements in charts and graphs and/or use shapes or patterns to differentiate elements.

People who are color blind or who have low vision may have trouble differentiating colors.

Scanned Documents

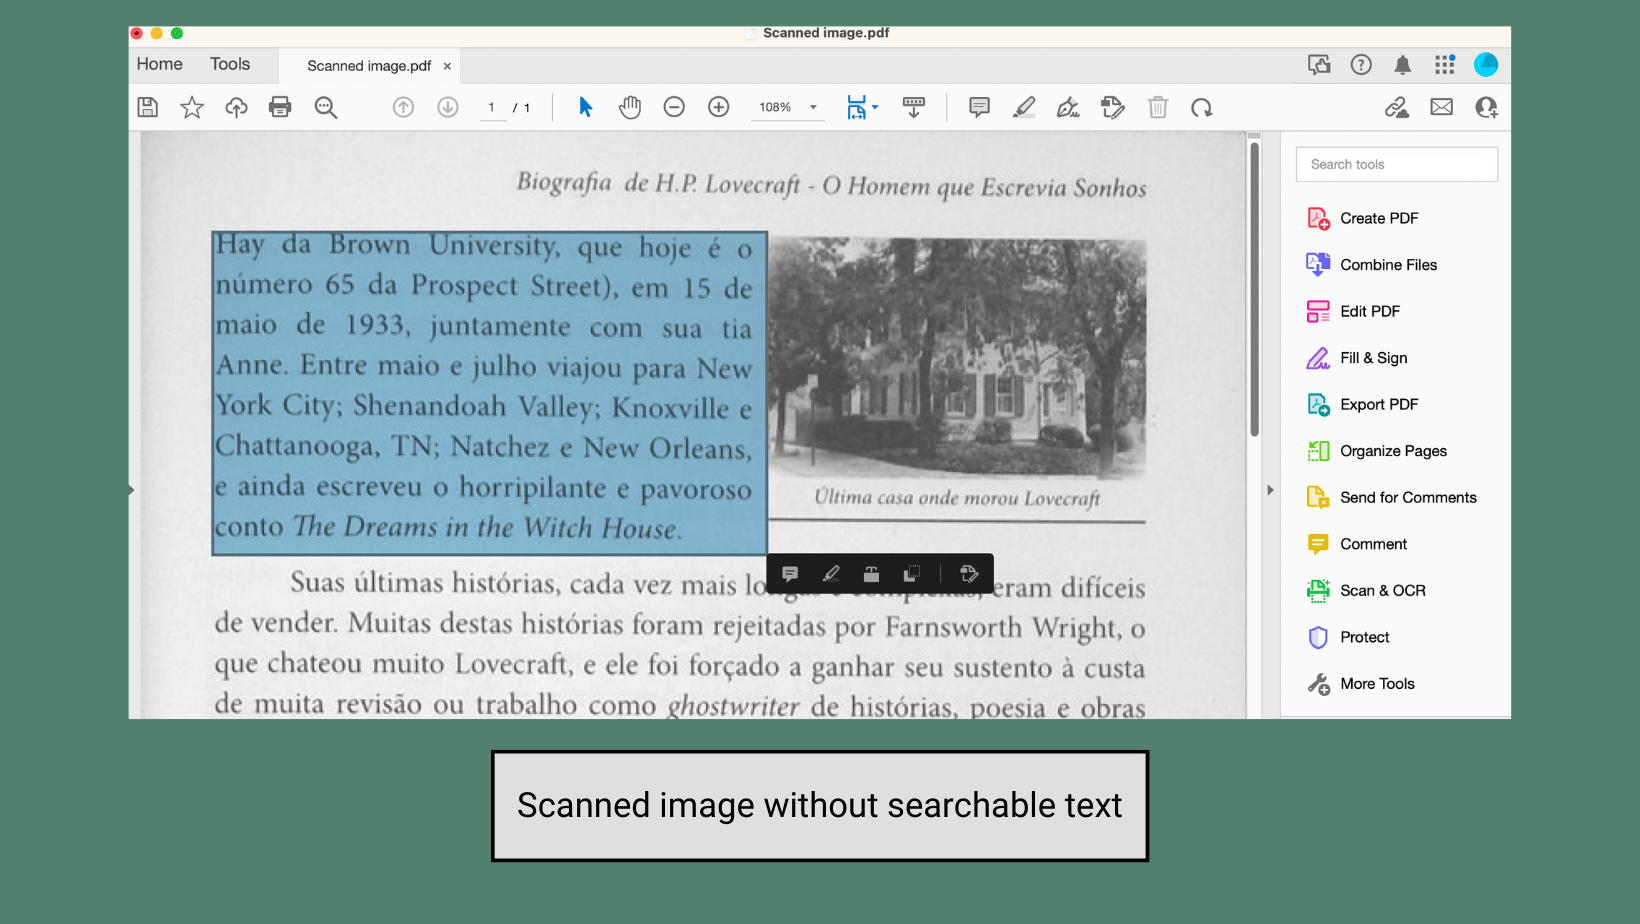
Screenshot of a scanned image of a book page in Adobe Acrobat. A solid blue box overlays a paragraph of text in the image, indicating that each word in the book is not scannable. Below the image, there is a text box that reads “Scanned image without a searchable text.”

Don’t… ❌

Use photos or scans of text without checking for accessibility.

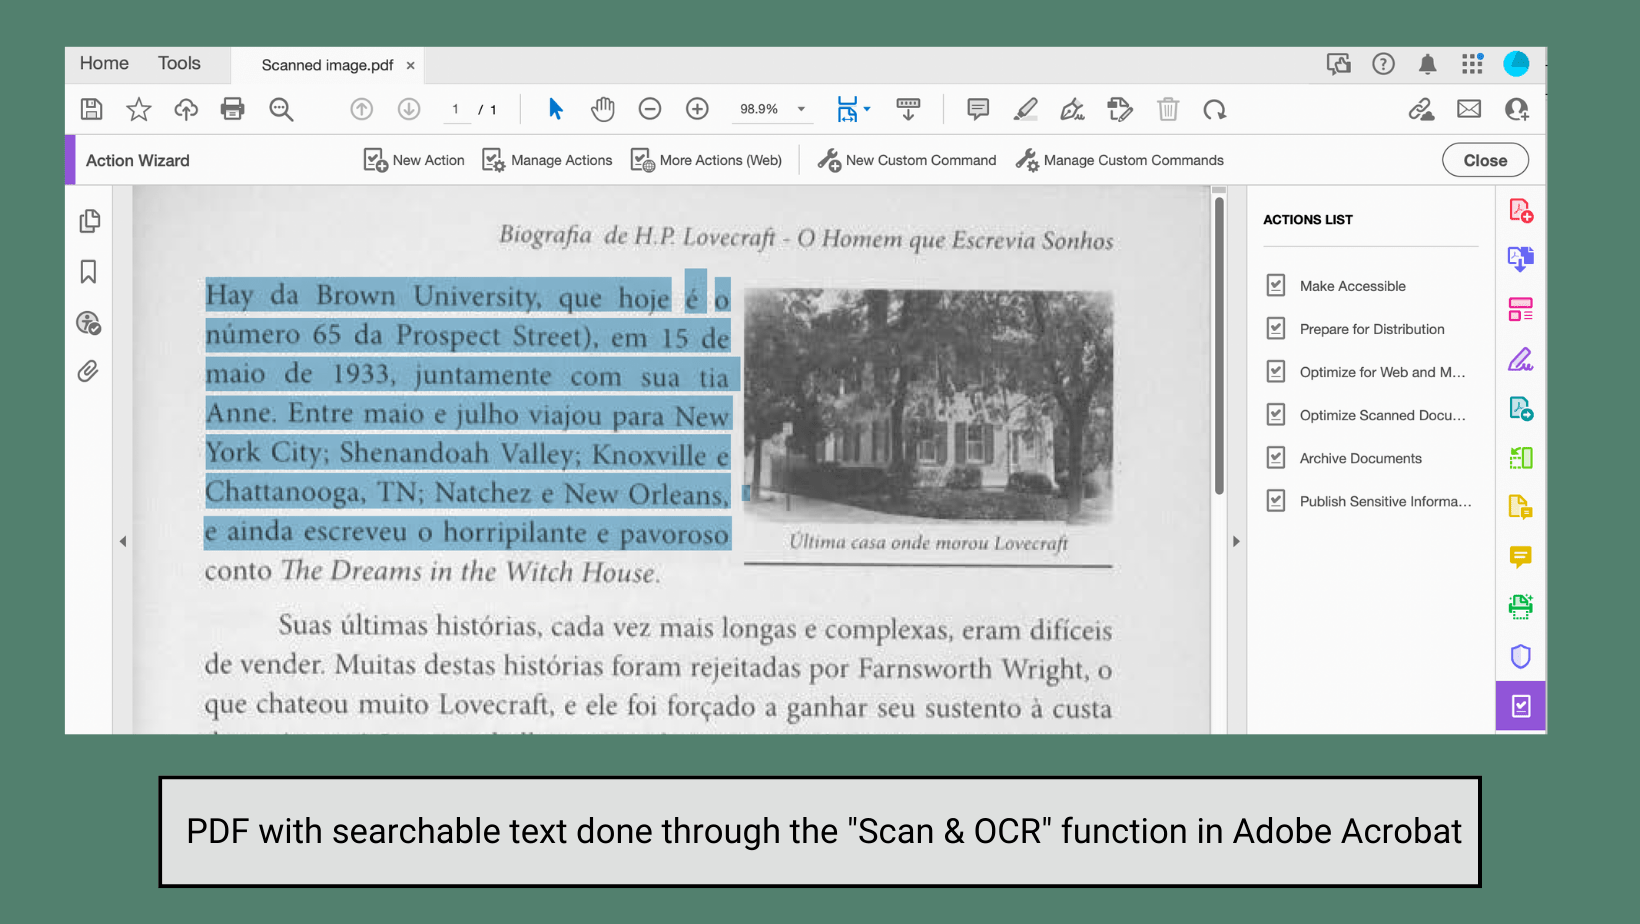
Screenshot of a scanned image of a book page in Adobe Acrobat. Blue highlight overlays a paragraph showing each word is scannable. Below the image, there is a text box that reads 'PDF with searchable text done through the Scan & OCR function in Adobe Acrobat.'

Do… ✅

Find an alternative accessible resource or use the optical character recognition (OCR) tools in Adobe Acrobat to turn a scan into an accessible PDF with selectable text and a logical reading order.

Digital scans of physical texts are encoded like images and are not readable by most screen readers. OCR converts a scanned document into a format that allows people who use assistive technologies to engage with the text, plus it benefits all users by making the document searchable.

Accessibility Checkers

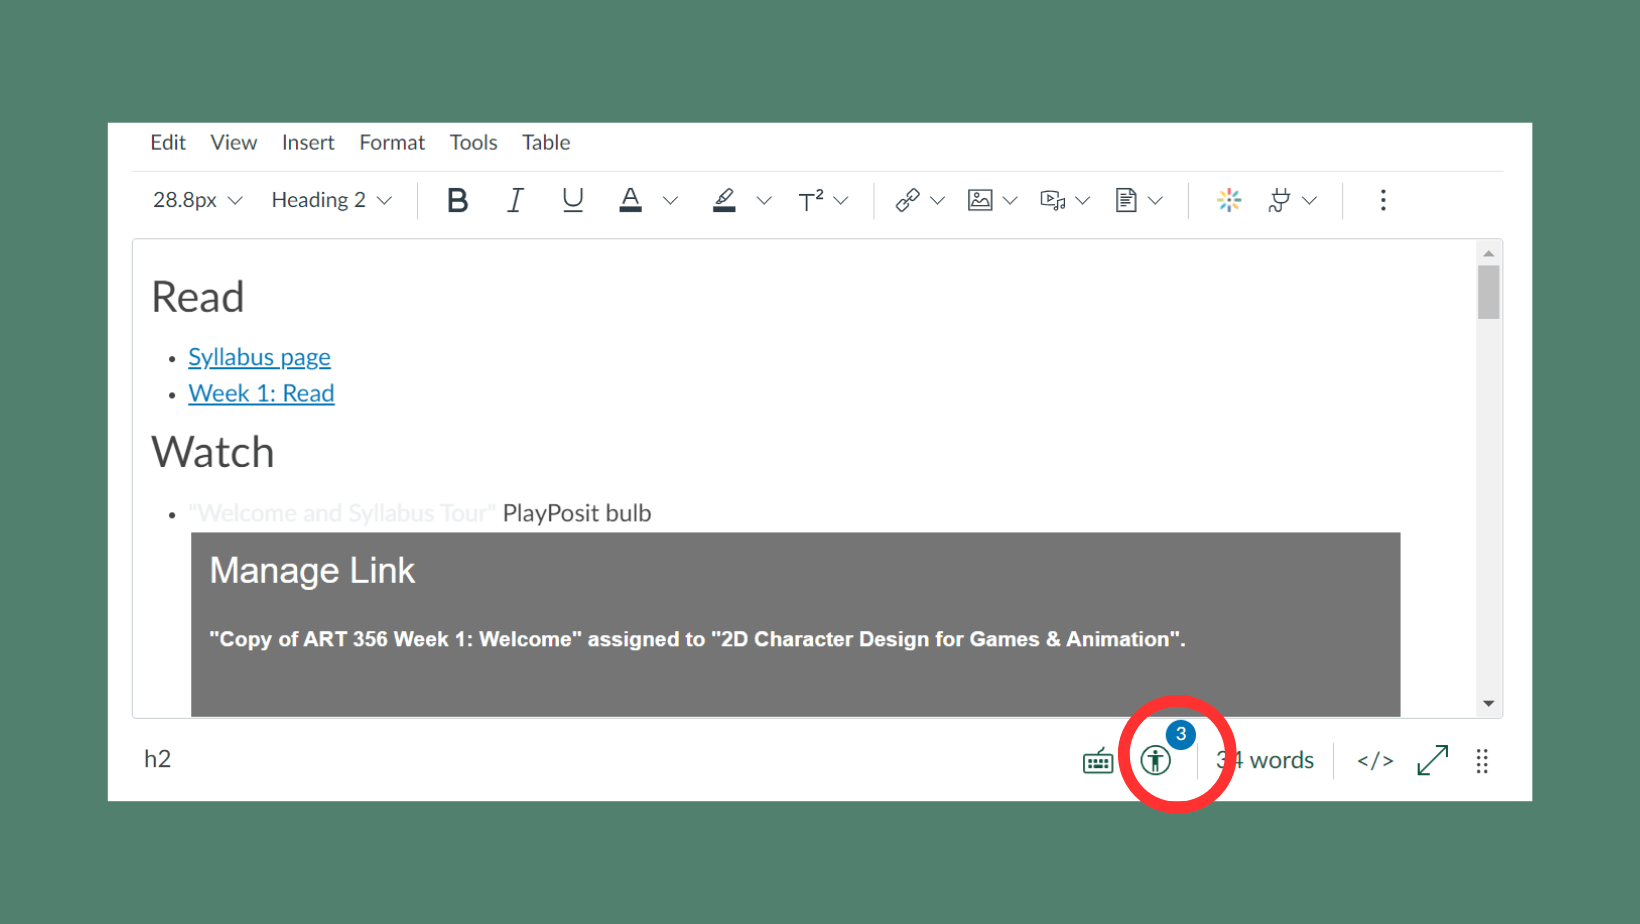
Screenshot of the Canvas RCE displaying some sample headings and text, including text that is light gray and very difficult to read. Under the RCE box, there is a red circle around the accessibility checker indicator, which notifies the editor that there are three accessibility issues within the page.

Don’t… ❌

Ignore the accessibility checker tools in Word, PowerPoint, and Canvas.

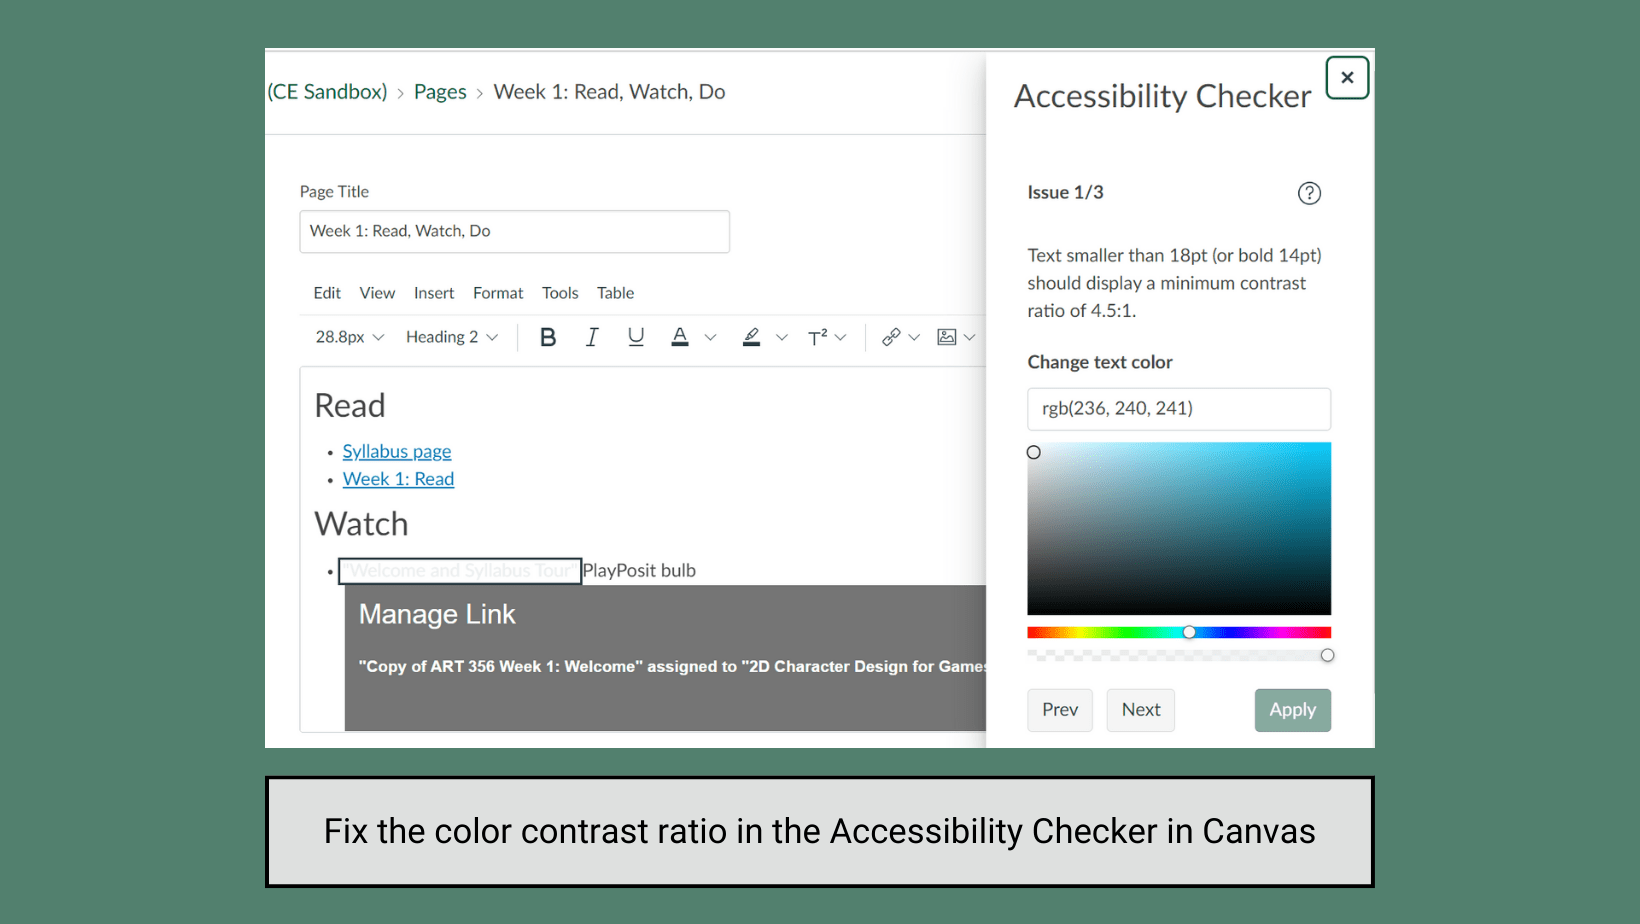
Screenshot of the Canvas RCE with the Accessibility Checker panel on the right-hand side. The panel highlights three accessibility issues and provides recommendations for how to fix them. The first issue identified in the panel is the insufficient color contrast ratio for light gray text against a white background.

Do… ✅

Use the accessibility checker tools in Word, PowerPoint, and Canvas to scan for and repair common issues – including many of the issues described in this resource – before exporting, publishing, or sharing materials. For Canvas, you can also use the UDOIT accessibility checker to scan your whole course.

Using built-in accessibility checker tools can help ensure that your course materials meet accessibility standards.

Resources by Application

For accessibility resources specific to Word, PowerPoint, and Canvas, respectively, please see the guides and tip sheets below:

Need Help?

This resource is meant to be a starting point for best practices in digital accessibility, but if you have questions beyond the scope of this guide, we welcome you to reach out to CATL! Send us an email at CATL@uwgb.edu or fill out our consultation request form to discuss digital accessibility in your own courses.