Organizing Canvas to Improve the Student Experience

Article by Sam Mahoney

We’ve all been there: someone told you to finish that thing, and you remember seeing the file somewhere a few weeks ago, but you just can’t remember where you saved it. Or when it’s due. Or maybe even what it was called. Maybe it was this file titled “download_040521”? No wait… maybe download_064053?

Now imagine yourself in that same situation, but you’re a student. Between unclear file names, multiple methods of communication, and so many places information can be posted, it can be frustrating to keep track of all the details in an online class. That’s where organization and consistency in how you use Canvas can save your students a lot of headache and you from the burden of answering a dozen emails a day from confused students. In fact, in a recent survey conducted by UW-La Crosse, students cited clear organization in Canvas as one of the most important things their instructors did that helped them during their Fall 2020 classes. Read on for some suggestions on getting more organized in Canvas so you can help your students be more successful in your classes.

Organizing Course Content

When teaching online, an important consideration is how to arrange and present your content. For maximum clarity and visibility, we recommend organizing your content in modules on the home page. Students are generally used to working through online content sequentially, so arranging modules chronologically with the first week/unit at the top is ideal. You could also arrange your course’s modules in reverse chronological order, publishing the most recent one at the start of each unit/week, so the current module is always at the top of the page. If arranging your content chronologically doesn’t seem like a good fit for your class, you could also try grouping content in modules by project instead.

GIF of reordering modules on the course home page
Modules can be rearranged by clicking and dragging the stacked dots in the top left corner.

Once you have decided how you would like to set up your modules, consider the order in which the content within the modules appears. The first item in a module is nearly always a page. This page should provide students with the context they need to successfully read/watch the necessary materials and complete the necessary activities for the week or unit. You can also use this page to provide an introductory paragraph with other necessary contextual information, as well as the learning objectives or goals for the unit/week. Depending on the depth of the material, you may also consider breaking this information down into multiple pages.

For example, your overview page in each module might include:

Briefly introduce the materials and concepts covered in the module.

Provide any necessary background information students may need to know before engaging with the "meat" of the content. 

You can also link to relevant, optional "pre-reading" materials that might be useful for some students to review before diving into the new content. 

Concretely describe what you would like students to know or be able to do by the end of the week/unit's activities.

For more on crafting objectives, see this guide.

Link to online articles or documents uploaded in the files area in Canvas.

Make sure all readings are accessible—PDF scans of physical textbooks, for example, are not usually readable by e-readers unless they have been OCR-scanned.

A quick way to check: can you copy and paste the text? 

Embed your pre-recorded lectures for the module in sequential order. 

Try to break down lectures into shorter, more digestible videos. Studies have shown that 6—9 minutes may be the sweet spot, and a conversational tone is equally important (Brame, 2016).

Link directly to Canvas activities that students are to complete for the week/unit (assignments, discussions, etc.). 

Include both graded and non-graded activities. 

After the overview page, add any relevant Canvas activities to the module, such as discussions, assignments, and quizzes, all with appropriate, descriptive and consistent namesIf you are using a weekly or unit-based module system, only add the activities that will be due that week/unit. In general, all Canvas assignments, discussions, and quizzes should also have due dates assigned to them in Canvas, as this will add the item to students’ to-do list and calendar in Canvas. These due dates, combined with adding those activities to the appropriate module, will let students see at a glance what is due by the end of the week or unit. Keep the content in the modules simple and high-level in terms of information—save the specifics for the assignment, discussion, or quiz details. 

Linking Related Materials 

It may be tempting to link all your readings, resources or other materials for a unit in the modules on the home page, but the more content students see in the module, the more overwhelmed they will feel. Instead, it is a good idea to keep materials related to each project, assignment, or other activity in the activity description itself. 

With Canvas’s Rich Content Editor, which is what you use to edit the descriptions of assignments, quizzes, and discussions, you can add links to files (documents that you have uploaded to the files area), content within Canvas (published pages, discussions, assignments, etc.) and external URLs (online articles or other websites that have content or activities you would like students to engage with). You can also embed videos that you have created (Kaltura/My Media videos) or videos from other sources that support embed codes (YouTube, Vimeo, etc.). Use this to your advantage by linking all relevant materials needed for completing an activity in the description for said activity. After you’re finished, it’s a good idea to check over the links in your course with Canvas’s link validator tool to make sure you don’t have any broken links.

How to link a file with the New RCE menu bar
Demonstration of how to link a file with the Rich Content Editor.

It’s not enough to just add links, however. Any materials that you would like students to engage with also require clear, concise instructions for what you would like students to do with the content that you’ve linked. 

Here are some questions to consider when you are adding materials to your assignments, discussions, and other areas of Canvas: 

Use the exact name of the article or video, or a clear, concise description for the inline text when you create a link.

For an article, for example, is your intention for students to skim it? Do a close read? Annotate it? Take detailed notes?

Include page numbers for readings and timestamps for videos, when applicable.

This information also allows students to better gauge the amount of time they will need to complete an activity.

Provide instructions on how you would like students to apply what they have learned/accomplished from the linked material to the activity.

Decide if you want students' use of the material to be open-ended or specific (e.g. for a discussion, do you want students to submit a free-form reflection on the reading, or answer specific discussion questions?).

Consistency is Key

However you decide to organize your course, it’s important to keep things as consistent as possible from week to week or unit to unit. This includes:

  • File naming conventions
  • Assignment/discussion/quiz naming conventions
  • Layouts on pages
  • Layouts in modules
  • When, where, and how students can find the instructions for an assignment/discussion/quiz
  • When, where, and how students are to submit an assignment/discussion post/quiz

You’ll find that students will become quickly habituated to doing things a certain way, so if you change up, for example, the location in which students can find the weekly PowerPoint slides, it will likely disrupt students’ learning and cause unnecessary confusion and frustration. Studies have shown that consistency in course design is one of the keys to student success in an online environment (Swan, et al, 2000).

Other Ideas

Have you found other creative and effective ways to organize your course content in Canvas? Let us know by dropping a comment below! Or perhaps there’s something you read about here that you’d like some help implementing in your own course—consider emailing us at catl@uwgb.edu or filling out our consultation request form to chat with a CATL member.


The content of this post has been adapted from CATL’s Pandemic to Online Teaching course from January 2020.


A broken chain

Avoiding Broken Links in Canvas

Has this happened to you? You open an email from one of your students that reads, “I can’t access the required reading file in week 3 of the Canvas course?” Concerned, you open your Canvas course. You check your week 3 module; it’s published and so is your “Required Readings” page. Strange. You open the course page and click on the link to the reading file; it downloads. Even stranger. Your student still insists that they cannot access the file. What is going on???

Instructors working in Canvas can occasionally encounter scenarios like the above where a link, image, or file in their Course works for them but does not work for their students. These errors can be very tricky to diagnose and are often caused by something sneaky going on “under the hood” in Canvas. Thankfully, Canvas has a tool that instructors can use to hunt out bad links in their course. This post introduces Canvas’s course link validator tool and explains how it can be used to proactively detect broken links in your courses. It will also provide a few tips for fixing these issues once they’ve been detected and best practices for avoiding these issues altogether.

Detecting Broken Links

Your secret weapon in this fight against broken links is the course link validator. The course link validator, which can be accessed from the Settings page of your course, scans all content in a course for links that may not work for any of several reasons. It will detect and report links to unpublished content, links to content in another course, and links to external websites that just don’t work. It’s a great idea to run the link validator right before you are ready to publish your course and run it again each time you make a large change or addition.

After running the link validator, Canvas will display a list of each piece of content in your course that contains at least one link that may need your attention. These problematic links are further sorted beneath a description of the cause of the error. In the example screenshot of link validator results below, the validator found five broken links in this course:

The results of a link validation check in Canvas.

  • One embedded image in a quiz question that will not work for students because the embedded image is stored in another course.
  • Three links within a single page that students cannot access because each link points to an object in another course. This page has a link to a page in another course, an embedded image stored in another course, and a link to a file stored in another course.
  • A link in a different page that points to an assignment in this course that has not yet been published.

These results illustrate two of the most common causes for confounding broken links in a course:

  1. Links pointing to unpublished files or other unpublished course content
  2. Links pointing to content that is in a different Canvas course

Both of these issues create links that appear to work fine for the instructor but do not work for students. Without a tool like the course link validator, it would be very difficult to detect these issues!

Defeating Broken Links

Whenever the link validator detects a broken link in your course, it’s time to spring into action and heal those links. Mending links that are broken because they point to unpublished content is straightforward: find that content in your course and publish it! Fixing links that point to content in other courses is trickier.

First, you need to remove the bad link. To do this, find the course content that contains the bad link and edit it. Then remove the bad link or embedded image:

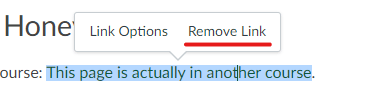
  • For broken links, find the course content that contains the bad link, click edit, click the link in the editor, then click Remove Link.
    The Remove Link option in Canvas
  • For broken embedded images, put your text edit cursor after the image and backspace to remove it.

Once the bad link is removed, use the Canvas editor’s tools to create a new link that points to the course file or course page, or embed the image from your course images. If that file, page, or image you are linking to doesn’t yet exist within the course, you’ll have to upload it from your computer or import it from the other course. Recreating the link in this fashion will point it at content that is contained within the same course, ensuring your students get to where they need to go!

Why Broken Links Happen

These sneakily broken links are typically the result of a teacher trying to share something with their students that their students are not allowed to access. Naturally, teachers are afforded much wider access to a course than students. The most confusing broken links commonly point to either unpublished content or content in another course. Students can’t see unpublished content or content in the teacher’s other courses, but the teacher can!

One item type in a Canvas course that can unexpectedly cause access problems with its published status is course files. Unlike most other content in a Canvas course, you typically don’t have to manually publish course files; most files you upload to a course will be published upon upload. However, files or even entire file folders can be unpublished in your course Files page. When that happens, students will receive access denied messages after attempting to click a link to that file. To resolve this issue, the course instructor must publish the file or folder in the course’s Files page.

Links to content in another Canvas course can sneak in whenever course content is manually copied from one Canvas course and then pasted into another course. The result of copying and pasting between courses creates links to files, pages, and images that point to an outside course. When students try to follow these links, Canvas sees that they are not enrolled in that course and sends an “access denied” message. To prevent this type of broken link, never copy and paste links or images from one Canvas course into another. Instead, use Canvas’s copy and import tools whenever you need to duplicate content from one course to another.

An Access Denied Error in Canvas

Try it Out!

Whether or not you have been bitten by broken links in the past, we encourage you to run the link validator in your Canvas courses. If the validator finds any issues, take a look at those pages in your course and either remake those links or publish any unpublished link targets. You can check to see if your fixes were successful by rerunning the validator and using student view to try the links as the test student. If you’re ever unsure of how to fix an issue reported by the link validator, please don’t hesitate to contact Canvas 24/7 support via the “Help” button in Canvas, email UWGB’s Canvas support team at dle@uwgb.edu, or request a CATL Consultation for one-on-one training on finding and fixing broken links!

So You Want to Be Flexible: Canvas Can Help

Article by Luke Konkol

In a time when students might require extra flexibility, it’s important to remember that it should not come at the expense of instructor bandwidth. Providing extensions on student work, alternative assignments, or dropping work can have a positive impact on students, but how can we best find the sweet spot between an inflexible structure and ‘anything goes’? Some answers lie in Canvas features. In this post, I’ll share a few ideas of how you might set up Canvas for your own benefit, in addition to students’.

“I Just Need a Little More Time.”

By default when you make a Canvas assignment, it’s assigned to every student and the due dates apply accordingly. However, you can also get specific and assign different dates to individual students. It’s easy to get lost in a sea of emails asking for extensions, and masses of sticky notes and spreadsheets suggest that no method of tracking them has been totally effective. By updating the assignment dates for each student who gets an extension, Canvas will track this for you and the student alike.

Some instructors also don’t realize how late work shows up on the student side. When work is late, Canvas is overly clear, marking it with a big red “LATE”. This can be off-putting to otherwise achieving students—especially when the work is not actually late. Adjusting a student’s individual due date means their work will only be marked as late if it is submitted past their specific due date.

A Usable Gradebook

An indication of ‘late’ work also shows up in your gradebook. Unfortunately, Canvas doesn’t make their cacophony of symbols and highlights transparent anywhere within the gradebook itself, so those individual cells just turn into noise. This is less true if you can use these features of the gradebook to their full potential. One first step is using individual due dates as described above; when you do, the highlight for “late” work starts to mean something.

Excusing and Dropping

Canvas grading is also not as “all or nothing” as it first appears. What seems like a flaw can work to our advantage: anything un-graded does not count against students in the way a zero would. But it’s sometimes difficult for students (and the future you) to interpret this lack of data. Canvas has thought this one through. You can make it explicit which assignments will not be counted towards a student’s final grade by marking such assignment as “excused”.

Excusing work is a good option if the dropped score doesn’t apply to everyone, but what if you want to discount a graded item for the entire class? You can tell Canvas to drop certain assignments, such as the lowest in an assignment group, by setting up assignment group rules. The thing to remember is to enter those zeroes for missing assignments—otherwise Canvas will drop the lowest scored assignment instead.

Assignment Groups

In fact, there are several tricks you can use so the Canvas gradebook tracks scores but assignments ‘count’ differently. For example, some instructors prefer to manually assign scores elsewhere but still want Canvas to serve as the interface for student work. A rather extreme example (using labor-based grading) can be found here. Whenever you use unconventional grading methods, the key is to be transparent with students about what Canvas (and you) are doing. This guide on group weights is enough to get you started on this advanced topic, but we recommend setting up a CATL consultation if this is something you’d be interested in exploring further.

The Learning is in the Doing “So Far”

These tips demonstrate the way in which, at first blush, Canvas seems to focus its flexibility on the student side of the equation. This is to say, instructor errors (like forgetting to enter a zero) seem to unduly benefit the student. But these effects are just symptoms of a wider philosophy underlying the way Canvas works. Like any learning management system, Canvas is based on the idea that a certain transaction is taking place, but instead of focusing on a raw accumulation of points (like other LMSs) Canvas’s approach to scoring is a reflection of how students are doing “so far”. If a student only does one of ten assignments but does it well, Canvas tracks this as success.

What does this do for us? For me, it clues us into a different way to think about student progress—and one that speaks directly to students achieving objectives. If we want students to be able to X, why have a dozen assignments asking them to do so if they succeed in doing it in two or three? Despite a distaste for ‘busy work’ shared by instructors and students alike, it tends to creep into the online environment. The silver lining is that the boost in remote learning (where the necessity that we clearly articulate the work we expect from students is highlighted) has revealed the craving we all seem to have for objective-centered student work.

A Note on Objectives

So, you want a student’s grade to reflect their meeting objectives instead of a raw accumulation of points. Now what? That’s a good question—and the answer is bigger than we’ve got the space to address here. My temporary answer is a cop-out: keep your objectives in mind as the driving factor for using the techniques I’ve provided above.

But give it some further thought. If this idea of objectives-based grading is intriguing to you, consider that Canvas has a spot for you to create outcomes and that you can then attach these outcomes to assignments.

As if this weren’t enough, Canvas even has an alternative gradebook based on what they call “learning mastery” which tracks this very thing using benchmarks for mastery you set. I didn’t advertise this above because the focus of this post is on practical action you can take now to save yourself some work, but if this is something you’d like to explore further, please don’t hesitate to schedule a consultation!

What Do You Think?

How do you manage flexibility in your courses? What Canvas (or other) ‘hacks’ do you have to share with your colleagues? Let us know below! I’ve also been thinking a bit lately about how some of these practices (e.g. objective-based grading) might be worth keeping around even once things “go back to normal”. I’m curious to hear from you on this. How have your grading practices changed? Is there anything you’ve started doing that you plan on keeping going forward?

A chat bubble made of yellow note cards

Connecting Online

By the time this post is published, we’ll be past the halfway mark of the fall semester. Adding the spring semester to this fall, that’s around a full semester of mostly online, virtual synchronous, and blended/hybrid instruction. These are instructional modalities that some instructors and students are disinclined to use. But here we are, nonetheless, making the best of things. Students are continuing their educational journey in what are for many new and uncomfortable environments, while instructors are wrestling with providing an equitable learning experience through technology and perseverance.

Illustration of a giraffe with text which reads "Giraffes have enormous hearts" and a speech bubble from the giraffe saying "I care too much."It is perhaps because of the focus on providing remote students all of the same information and activities that we can sometimes forget to include “us.” Online  education can often devolve into a series of tasks that one checks off. We meander into holding virtual correspondence courses, silently reviewing student homework, assessments, and discussion posts and assigning scores.

When we’re teaching in-person, having a side conversation with students before or after class or an informal chat during group worktime can be a trivial task to complete and also be rewarding for students and instructors at the same time. Office hours, although perhaps underutilized, provide another opportunity for ad-hoc in-person engagement with students. But what happens when we don’t actually see our students? Where do ad-hoc and interpersonal conversations go? Some people may argue the lack of that type of engagement with our students and them with us is part and parcel of online instruction.

Online students choose this environment.”

—Made-up instructor used for narrative purposes

Even if one does subscribe to that approach, the nature of our current educational environment includes many remote students who did not choose their current learning environment. They prefer in-person education, talking with their peers and instructors, and a structured educational experience. Online students prefer personal interactions with their instructors as well! In fact, it’s been shown to positively relate to student grades (Jaggars, S. & Xu, D., 2013)

So how does one recreate the feeling of connectedness, ad-hoc conversations, and interpersonal engagement with remote students? We’ve provided some examples of how instructors can do this while increasing their “there-ness” in courses, below.

Provide timely feedback on student work

Assignment and assessment feedback can serve double duty for instructors. First, feedback allows students to correct misconceptions, assess the amount of effort they’re putting into the course and perhaps increase it, and be better prepared for subsequent assessments. Second, feedback allows instructors to form an interpersonal connection with students. Depending on the subject matter and the course, feedback may be the only personal connection instructors form with students. Feedback can provide an opportunity to provide personalized instruction to students that may not be available through other means.

Consider including the student’s name when providing feedback, even if the feedback is somewhat canned. It personalizes the feedback, lets students know they’re “seen,” and communicates nonverbally that the student is “part of the community of people…” (Willemsen, 1995, p. 15). As Kent Syverud (1993) points out, “who is the one teacher in your entire life who made the biggest difference for you — who taught you so well that you still think about him or her as your best teacher. I bet that for almost all of us, that best teacher was someone who knew you by name” (p. 247).

An animated GIF of Fred Armisen in character toasting a bird on to a piece of bread.
“We put a bird on toast.”

Put a bird face (or voice) on it

Although not for everyone, instructors can add presence to their course through the incorporation of brief videos. We’re not referring to hour-long PowerPoint presentations, but rather short webcam recordings. These recordings can be used to introduce units, particularly challenging topics, or to serve as a way to deliver announcements to the class. In an example below, Prof. Matt Mooney (History at Santa Barbara Community College) uses videos at the start of a new modules to help students through sticky topics. Mooney visually communicates a historical phenomenon included in an upcoming module that students are known to struggle with.

An additional or alternative way to reinforce your course presence is through “video postcards.” The example below is from Fabiola Torres, Ethnic Studies professor at Glendale College, who uses video postcards to communicate with her students when she’s not readily available. In the example provided, Dr. Torres is at a conference and using her smartphone to record a brief message to her students.

Recordings like Dr. Torres’s reinforce to their students that their professor is in fact a real person and their course is not led by a robot. This process of “humanization” is shown to increase positive traits like trust and psychological safety in student-instructor relationships, which can help keep your students engage with the course long-term (Gehlbach et al., 2016).

For those disinclined to recording video of themselves, recording just audio may provide a happy middle-ground. Besides providing a human connection that written text cannot, audio recordings can also help prevent misinterpretations in tone that reading text can lead to. Because of this, audio recordings are often paired with feedback to students on their work. However, audio recordings don’t need to be restricted to feedback. Some experienced online instructors choose to use audio recordings throughout their courses to introduce topics, explain difficult concepts, and provide and additional way learners can engage with content.

Communicate regularly

Another way to engage and build rapport with remote students is through regular communication and announcements. This messaging can help students not accustomed to being in a less structured learning environment to stay on track, and also allow for ad-hoc responses from students that may be silently struggling. Irregular communication was identified as a large problem by students following the spring semester and is often over-looked as a simple way to address student disengagement and feelings of disconnection.

Some areas that can lend themselves well to regular communication are introducing new units or topics, shining light on a difficult concept or something that came up in discussion or through private communication, kudos to share with the class to call out quality student work and call out what quality work looks like for those that aren’t quite there yet, and recapping units that the class is finishing up to reinforce critical concepts.

Message students who…

When working with students in-person, it can be fairly trivial to let students know it would be in their best interest to contact you regarding their graded work. However, when teaching remotely this can seem much more challenging. Did they read the feedback that was provided? Who knows?

Regardless of whether they read your feedback, you can still make it clear they really ought to get in touch. This can be accomplished through the Message Students Who feature in Canvas. This feature allows instructors to message any students in their classes that meet certain criteria for a particular graded activity. Options include students that have not submitted anything for the graded activity, those that haven’t been graded yet, and those with scores lower or higher than a specified threshold. More information is available here.

Office hours

Although instructors aren’t likely to be offering office hours in-person this year, it’s still possible to hold “live” office hours through virtual meetings. Consider providing a recurring virtual meeting to your students during your scheduled office hours. This can allow your students to take advantage of the focused help that office hours provide, along with the non-verbal cues a video call can provide and include the tone missing from textual communication.

The meeting could be set up as a Collaborate Ultra meeting in Canvas, an open Teams or Zoom meeting link provided in your course, an Outlook Calendar invite to your students containing the room link, or through some other method.

If Discussions are used, use Discussions

The discussions area of Canvas can be another place where instructors can engage with their students. If you’re already using Discussions in your course but don’t participate, consider how you could. This provides another opportunity for students to connect with you as sage or guide and gives you an opportunity to turn the discussion in the proper direction when needed and correct misconceptions.

Sound like more work than you’d like to take on? It can be. That’s why it’s important to manage the time spent in discussions. Set aside twenty or thirty minutes a couple times per week with the intent of replying to discussion posts. In the time you’ve set aside,  post where you feel you’ll have the greatest impact, not in response to every student.

Two people looking at a digital display of information on flight times.

Make a schedule

Veteran online instructors often integrate a to-do list for their classes into their own weekly schedules. This can help in keeping oneself accountable and on task and help segregate class-time from other responsibilities. A schedule might include things like, ready/post in weekly discussion, make weekly announcement, contact at-risk students, send encouraging email, etc.

How do you “connect” with your students?

The information above is far from an exhaustive coverage of methods to make oneself visibly available and connected with one’s course. What methods do you implement? What has and hasn’t worked well? Questions about implementing something above or seen elsewhere? Drop a comment below or email us at CATL@uwgb.edu.

"Test pattern" bars and text covering an LCD screen.

Using Video Responsibly

Article by Scott Berg

“A picture is worth a thousand words.” If that saying is true and one second of video is 30 pictures, then it could be said that a minute of video is worth 1.8 million words! While it is not likely that students glean that much meaning as a video flashes onto their screen, there’s no denying the great power of the moving picture for conveying information and demonstrating technique. But, to repurpose another saying, “with great power comes great responsibility.” Harnessing the power of video in your courses comes with a cost. These days, it’s possible to quickly and cheaply produce video content on nearly any device, but video carries it’s high cost in the data, bandwidth, and hardware requirements necessary for students to access or produce their own. Because video is resource-hungry, it’s important to provide alternative paths for your students in addition to video options. This article aims to describe why it is important to keep this “cost” of video in mind and suggest some strategies you can implement to ensure that your course content is accessible to all students. 

The slings and arrows of outrageous file sizes 

Video files are huge! To help demonstrate how large videos files are in comparison to other types of web content, I ran an experiment. I returned to “a picture is worth a thousand words,” but considered it through the lens of file size instead of knowledge conveyance. I started with 1,000 words and generated a text document containing 1,000 words of Lorem Ipsum. Next, I took the old saying too literally and took a screenshot of those same 1,000 words on my screen and saved it as an image file. Next, I decided to make a video of myself reading 1,000 words using the Kaltura webcam recorder. In a move that will call into question both my scientific and humanities bona fides, I realized that I cannot read Latin, so, for my video dictation, I swapped the 1,000 words of Lorem Ipsum with four consecutive readings of the first 250 words of Hamlet’s soliloquy. The last step of my experiment was to use a free program called VLC to extract the audio from my video recording to create an MP3 audio file. After each step of the experiment I recorded the size of the resulting file. 

Here are my results: 

File Type  Size (Kilobytes)  times larger than text  N downloadable w/ 1GB data 
Text (TXT)  6.58  N/A  159,358 
Image (PNG)  209.07  32  5,015 
Audio (MP3)  4,693.88  713  223 
Video (MP4)  17,327.98  2,633  60 

As you can see, each file type is roughly an order of magnitude larger than the one that precedes it. The 5-minute video recording of me reading 1,000 words of Hamlet is a whopping 2,633 times larger than the 1,000-word text file, 83 times larger than the image file, and nearly 4 times larger than the audio file. Another way to frame this data is to think about how many of each file type could be downloaded with one gigabyte (GB) of cellular data, which is the limited amount of data I thriftily pay for each month with my cellphone plan. My monthly data would be exhausted after watching the video 60 times. I could listen to the audio recording over 200 times, view the picture over 5,000 times, and load the text file nearly 160,000 times in a month without exceeding my data plan! Hopefully, this comparison illustrates just how much larger video files are than pages made up of text and images. My experiment even used perhaps what is a best-case scenario for video files, as Kaltura was able to compress my video’s size to be about 5 times smaller than the raw video file during playback! The results obtained from using a higher-quality or less-efficiently compressed video in this experiment would have been even more evocative. 

Having your cake 🍰 and eating it too 🍴

So, is all this intended to scare you away from using video in your courses? No! Video is a great instructional tool! A September 2020 survey of students who completed the UWGB Impact MBA online bootcamp revealed that 69% of 13 respondents preferred course presentation types that included video. Instead of arguing against using video, I have chosen to demonstrate video’s demanding file sizes to argue that you should use it responsibly by taking steps to ensure that lessons and assessments are accessible for all students, and not just those with easy access to unmetered broadband internet. In a survey of UWGB students conducted in May 2020, when asked to describe the technology the they had to complete their coursework since UWGB shifted to remote instruction, 20% of respondents reported that they had regular access to a computer but not high-speed internet. That’s a significant segment of our student population who would struggle to keep up in a course that used video as the sole medium of instruction. Providing additional lower-bandwidth (i.e. text-based) means to access course lessons can help the students who have wound up on the wrong side of the digital divide achieve positive outcomes. 

A pie chart showing the results of the UWGB Impact MBA online bootcamp survey.
Results of the “Presentation Types” question on the UWGB Impact MBA online bootcamp survey.

Beyond accommodating students with limited internet access, providing additional ways for students to access lessons beyond watching videos will help them learn on-the-go whenever they have a quick opportunity to study on their smartphone. Text-based lesson alternatives can help a student study while away from a solid Wi-Fi connection at home, traveling, or in a break room at work. Another reason to provided additional alternatives to video learning materials is that not all students share the same learning preferences. This practice of providing multiple paths for a learner to access and consume a lesson is one of the central recommendations of the universal design for learning (UDL) framework. UDL revolves around the idea that courses should be designed so that all learners can access and participate in learning opportunities. While universal design is often thought of solely as an accommodation for learners with disabilities, according to Thomas J. Tobin, a leading proponent of UDL, “Universal design goes beyond just assisting those with disabilities and offers benefits for everyone involved in the online learning environment.”

Tobin illustrates the benefits of using UDL in your course design by imagining a lesson where “students can start by watching a short video clip of their professor, print out the text-only version while they are working on an assignment, and then watch the video again with captions turned on while they are studying after the kids have gone to bed” (Source: “Universal Design in Courses: Beyond Disabilities” from the book Planning and Designing Your College Course).

Using video responsibly by incorporating these principles of UDL will not only lessen the effects of the digital divide in your course, it can keep your students engaged in course materials and help them make use of every opportunity they have to study and keep up in your course. 

+1 for captioning 

Retrofitting UDL principles into an existing course can seem like a daunting challenge, but there are some relatively easy and enriching techniques you can use to add additional paths to your video lessons. In his article, “Reaching all learners through their phones and universal design for learning,” Tobin writes that, instead of being overwhelmed by the consideration of every possible alternative format that could be added to each element and interaction in a course, instructors can adopt a “plus one” mindset to identify a single alternate format for multimedia that can be consistently provided throughout a course. The “plus one” mentality can help divide the work of adding UDL design principles to your courses into manageable chunks. 

One potential “plus one” to focus on in your courses using video would be to add closed captions to your videos. Within the Canvas course at UWGB, machine-generated captions can be quickly added to videos created with or uploaded to the Kaltura My Media service at no additional cost to you or the University. The procedure to add these captions to a video can be completed in under a minute and requires only a handful of clicks within Canvas. While the machine generated captions won’t be 100% accurate, even imperfect captions can help your students with their note-taking and comprehension. Whenever you have the time to work on it, the captioning files can be edited via the intuitive captioning editor that is built-in to the Kaltura service to make them 100% accurate and suitable to fill a potential future need for disability accommodations. 

Captioning your Kaltura My Media videos has become even more powerful with a recent addition to the My Media service in Canvas. UW-System has released a new “Transcript” video player that can be used to easily insert a searchable, printable, and downloadable text transcript underneath your videos when they are embedded in Canvas. The transcript video player automatically generates its transcript from your video’s captioning file, so, if your My Media video is captioned, embedding it with the transcript player is easily done through the advanced video embed options. The transcript player makes it simple for your students to download a text version of your video lesson and take it with them on-the-go to study offline. 

Beyond captioning 

Providing captions and transcriptions are far from the only ways to “plus one” your video content and provide additional paths for your students to access and be engaged by course content; podcast-like audio-only versions of course lectures cut down on screen time. You can provide them for students to learn during a commute. A collection of available articles on a lecture topic could provide yet another means for students to engage with a topic. There is also more to using video responsibly than providing alternatives to video content.

Based off of our knowledge of supportingstudies, CATL has long recommended creating videos that are not… long. Another video “responsibility” is to produce multiple short (under 10-minute) videos instead of one long lecture-length video. That strategy helps with the internet bandwidth concern by keeping individual video file sizes down, but it also helps combat the attention and retention problems seen with long videos. Using multiple short videos also provides the opportunity to sprinkle interactions between videos. Imagine creating a Canvas module for a lesson that contains five short videos (with transcriptions) and placing formative quizzes and/or discussion opportunities between them. You can even add interactions right to the video playback experience by using the Kaltura Quiz tool (or, for Fall 2020, by taking part in our pilot of PlayPosit, a new interactive video platform—just ask CATL to join!). Whether added to the videos themselves or included in the structure of a module, those interactive breaks can help your students stay interested in a lesson and help prevent an “ugh, another video!?” feeling. 

We’d like to hear from you

So, do you think you are using video responsibly in your courses? If so, what strategies are you using? If you suspect your video use is an area for growth, what ideas do you have make your use of video more responsible? Do you use tools other than Kaltura for video? What features can you use to help make your courses accessible for all students? What resources would you like CATL to provide? What other ideas do you have for implementing UDL principles in the design of your course content and assessments? Please sound off in the comments or share your questions and ideas via email at CATL@uwgb.edu.

Until then, as you harness the great power of video in your courses, please remember to wield it with great responsibility!