Teaching with Technology Certificate and Course Enrollments (2023-24 AY)

CATL is continuing the Distance Education Certificate program under a new title this year, the “Teaching with Technology Certificate.” Instructors interested in learning more about how to leverage Canvas and other tools for effective teaching, regardless of modality, are encouraged to participate and complete the full certificate.

The Teaching with Technology Certificate consists of three courses which act as progressive steps in a sequence. Instructors will earn a digital badge after completing the first and second courses in the series, and the Teaching with Technology Certificate after completing the third course. Full-time instructors for the 2023-24 academic year will also earn stipends after completing the second and third courses in the sequence.*

Note: If you have already completed the Distance Education Certificate, this is not a new credential; it has simply been re-titled, so there is no need to re-enroll.

Course Availability, Deadlines, & Compensation

Course 1: Learning and Integrating Technology for Education (LITE) 101

  • All full-time instructors are automatically enrolled in LITE 101: Modalities & Technologies. The course will remain open indefinitely, and there is no deadline for completion.
    • If you are not a full-time instructor but would like to be added to the course, please email CATL@uwgb.edu.
  • LITE 101 is not tied to a stipend.
  • All instructors working toward the Teaching with Technology Certificate who complete LITE 101: Modalities & Technologies will be able to enroll in LITE 201: Course Design the following semester.

Course 2: LITE 201

  • The Spring 2024 cohort of LITE 201: Course Design will begin on Monday, Feb. 5, 2024, and run until the end of the spring semester.
  • Registration for the Spring 2024 cohort of LITE 201 is open through Friday, Feb. 2, 2024. Register today!
  • Full-time instructors who complete LITE 201 within the 2023-24 academic year will qualify for a $750 stipend.*
  • All instructors working toward the Teaching with Technology Certificate who complete LITE 201 will be able to enroll in LITE 301 the following semester.

Course 3: LITE 301

  • The Spring 2024 cohort of LITE 301: Course Revisions will begin on Monday, Feb. 5, 2024 and run until the end of the spring semester.
  • Registration for the Spring 2024 cohort of LITE 201 will remain open through Friday, Feb. 2, 2024. Register today!
  • Full-time instructors who complete LITE 301 within the 2023-24 academic year will qualify for a $750 stipend.*
  • All instructors who complete LITE 301 will receive the Teaching with Technology Certificate.

*Only full-time instructors for the 2023-24 AY are eligible for compensation. To receive compensation, participants must receive approval from their unit chair. Instructors that have already met their maximum overload payment for the contract period do not qualify for compensation.

If you have questions about these courses, please contact CATL at catl@uwgb.edu. If you have questions about compensation or the payment process, please contact Human Resources at hr@uwgb.edu.

Course Descriptions

The first course in the series is called Learning and Integrating Technology for Education (LITE) 101: Modalities & Technologies. This self-paced course includes information about the different course modalities offered at UW-Green Bay, as well as the technologies you might use for teaching in each one, including in-person teaching. This course also serves as the foundation of the Teaching with Technology Certificate series because it provides an overview of our specific distance education modalities and the technologies that will help you to be successful in them.

LITE 201: Course Design (formerly called Trail Guides) picks up where the first course leaves off. LITE 201 course centers on developing learning pathways for students. This self-paced course is for you if you would like to explore how to develop distance education courses more systematically. Through LITE 201, you will develop a module for a distance education course. LITE 201 is self-paced but offered on a semester basis.

In LITE 301: Course Revisions (formerly called Retreats), you will be encouraged to reflect on your own teaching practices. LITE 301 focuses on the process of using feedback, reflection, and scholarly teaching practices to refine classes. You will, for example, explore scholarship of teaching and learning (SoTL) literature relevant to issues in your course or to revisions or teaching innovations you are considering. You will also engage with several of your colleagues through synchronous and asynchronous activities designed to support your efforts in reflecting on and refining your teaching practices. LITE 301 is offered as a cohort-based, semester-long community of practice.

Teaching with Technology Certificate: LITE 101 Course

The first course in the Teaching with Technology Certificate series is called Learning and Integrating Technology for Education (LITE) 101: Modalities & Technologies. This self-paced course includes information about the different course modalities offered at UW-Green Bay, as well as the technologies you might use for teaching in each. LITE 101 will serve as the foundation of the Teaching with Technology Certificate series and provide the essentials you need to be successful on the path to building your course if you elect to continue onto the next courses (LITE 201 & LITE 301).

Prerequisites: None

Next course in the series: LITE 201: Course Design (formerly Trail Guides)*

*If you completed either Foundations of Teaching with Canvas or Teaching with Technology Basecamp prior to Fall 2022, you already meet the pre-requisites for LITE 201; however, you are encouraged to use LITE 101 as a resource and/or complete the course for a badge because it includes information, such as course modalities, that the other two courses did not.

Badge

Every participant who successfully completes LITE 101 will earn a digital badge that you can include in your email signature or embed in online portfolios or resumes as evidence of your commitment to professional development!

LITE 101 badge with a lantern in a snowy landscape

Earning Criteria

    1. Reviewed technology that supports teaching in a specific modality, such as In Person or Virtual Classroom.
    2. Demonstrated how technology can enhance student learning experiences.
    3. Compared and contrasted the different technologies available at UWGB to support student learning experiences.
    4. Identified the technology available at UWGB that supports student learning experiences in their own courses.

FAQs

Click one of the questions below to expand the accordion.

All full-time instructors will be automatically enrolled in LITE 101 in cohorts based on academic unit. Check your email for an invite from University of Wisconsin Canvas or Instructure Canvas (notifications@instructure.com) and click the Get Started link to gain access to the course.

LITE 101 is a self-paced Canvas course organized by module, with one module for each of UWGB’s course modalities. To complete the course, you will need to pass six multiple-choice quizzes with a score of at least 80% or higher and complete the final in-course feedback survey. Doing so will also grant you a digital badge.

Unlike Foundations and Basecamp, LITE 101 covers in detail the various teaching modalities offered at UWGB. Even though there is some content overlap between Foundations, Basecamp, and LITE 101, the resources on course modalities and integrating technology across all modalities will be insightful for instructors who have completed one of these previous self-paced introductory courses.

If you completed Foundations of Teaching with Canvas and/or Teaching with Technology Basecamp prior to Fall 2022, you already meet the prerequisites to take the second course in the Teaching with Technology Certificate sequence, LITE 201: Course Design. If you have not completed either of these courses, you will need to complete LITE 101: Modalities & Technologies to continue in the Certificate sequence.

The Teaching with Technology Certificate consists of three consecutive courses: LITE 101: Modalities & Technologies, LITE 201: Course Design, and LITE 301: Course Revision. LITE 101 is replacing Basecamp in the certificate series as of Fall 2022. Learn more about the Teaching with Technology Certificate.

LITE 101: Modalities & Technologies is not being offered for compensation, however, the stipends for LITE 201: Course Design and LITE 301: Course Revisions are $750 each for the 2023-24 academic year. As a result, instructors will earn $1500 for those two classes in total.

Yes! All UWGB staff and faculty are welcome to take the LITE 101 course. We hope this course can be a resource to help educators at our institution familiarize themselves with UWGB's modalities and the technologies that support them, including Canvas. If you are not a full-time instructor but would still like to be enrolled in LITE 101, please email CATL (CATL@uwgb.edu).


Questions?

If you have any questions about LITE 101: Modalities & Technologies or the Teaching with Technology Certificate  in general, please contact CATL (CATL@uwgb.edu).

Teaching & Learning in Point‐To‐Point (P2P) and Point‐To‐ Anywhere (P2A) Classrooms

Definitions

Point‐To‐Point (P2P) and Point‐To‐Anywhere (P2A) rooms are used at UW‐Green Bay to teach in the Interactive Video modality. Both room types allow for a synchronous class experience with a combination of in‐person and virtual students. Class sessions are not recorded. There is a Special Note added to these classes if they are campus‐to‐campus. A movie camera icon Camera Movie Video Record Film - Film Camera Icon Png, Transparent Png , Transparent Png Image - PNGitem is used to represent Interactive Video modality in the Schedule of Classes.

General Considerations

  1. Get comfortable with the equipment and modality prior to the start of the semester by testing it out and using resources such as the UKnowIt guide on P2A rooms and P2P rooms.
  2. Try to ensure that student learning is an equitable experience for all students, regardless of location.
  3. Consider student engagement as a continual area of importance and focus, both in‐person and online.
  4. Be prepared in advance with back-up plans in case technical and logistical issues arise during teaching.

For assistance or discussion of pedagogical strategies and best practices related to these types of rooms and the Interactive Video modality, please reach out to CATL (CATL@uwgb.edu) to schedule a consultation. If you need physical access to a room or have an issue with the technology in it, please contact GBIT (GBIT@uwgb.edu).

Tips for Success

Engage in advance preparation to support success for you and the students.

  • Ensure your use of technology and online components are aligned with your learning outcomes, as this is the most successful way to utilize the technological environment. For example, if your learning outcomes are tied to specialized knowledge about the field of chemistry and thermodynamics, integrating a Zoom poll that checks for understanding (i.e., which statement best represents the second law of thermodynamics?) could prove to be beneficial. (Howell, 2022; Raes et al., 2019)
  • Visit the classroom to become more familiar with its technology. Test out all equipment. You can attempt to share your materials on the virtual platform of Zoom or Teams with a volunteer ahead of time from the classroom. You can also do this alone as long as you take a second device to the room. [Note: You may need to step in the hallway when testing the second device] On one device, begin the meeting as the host. On the second device, use the invitation/link to access and to enter the meeting. This will simulate a second user in the meeting. Since you will have the same permissions on either computer, attempt to share any materials (presentations, videos) you will be presenting via the button in the platform (i.e., Zoom or Teams) while viewing it on the other device to ensure that it works as intended.
  • Before class each day, preload all files, pages, and/or programs that you will be accessing to reduce the wait time for students. This is especially true of videos that are streamed, including those on YouTube or in Kaltura. Preloading can be done on your own personal laptop (highly recommended method) or by using the podium computer in the room. If you are using your own device(s) in the room to project, you can connect via ShareLink, or preferably, to the HDMI cable in the room (please see our UKnowIt guide on P2A rooms).
  • Only have files, pages, and/or programs that are necessary for your class open during class. Unnecessary applications or windows could slow down the computer and lead to loading failures.

Promote equitable experience for your students across modalities.

  • Plan activities that involve both in‐person and remote students and promote their interaction. For example, alternate between online and in‐person participants in discussions (Bockorny et al., 2023).
  • Promote good communication by repeating or paraphrasing questions and/or answers from in‐person students to your remote learners even when there are drop microphones in the room, and by reading aloud what is in online chat and paraphrasing online student comments within the room itself.
  • Facilitate community‐building to help all students feel valued as members of the class (McGee & Reis, 2012).

Facilitate student engagement in-person and online.

  • Use online tools such as Hypothesis, OneDrive, Teams whiteboard, or Zoom whiteboard to allow social annotation and collaborative technological spaces for students to work. [Note: Some tools would potentially require in‐person students to be online in‐class as well] (Bower et al., 2014).
  • Facilitate small group discussions by giving clear directions, and participating both in‐person and online, being intentional about online students sharing out to the in‐person students, and vice‐versa.
    • One possibility is to monitor or join briefly each small group as the instructor. In addition to circulating in the classroom, you can potentially join virtual students via Teams or Zoom on a secondary device to engage in the conversation. [Note: You may need to step in the hallway when joining virtual groups.]
    • Another option for small group work is to elect group leaders, speakers, and/or notetakers to help facilitate reporting back to the larger class.
  • For large group discussions, consider having a student, or multiple students, monitor the chat so that interactions between remote and in‐person students can be as seamless as possible. (Raes et al., 2019)
  • Create online polling options (via Zoom or other platforms) for students to engage in rapid responses as class progresses, gathering real‐time feedback. [Note: In‐person students may need to be online as well]
    • Begin each class period with a warm‐up activity designed to engage students in both modalities. Use online polling as described above or try strategies such as playing videos or music or having a question of the day for people to answer in chat or out loud.

Create alternative ways of accessing materials when technological or logistical issues arise.

  • Access plays a critical part in the success of all students, so ensure that regardless of modality, everyone can access course content, assignments, activities, discussion boards, and other class materials in a digital format.
  • Be clear with students about your plan for class time. For example, you could proactively draft an agenda for each class session and publish it in Canvas. This way, if issues with connectivity arise, students will know what to do, what they can work on, and where to find materials applicable to the week or module. As with face‐ to‐face classes, interactive video courses are not recorded.

Common Technological Issues

  • Lag time between muting, unmuting, and responding to questions or prompts
    • Expect lag time between asking questions of remote students and their response. Practice patience in wait time to give ample opportunity for remote student participation. You can discuss the issue as an entire class, so that in‐person students know that you will wait before calling on anyone to respect that time delay.
  • Inaccurate position locking of voice‐tracking cameras
    • In‐class cameras in the P2P and P2A classrooms use voice tracking to follow the speaker, but they sometimes ‘lock in’ on someone who is not the intended primary speaker at the time. This is most likely to happen due to stray noise in the classroom. If it happens, the audio from the primary speaker may temporarily not be as clear. To bring the camera back to the instructor or the student who is talking, try to reduce background noise (classroom chatter, music, etc.) and have the person speak a bit more loudly for a few seconds. The camera should re‐position itself on them.
  • Unfamiliarity with Zoom’s customizable settings (for P2A classrooms only)
    • Not all P2A classes use Zoom technology for sessions, but if instructors are using it, they may find that the default settings feel too restrictive or not restrictive enough. There are many features in Zoom you can choose to use or change. These include: activating a ‘waiting room’ that requires acceptance by the host to join, allowing or restricting screensharing, muting microphones, hiding profile photos, restricting chat, or even immediately suspending all participant activities. These options can be changed. More information on the host controls and Zoom settings can be found here.

Contact Us!

Do you have a tip for your peers on teaching in these classrooms? Please let us know by writing to CATL@uwgb.edu.

Bringing Your Canvas Course Forward into the New Term

Creating a Canvas course from scratch is a lot of work. That is true whether you are teaching fully online or using your Canvas course to supplement in-person instruction. Thank goodness, then, that Canvas courses don’t have to be one-time use! When you teach a course with Canvas for the second (or third, or fourth…) time, you can easily import your previous course’s content into the new term’s course to reap the benefits of your past hard work. Of course, the continuous iterative improvement you’ll strive to make in the new version of the course will still be important hard work, but that shouldn’t stop anyone from celebrating the ability to reuse content and work smarter. While importing content from a past course is easy, there are enough fine points and useful tricks that are worth knowing about to warrant a guide (like this) that can help you most efficiently bring your content forward and prepare it for the start of the new term. Even seasoned Canvas instructors may learn a few new tips for speeding up their semesterly workflow! Read on to learn the best ways to bring your course forward and get it ready for your new class.

Table of Contents

Importing Your Content

When you want to import most of the content from a past course into your new Canvas course, Canvas’s Course Import tool makes the job quick and easy. It may be tempting to do so, but you should never manually copy and paste content from one Canvas course to another—copying and pasting between courses commonly results in images and links that seem to work for you but will be broken for your students. Always use the Course Import tool (instructions below) or Canvas’s “Copy To…” feature to copy content between courses.

While researching for this article, we discovered an excellentvideo tutorial on importing Canvas content and preparing it in the new course produced by Chapman University. This video truly hits all the major points we want to make with this article, so we highly recommend it for anyone who prefers to watch a video over working through text-based instructions and for anyone who’d like to reinforce what they have read on this page.

Course Import Tool Instructions

To begin importing content into your new course with the Course Import tool, navigate to the home page of your new (blank) Canvas course and select the  Import Existing Content button, which can be found in the stack of buttons on the right side of the page.

Screenshot of a Canvas course home page with the Import Existing Content button highlighted

On the  Import Content screen, perform the following steps:

  1. In the “Content Type” drop-down menu, select  Copy a Canvas Course.
  2. In the “Select a course” drop-down menu, select the course that is the source of the content you want to copy.
    • To help ensure you are making the correct selection in this menu, pay attention to the term under which the course is listed.
    • If you have trouble distinguishing between similarly named courses, try renaming a course from its Settings page to make it more distinguishable.
  3. Next to “Content,” choose between  All content or Select specific content. We strongly recommend choosing the  Select specific content option. In most cases, your past course will contain some content that you should not bring forward—things like announcements and calendar events. The next section of this article contains tips for selecting which content to import.
  4. If you would like to have the Course Import tool automatically adjust the dates on events and assignments, enable the Adjust events and due dates checkbox and then configure the options that appear below it. The  Canvas Instructor Guide on adjusting dates during content imports explains how each option works. Shifting dates during import will rarely yield perfect results, but it can set the dates close to where you want them and help you make fine-tuning adjustments later—learn more about that in the section on adjusting dates below. If you have the automatic missing submission policy enabled in your past course’s gradebook, shifting or removing dates during import can also help prevent that policy from prematurely grading assignments.
  5. Select the  Import button.

Screenshot of the Import Content menu of a Canvas course. The positions of steps detailed in the list above are labeled by number.

Selecting Specific Content During the Import

If you followed our recommendation and chose the  Select specific content  option, Canvas is now waiting for you to make your content selection (if you instead chose  All content  the import process begins running immediately). Carefully selecting which content to copy during the import process can save you time in the long run because it is easier to omit content during the import than it is to individually track down and delete unwanted items in your course later. To choose which content to import, select the  Select Content  button found next to the top item in the Current Jobs list. This button opens a menu where you can make your selections.

Screenshot of the Current Jobs list found in the Import Content menu of a Canvas course with the Select Content button highlighted.

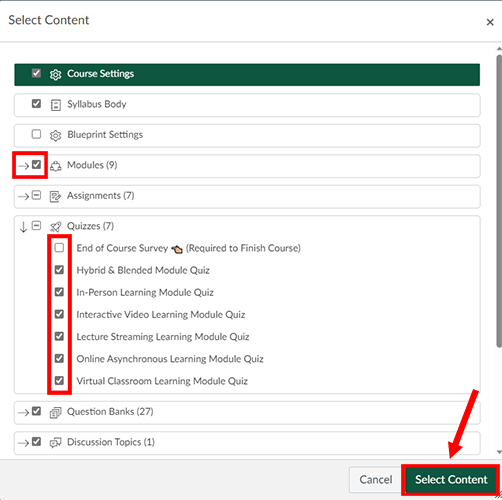
You can select entire content types to import or expand each content type to select items individually. Use the checkboxes to select the content types and individual items for import.

Screenshot of the Select Content menu in a Canvas course with checkboxes for a content type and individual content items highlighted. The Select Content button is also highlighted.

Here are a few things to consider while selecting content:

  • Announcements: In many cases, you will not want to import announcements from your old course as they are often specific to the moment in time and group of students for which they were made. If you do have announcements to reuse, you can import them and then use the delay posting feature to schedule them to post at a future date.
  • Modules: If you use a student resource module that you copied from a CATL or program-specific template, you may want to skip importing that module (and its contents) from your old course and instead recopy it from the original source. Doing that will ensure you get all updates made to that module’s resources since you last copied it.
  • Calendar Events: Most of the time it is best to leave these behind in the old course and not import them. If you use the Zoom integration to schedule online class meetings, take special care to not import the calendar events for the old, expired Zoom meetings into your new course.
  • Files: If you import a content item or a module that contains a link to a course file, Canvas will automatically import that file along with it regardless of the selection here. If all of your files are shared with students through links and modules, deselecting the Files content type during an import is a trick that can help you leave behind any unused files and images that were cluttering up your past course.
  • General Tip: If you want to import most items from a content type while making a few omissions, try first selecting the checkbox for the entire content type, then expand that type and deselect the few individual items you don’t want to import.

Once you’ve checked the boxes of all the content you want to import, select the  Select Content  button to start the import. Most import jobs finish within a few minutes.

(Back to Top)

Getting Your Course Ready

Now that you have a new course full of content from the past term, here are the next steps for getting that course ready to launch:

Adjusting Dates

The most important thing to take care of after your import is adjusting the dates of the assignments, events, and to-do list items copied over from your previous course. Canvas has two great tools to help you adjust dates quickly.

Update Assignment Dates Fast!

Screenshot of the Edit Assignment Dates page in a Canvas course

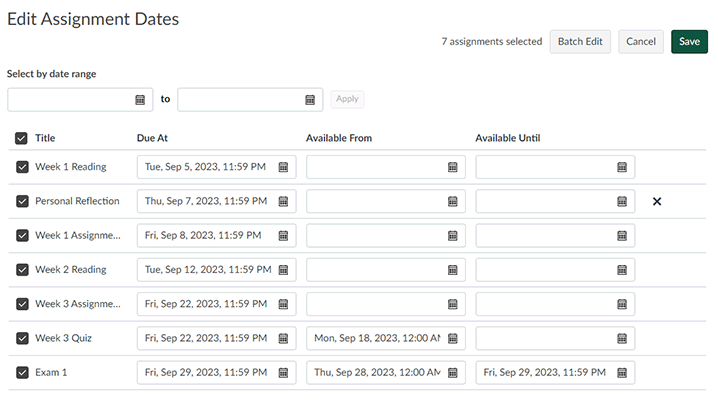
An extremely useful tool for adjusting course due dates hides within the options menu of the  Assignments Index  page of your course. Select  Assignments in your course navigation menu and then select the three-dots  Options  icon and  Edit Assignment Dates  to open a page that shows a list of all assignments with fields for adjusting each assignment’s due date and availability dates. You can adjust dates for all your assignments on this single page and then select the  Save button to apply the changes. This page also has a  Batch Edit  button with which you can quickly shift the dates of all or a subset of selected assignments forward or back any number of days. To find out more, read the  Canvas Instructor Guide page on batch editing assignment dates.

One Slick Calendar Trick

Screenshot of a Canvas course home page with the Import Existing Content button highlighted
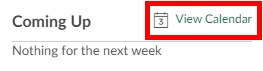
Your course’s calendar is another place where you can quickly adjust due dates for assignments and to-do dates for pages, ungraded assignments, and calendar events. This method is great if you like to work with a visual representation of your course’s schedule. A quick way to open your Canvas calendar with only a single course’s items shown is to select the  View Calendar  link that can be found next to “Coming Up” in the right-hand sidebar of that course’s home page.

In the monthly calendar view you can drag and drop an item from one day to another to change its due date (for assignments) or its to-do date (for ungraded items). If you want to adjust the time of day of a due or to-do date or change the date itself without dragging and dropping, select it on your calendar and then select the Edit button in the pop-up window to reveal a menu where you can quickly make those adjustments.

Screenshot of the Canvas Calendar with an pop-up window for a discussion assignment expanded and the Edit button highlighted

When changing assignment due dates from the calendar, keep in mind that dragging and dropping an assignment only changes its due date and it does not also adjust the availability dates. If you try to drag and drop an assignment to a date that falls outside of its availability dates, Canvas won’t accept the change and will show an error message which references “locked dates.” When working with assignments that use availability dates, we recommend that you make the date edits from the batch edit page or while editing assignments individually.

Updating Typed-in Dates and Files

After you have edited the due and to-do dates, we recommend that you skim through your course content to check for any dates that you have manually typed in pages and assignment instructions. If you uploaded your syllabus or any activity instructions as a file, replace those files with updated versions. Deleting a previously imported file from your new course does not also delete that file form its original course, so you can keep your course tidy by deleting outdated files while still having the peace of mind that the old files are safely backed up in your past course. While reviewing your course page by page may be the most thorough way to scan it for written dates and other outdated content, searching for prior years or months (or month abbreviations) with the  Search tool may speed up your ability to identify content that needs updating.

(Back to Top)

Quick Considerations

Checking for Broken Links

Run the  course link validator  from your course settings page to check for any links that may have broken during your course import or while you were replacing files. We recommend running the validator each time you make a significant change to a course.

Prepping Reused Announcements

If you imported announcements from your previous course, edit them and enable the delay posting feature to schedule them to post at a future date. Using the delay posting feature with imported announcements is important because it ensures students receive a notification for the announcement. For students to get a notification for an announcement, you need to pick a delayed posting date that will fall sometime after you publish the course.

Managing External Tool Content

Check any external tool assignments and links in your course to make sure that they imported properly and are working as intended in the new course. Most tools support being copied from course to course with the Canvas Course Import tool, but exactly how each tool handles being copied will differ.

If you schedule Zoom meetings in your course, those meetings do not copy from course to course, so you will need to schedule new Zoom meetings in the new course. If you pasted any Zoom join links in a page in an introductory module, make sure to replace those links after scheduling the new meetings.

Releasing Modules Gradually

If you prefer to prevent students from working too far ahead by only having a few modules available at the start of the course and then releasing additional modules as the course progresses, you can add “lock until” dates to your modules to schedule the release of course content. Keep in mind that, while both features control student access to course content, module locking works separately from publishing and unpublishing content items. For the “lock until” date setting on a module to release content as intended, you must keep the module and its module items published.

If you prefer to release content manually instead of scheduling it by date, you can unpublish the later modules of your course and then manually publish them as you go. If you choose to keep modules unpublished and then publish them gradually as you go, we recommend keeping the module items within those modules published. This technique makes sure that while students won’t be able to access those items, they will still be able to see the due and to-do dates for those items on the course calendar, which will help them plan for upcoming weeks.

Readying the Gradebook

Before publishing your Canvas course, we recommend quickly checking your assignments and gradebook to make sure the following settings are configured as you need them:

  • Review your Assignments Index page to make sure that your assignments are all categorized into the correct assignment groups and that your assignments groups are weighted according to your syllabus (if you use weighted grading).
  • In your gradebook, confirm you have set your preferred grade posting policy (automatic or manual) at both the course level and for individual assignments.
  • In your gradebook, determine whether you want to use automatic grading policies for missing and/or late submissions, and make sure to configure that before publishing the course.

(Back to Top)

Fit to Publish!

We hope this guide helps you go from a blank course to being publish-ready more quickly each term. If you get stuck while working on any steps in this guide, reaching out to Canvas 24/7 support is often the fastest way to get immediate help and overcome technical obstacles. Spending less time on these term-to-term Canvas housekeeping tasks can free up more of your time to work on improvements and new ideas for your instruction. If you need a partner in thinking through the design of your courses, CATL is here to help, and we encourage you to  sign up for a consultation or to send us an email at  catl@uwgb.edu.

(Back to Top)

Guides and Resources

Pre-Semester Workshops (Summer 2023)

Get ready to teach! CATL is offering a variety of pre-semester workshops to help instructors prepare their Fall 2023 courses. Each workshop will be held via Zoom.

If you would like to receive an Outlook invitation with the Zoom link, you can register. Registration is not required, feel free to drop in and meet the the CATL team!

Creating a Student-Friendly Syllabus (Friday, Aug. 25, 10:00 a.m. & Tuesday, Aug. 29, 1:00 p.m.)

One of the best ways to set a positive, welcoming tone for your class is with the syllabus. Join us for a one-hour session as we dive into UWGB’s syllabus requirements and go beyond them to consider characteristics of effective syllabi, including transparency, clear learning outcomes, welcoming language, and more.

Friday, Aug. 25: Zoom meeting link

Tuesday, Aug. 29: Zoom meeting link


Getting Started with Canvas: Building Your First Module (Friday, Aug. 25, 1:00 p.m. & Tuesday, Aug 29, 10:00 a.m.) 

New to Canvas and not sure where to start? In this one-hour workshop, we will walk you through the essentials for building your first module! Learn about the features you might need to prepare your class including pages, assignments, discussions, and quizzes.

Friday, Aug. 25: Zoom meeting link

Tuesday, Aug. 29: Zoom meeting link


Getting Your Canvas Gradebook Going  (Wednesday, Aug. 30, 10:00 a.m.) 

Maintaining an accurate gradebook in Canvas benefits students in any class modality. Bring your questions to this session as we explore the ins and outs of using the feature-rich Canvas gradebook.

Zoom meeting link


Building Relationships: Communicating With Your Students in Canvas (Wednesday, Aug. 30, 1:00 p.m.)

Join us as we discuss ways to build relationships and foster effective communication with students on Canvas. We’ll focus on ways to use Canvas to communicate with your students, establish a welcoming class community, and explore small ways to create a warm, inclusive class environment that promotes student engagement and belonging.

Zoom meeting link


Generative AI & Assessments (Wednesday, Aug. 30, 3:00 p.m.)

Join us as we discuss the implications of emerging AI products, and brainstorm creative, high quality, aligned, and feasible strategies for adapting course materials and assessments. We encourage you to bring your syllabus, learning outcomes, and assessment ideas to this workshop. View our blog post on the Generative AI & Assessment Workshop for more details and registration information.

Zoom meeting link 


Making Your Canvas Course Materials Accessible (Thursday, Aug. 31, 11:00 a.m.)

Do you have questions about course accessibility in Canvas? If so, please join our one-hour workshop to discuss the ins and outs of improving accessibility in your Canvas course. Learn how to effectively utilize the Canvas accessibility checker, leverage the power of UDOIT, and explore general accessibility tips tailored specifically for teaching with Canvas.

Zoom meeting link


Creating and Sharing Video Recordings with Kaltura My Media (Thursday, Aug. 31, 1:00 p.m.) 

Instructors at UWGB can use Kaltura My Media to create, upload, and share videos in Canvas courses. Join us for a one-hour session where we will cover how to create and share engaging instructional videos with Kaltura’s easy-to-use media tools and unlimited storage space.

Zoom meeting link


If you need accommodation for this virtual event, please contact CATL at CATL@uwgb.edu.