PlayPosit Introduction and Overview

A blue, white, and black logo with a Dachshund dog and the word "PlayPosit"

The PlayPosit logo; in written copy, PlayPosit is written with no spaces and both “p’s” capitalized.

What is PlayPosit? 

PlayPosit is a platform for building and viewing interactive video content. With PlayPosit, learners are invited to engage in interactions at various points throughout a video. These interactions can be simple or complex, and graded or ungraded. PlayPosit’s uses are broad and varied, but one thing they all have in common is that they can help increase the engagement and attentiveness of learners, particularly in asynchronous environments.

An interactive video built with PlayPosit is called a “bulb.” A bulb is made up of a video or series of videos and a set of timestamped interaction points. When building a bulb, you can import videos from YouTube, Kaltura (My Media), and Vimeo, and then arrange and trim the clips as necessary. After that step, you pick points on the timeline to add interactions—multiple choice questions, polls, reflective pause points, and more—and then determine other important settings, like whether the interactions will be worth points or whether students can attempt a bulb multiple times.

The first tab of the PlayPosit bulb video builder, "Video Source." The dropdown menu is set to "Kaltura" and underneath are the first two video listings from a Kaltura video gallery
When building a PlayPosit bulb, you can pull in videos right from your Kaltura (My Media) library, such as lectures recorded with Kaltura Capture.

When a viewer watches a PlayPosit bulb, the video clips play until the player reaches the first interaction point on the timeline. Though it depends on the bulb’s settings, generally video playback will pause at an interaction point and a menu will pop up, asking the viewer to answer a question, complete an activity, or engage with an external resource. After doing so, the viewer can click “continue” and then proceed with the video until the next interaction, and so on, until they reach the end of the PlayPosit bulb.

The PlayPosit video player; on the left is a menu bar, and on the bottom a playback bar. In the middle there is the video and a pop-up menu with a true or false question.
An example of what the PlayPosit player looks like from a learner’s perspective. In this scenario, the student submitted the incorrect answer to a true/false question presented at the end of the video. As in this example, you can add automatic feedback for a correct or incorrect answer when building a PlayPosit interaction.

PlayPosit Canvas Integration

PlayPosit at UWGB is integrated with Canvas, and instructors can build and assign bulbs directly within their Canvas courses. Instructors can add bulbs to their Canvas course as either graded or ungraded activities: 

  • Instructors can build and assign graded PlayPosit bulbs within Canvas assignments that sync with the Canvas gradebook. 
  • Instructors can build and add ungraded PlayPosit bulbs to their course by embedding a bulb in a page with the Rich Content Editor or adding a bulb as an external tool link in a module. 

Graded Bulbs 

Graded bulbs are bulbs that are tied to the Canvas gradebook. Graded bulbs can contain both automatically graded interaction types like multiple choice questions and manually graded interaction types like free response. To create a graded bulb, you will create a Canvas assignment and then select “PlayPosit” from the “External Tool” submission options. You can read more about how to create graded bulbs in this knowledgebase article.

The "submission type" dropdown menu and settings in a Canvas assignment
You will find PlayPosit as an option in the “External Tool” submission type in Canvas assignments.

For a graded PlayPosit assignment, a student’s score in the Canvas gradebook is calculated by applying the percentage of points earned out of points possible in the bulb to the total points the assignment is worth in Canvas. For example, let’s say you create a Canvas assignment worth ten points and link a PlayPosit blub within that assignment which contains two questions worth a point each. A student who answers one out of two questions correctly would earn 1 out of 2 possible points in the bulb (50%), which would translate to a score of 5 out of 10 (50%) in the Canvas gradebook. 

Ungraded Bulbs 

Ungraded bulbs are completely independent from the Canvas gradebook. While they can still have interactions that are worth points in PlayPosit, these points are not tied to any gradebook item in Canvas. For ungraded bulbs, points and grades are only there for the learner to check and assess their own understanding. If you wish to add an ungraded bulb to your course, you can either add it to a module as an item or embed it with the Rich Content Editor (the editor found in Canvas pages, discussions, etc.).

A Canvas module titled "PlayPosit Demo Jan 22" with an external link item underneath labelled "Stopping a Kaltura Classroom Stream Early"
One advantage of the PlayPosit Canvas integration is that learners can complete PlayPosit activities without going to an external site. For example, this PlayPosit bulb linked in a module will open in Canvas when a user clicks on it (unless the “Load in a New Tab” box was checked when adding the link).

Types of Interactions

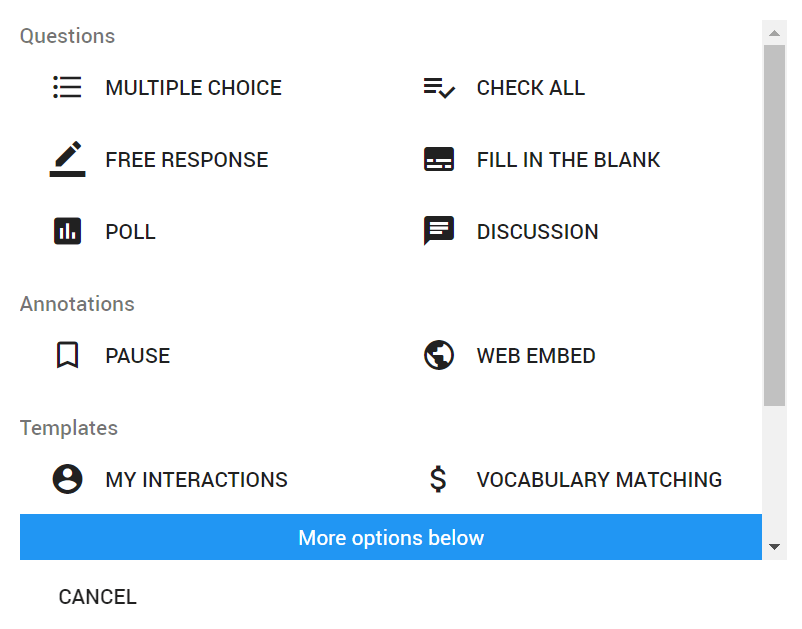
PlayPosit has eight main types of interactions. Each type of interaction is either auto-graded, manually graded, or ungraded by default. For graded interactions, keep in mind that the points only impact students’ grades in Canvas if the bulb is added to the course as a Canvas assignment. Below are the types of PlayPosit interactions. You can also read descriptions of the interaction types in this PlayPosit guide.

The menu for inserting an interaction in PlayPosit. Questions: multiple choice, check all, free response, fill in the blank, poll, discussion. Annotations: pause, web embed. Templates: my interactions, vocabulary matching. At the bottom is a button that says "more options below."
PlayPosit’s interaction menu also includes the option to use a template for building an interaction. Templates still use one of the eight interaction types but have pre-sets for common question styles. For example, the vocabulary matching template makes use of the “fill in the blank” interaction type.

Auto-Graded Interactions 

Auto-graded interactions are graded by PlayPosit. When you create one of the interactions below, you will be asked to provide the correct answer(s) for auto-grading. These interactions can also be set to “0 points” if you wish for them to not count toward a student’s score. 

  • Multiple choice 
  • Check all 
  • Fill in the blank 

Manually Graded Interactions 

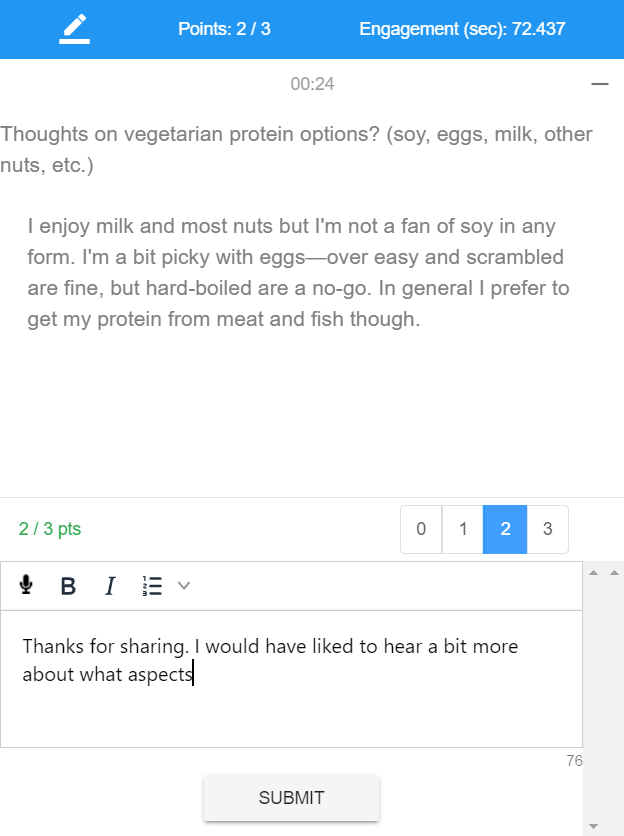
Manually graded interactions require the instructor to read students’ submissions and then assign a grade. These interactions can also be set to “0 points” if you wish for them to be ungraded. 

  • Free response 

Ungraded Interactions 

Ungraded interactions are not scored and therefore are set to “0 points.” You can assign points to these interactions if you choose, in which case PlayPosit will award full points for completing the interaction (clicking “continue” for a pause or web embed, or submitting a response for a poll or discussion). 

  • Pause 
  • Web embed 
  • Poll 
  • Discussion
The grading view in PlayPosit. At the top is the question and the student's response. Below that is a bar to select the number of points to award, and a text box for entering feedback. At the very bottom is a "Submit" button.
When reviewing a student’s PlayPosit submission, you can change the points they received for an interaction and in some cases, like free response interactions, leave feedback.

Questions? 

As you explore PlayPosit, we encourage you to consult PlayPosit’s extensive knowledgebase of instructor guides, including this guide for Canvas users. You can contact PlayPosit support directly by clicking the “Contact” link on their support site and filling out their web form. PlayPosit also offers live trainings, webinars, and office hours. If you are interested in any of these vendor-led training opportunities, contact dle@uwgb.edu to learn more. 

As always, we also welcome you to request a CATL consultation if you’d like to see a demo of PlayPosit or talk through how you might use it in your course. 


Event Follow-Up: Building Information Literacy and Racial Literacy Together

Below is the recording of the Presentation and Discussion with Christin DePouw “Building Information Literacy and Racial Literacy Together” from Thursday, Oct. 14, 2021. We’ve provided the video as a PlayPosit Bulb so that you can engage with questions from the workshop facilitator.

To view the bulb, type your first and last name, then click “Save.”

Here are the resources discussed during the workshop:

Event Follow-Up: Collecting and Working with Mid-semester Feedback

Below is the recording of the “Collecting and Working with Mid-semester Feedback Workshop” hosted on Monday, Oct. 11, 2021. We’ve provided the video as a PlayPosit Bulb so that you can engage with questions from the workshop facilitator.

To view the bulb, type your first and last name, then click “Save.”

Here are the resources discussed during the workshop:

We’d love to hear from you!

Let us know how you collect and work with mid-semester feedback. What strategies have you employed? What works? What do students like and what are some areas to avoid? Feel free to share sample prompts and success stories. Comment below or drop us a line at catl@uwbg.edu.

Using Zoom for Office Hours

Whether your course is held completely online, face-to-face, or somewhere in between, offering your students the opportunity to meet for office hours remotely rather than just in person is a great way to offer additional flexibility and help meet your students’ needs. With its robust Canvas integration, Zoom is a solid choice for virtual office hours. Using Zoom for office hours is mostly the same as setting up a meeting for a virtual class session, though there are a few additional options you may wish to consider. 

Enabling the Waiting Room 

For office hours, we highly suggest enabling the waiting room in your meeting settings. When the waiting room is enabled, it means that each attendee will have to be manually let into the Zoom meeting by you, the host. This gives you more control of who joins the call and when, and you can prevent a student from “popping in” and accidentally intruding on a private meeting. 

Security options for Zoom meetings
The waiting room is one of the options you can select in the “Security” section of your meeting settings. You can require both a passcode and the waiting room, if you desire.

Setting Up a Recurrence 

If you have office hours at the same time each day and each week, you can set up a recurring meeting just like you would for virtual sessions. Let’s say you have office hours from 11 a.m. to 1 p.m. on Tuesdays and Thursdays. You would set your recurrence to “weekly”, check Tuesday and Thursday, set the start time as 11 a.m., and set the duration to two hours. The start and end dates of the recurrence would be the first and last days of the semester. When you set up your office hours through the Zoom Canvas integration, this will also populate the Canvas calendar with these meeting times. 

"When", "duration" and "time zone" settings for Zoom meetings; the meeting is set to start at 11 a.m. for a duration of 2 hours. Recurrence is checked and set to "weekly", with Tuesdays and Thursdays checked. The end date is set to May 9, 2022.
Sample office hour recurrence settings based on the scenario described above.

But what if your office hours don’t occur during the same time slot each day, such as 8 to 10 a.m. on Mondays and 1 to 3 p.m. on Thursdays? You could set up two recurring meetings, one for Mondays and one for Thursdays. In this case, you will want to make sure your two meeting links are clearly labeled with the day of the week so students don’t mix them up. You could also set up a single recurring meeting and ignore the fact that the meeting time for one of the two days is incorrect—the link will still work outside of the designated time slot, but it does mean that it will also list the incorrect time on the Canvas calendar and in Zoom. 

In these cases, another solution is to create a recurring meeting with “no fixed time”, which can be set from the “recurrence” dropdown menu when adjusting your meeting’s settings. This will create an open-ended meeting link that won’t expire for 365 days. Note that “no fixed time” meetings will not show up on the calendar in Canvas, though you could still manually add your office hours to the Canvas calendar and your Outlook calendar. 

The "recurring meeting" box is check in the Zoom settings and the recurrence dropdown is set to "no fixed time"
Recurrence settings can be managed under the “Time Zone” section of your meeting settings in the Zoom Canvas integration.

Questions? 

For most technical questions, please contact Zoom support or the UWGB Help Desk. If your questions pertain to the Zoom Canvas integration, your best point of contact is dle@uwgb.edu. Lastly, if you have general questions about how you can use Zoom to support your teaching, we always welcome you to email the CATL inbox (catl@uwgb.edu) or schedule a consultation with a CATL member.

Using Zoom for Facilitating Small Group Activities

Small group activities are a key part of face-to-face learning, but they are also particularly useful in virtual classroom learning environments. Many active learning activities like think-pair-share and collaborative document annotation work well in Zoom using a feature called breakout rooms 

Breakout Rooms Overview 

The Breakout Rooms button on the Zoom controls toolbar
The Breakout Rooms button in the Zoom meeting toolbar. If you don’t see this button, click the three dots (…) on the right side of the toolbar and then select “Breakout Rooms” from the options.

Breakout rooms are used to split Zoom participants into smaller groups and place them in separate sessions where they can only hear and see their fellow group members until they return to the main room. During this time you could have students discuss a question, brainstorm solutions to a problem, or read an article with their small group. As the host, you can join and leave any of the breakout rooms as you please, which may be useful for checking how students are doing or clearing up any questions the group may have. 

Like any small group activity, breakout rooms work best when they have a clear purpose. Before you consider using breakout rooms in your virtual class sessions, consider the intention of the activity. Provide your students with clear instructions on what they are supposed to do during their breakout group time. It might be helpful to give students a concrete goal for their discussions as well. For example, you could have the groups nominate a notetaker to jot down important points from their conversation and then verbally summarize their group’s discussion when they return to the main room with the entire class.  

Creating Breakout Rooms 

Once you have decided on how you want to conduct your group activity, you can use that information to inform what settings you’d like to use for breakout rooms. First, you will want to learn about the basics of creating and managing Zoom breakout rooms. You have three main options for assigning students to breakout rooms:  

  • You can manually assign students to breakout rooms. 
  • You can automatically (randomly) assign students to breakout rooms based on the number of rooms you want (Zoom will show you how many participants per room in the bottom left corner of the pop-up window). 
  • You can let students choose which breakout room they want to join.  
"Create Breakout Rooms" pop-up menu
The pop-up window you see after clicking on the “Breakout Rooms” button, along with the three options for assigning participants.

Once you have selected which method you will use to assign students to their breakout rooms, you can click the blue “Create” button in the bottom-right corner of the pop-up window. This will set up your breakout rooms, but it will not start them yet. 

If you are using Zoom’s default settings for breakout rooms, you can click “Open All Rooms” to start the breakout rooms. Once you are ready for your students to return to the main room, simply click the red “Close All Rooms” button.  

Breakout Room Options and Features 

The breakout rooms "Options" pop-up menu
Clicking on the word “Options” in the breakout room menu will provide you more settings to customize your breakout rooms.

Zoom has a variety of features and options for breakout rooms. In this guide, we will include a few that are particularly useful for facilitating group activities. You can adjust breakout room settings before you open the rooms or even while the rooms are open.  

To open the breakout room options, click the word “Options” (or the gear icon on Mac) in the bottom-left corner of the breakout rooms menu. The first option, “Allow participants to choose room” will let students move between rooms, despite their original room assignment. The second setting, “allow participants to return to the main session at any time”, allows students to rejoin the main room where you, the host, will be unless you are visiting a breakout room. This could be useful if students need to “pop in” and ask you a question. If the third box is unchecked, students will be prompted to move to their assigned room once you open breakout rooms. If you would like students to be moved to breakout rooms automatically, you can check the third box. 

"Broadcast Message to All" pop-up text box
You can send all breakout rooms a message in chat with the “Broadcast Message to All” button.

Once your breakout rooms are open, it may be useful to provide your students with additional reminders or instructions. You can use the “Broadcast Message to All” button at the bottom of the breakout room menu to send a message to all groups, such as a warning on how much time they have left to discuss.  

You can also set a countdown timer from the breakout room settings. By default, when you close breakout rooms participants will see a 60-second countdown in which they will be prompted to move back to the main room. At the end of the minute, any remaining participants will be moved back to the main room automatically. You can adjust or eliminate this countdown from the breakout room settings as well. 

If you plan on using breakout rooms multiple times throughout a session, you can re-open the rooms at any time by clicking on the “Breakout Rooms” button in the toolbar and then the “Open All Rooms” button. This will put students back in the same breakout groups as before. If you wish to create new breakout groups (either of a different size or just to have students work with new peers), click the button that says “Recreate” instead. This will let you set the parameters for a new set of breakout rooms. 

Questions? 

For most technical questions, please contact Zoom support or the UWGB Help Desk. If your questions pertain to the Zoom Canvas integration, your best point of contact is dle@uwgb.edu. Lastly, if you have general questions about how you can use Zoom to support your teaching, we always welcome you to email the CATL inbox (catl@uwgb.edu) or schedule a consultation with a CATL memberThe best way to become familiar with breakout rooms is to practice, so grab a few fellow instructors and give it a go, or set up a consultation with CATL where we can act as your pretend students.