As you prepare for the upcoming semester, keep in mind that even if you’re teaching 100% in-person, some of your students may not be able to attend. We’ve provided information on several topics around assessment that we thought you may be interested in. Use the tabs below to toggle between topics.
Quick Links to Sections on this Page
Low vs. High Stake and Alternative Assessments
Traditional “Scantron” Exam format
How to make, modify, and edit quizzes in Canvas – Guide
If you plan on putting assessments online, apart from the technical steps required, there is a planning element as well. Will you do a few exams? Multiple smaller assessments? A mix of both? As you think about this, consider the items below.
- Regardless of the number of assessments you have, feedback for both correct and incorrect answers is the most beneficial to student learning
- Students learn more from doing information recall than just studying – a quiz can be more effective than just studying
- Students learn more through repeated assessment in comparison to one assessment
- Student long-term recall is lower when assessment immediately follows the presentation of information
Brame & BIel, 2015 Roediger & Butler
How does one apply these ideas?
Alternative Assessment
In alternative assessment, students are responsible for creating their own response to an assignment or examination. They can be useful in measuring student application of learning, as an alternative to traditional assessment, and in “one-off” student assessment situations. Alternative assessments can be used at any point in the class, or they can be used as a final assessment. There are many types of alternative assessments including essay responses, oral presentations, portfolios of compiled work, short answer questions and demonstrations of a concept/strategy.
Ten specific examples of alternative assessments, provided by Rutgers Center for Teaching and Learning with Technology (presentation), are below along with some options categorized by “bandwidth,” in this case referring to internet/computer bandwidth or impact.
| Alternative Assessment Examples |
+1 – Low Bandwidth |
+1 – High Bandwidth |
| Series of quizzes: offer a low-stakes opportunity for students to demonstrate mastery of material, and give you ongoing information about student understanding. Frequent quizzing has also been shown to reinforce student understanding. Canvas can randomize questions in quizzes, making cheating more difficult. |
Canvas Quizzes are probably the easiest way to incorporate resilient low-stakes assessments. If meeting in person and desirable, paper quizzes could be distributed. |
|
| Student-developed quiz questions: writing quiz questions both builds and demonstrates students’ understanding of the material. This assignment can be structured as a collaborative group activity. |
Make use of Canvas’s Group tool, allowing students a collaborative space and discussion area to work together. Other collaborative options include shared documents (Google Docs, etc.), or team-selected platforms. |
Group meetings using Microsoft Teams, Collaborate Ultra, or other synchronous meeting software. |
| Open-book, take-home assessments: many disciplines already have a tradition of take-home exams, typically involving more conceptual or applied questions that students cannot quickly look up in a textbook. |
Make use of the online submission option in Canvas “Assignments” to allow remote students an opportunity to submit their work digitally. |
|
| Professional presentations or demonstrations: students can create audiovisual presentations using a variety of media, PowerPoint, Prezi, and other tools. Example Rubric |
Students not able to present in person can do attach their presentations in file format to Assignments or Discussions in Canvas, or link to their cloud-hosted presentation (e.g. Prezi). |
Students could convert a PowerPoint with audio to a video and share that, record themselves presenting with Kaltura My Media, or do a live presentation in Collaborate Ultra or Teams.
|
| Annotated anthology or bibliography: this project gives students choice in selecting works while assessing their higher-order abilities to evaluate sources, compare multiple perspectives, and provide rationales for their choices. Example Rubric |
Student share their digital annotated bibliographies using Zotero, a shared document (e.g. Google Doc or Word Online), through Discussions, or as an Assignment. |
|
| Fact sheet: students create a one-page fact sheet on a topic. Students must select relevant facts and explain them clearly and concisely. Example Rubric |
Student share their fact sheets using a shared document (e.g. Google Doc or Word Online), through Discussions, or as an Assignment. |
|
| Peer– and self-review activity: these allow for personal reflection on learning and peer-to-peer instruction, both of which reinforce and deepen understanding. Students do need instruction in the task of providing constructive feedback. Targeted rubrics laying out expectations for student work are very helpful. Example Rubric |
Make use of Canvas’s Peer-grading features in Assignments and Discussions . Provide a Canvas-integrated rubric to your students to help in assessment. Encourage the use of the feedback capabilities.
Consider Assignments for self-reflection activities. |
Video recorded messages add a human touch to reflection and feedback. Canvas Assignments and Discussions allow students to leave “Media Comments” for their peers. VoiceThread is another option. |
| E-Portfolio: a student-selected portfolio of work from the semester. Students compile their best or representative work from the semester, writing a critical introduction to the portfolio and a brief introduction to each piece. Example Rubric |
Canvas has a built-in portfolio tool. Some departments may subscribe to their own, as well.
Student documentation
Canvas overview |
Incorporating elements of digital storytelling can add a personal touch to portfolios. |
| Non-Traditional Paper or Project: creative assignments work best when they have some “real-world” relevance and offer students some choice in delivery format. |
Examples: students submitting their op-ed piece on a topic, writing a memo or briefing to Assignments. |
Examples: students hosting a “webinar” for the class, create a brief documentary or podcast, create a “news report” in VoiceThread or Discussions. |
| Group Project: group projects require students to demonstrate mastery of subject matter and develop their ability to communicate and work collaboratively. It is crucial to make your assessment criteria and grading scheme clear, and to ensure that there are clear, explicit expectations for each team member. Assessment, Example Rubric |
Some collaboration tools include Canvas Groups (including group workspaces and discussions), shared documents for collaboration (Word Online, Google Docs), Slack, MS Teams |
High bandwidth tools might include synchronous meetings (Teams, Collaborate Ultra), asynchronous video or audio messages with VoiceThread |
Recognizing Disruptions
Recognizing Disruption
There’s a natural inclination to expect students to be able to participate in class, regardless of the “modality” or method in which students engage with the course. When teaching and learning in an online environment in previous years, this meant having a reliable internet connection, access to a computer, and the ability to install and run whatever software was required for the class. With the flexibility required during COVID-19, this is no longer a safe assumption.
Although the Spring semester, and the quick-pivot to online instruction, is behind us, COVID-19 is still with us and so are alternative attendance scenarios. There are some steps you can take before your course begins to be better situated to accommodate disrupted students.
- Consider having your “online core” learning resources, activities, and assessments in place. This way you’ll be prepared when a student cannot attend in the expected learning environment, and they won’t feel internal pressure to attend when it’s difficult or they are unable to.
- Take advantage of the flexibility within Canvas when possible. This could mean not having “end dates” on assignments that normally would have a deadline. By not having an “end date,” it allows students to hand in work later without needing special accommodations. Including a “due date” will still put the assignment on their calendars and to-do lists. Another example would be for group work in Canvas. You could create groups for students that plan on attending in-person and those that do not, and allow them to self-enroll in those groups instead of you assigning them. More specific examples and help implementing them are listed below.
- Familiarize yourself with support resources available to your students if you’re not already aware of them. Many instructors are familiar with the tutoring help The Learning Center provides, but some are not aware that The Learning Center provides access to e-tutoring through a partnership with Brainfuse. If you’re unfamiliar with the Incomplete grades process, you may also want to familiarize yourself with its requirements and process. There’s a bureaucratic element, described in the Catalog.There is also a separate technical element required in Canvas. To grant extended access to a student or your entire class in Canvas, see the links below.
How can we accommodate students, and what other resources are available? Consider the following table.
Exam Security Concerns
Exam Security Concerns
The following document was created by the Canvas Community to help instructors better understand quiz settings and how they can be used to enhance quiz security. In many cases locking down a quiz as much as possible (ex: not allowing students to review what they got wrong on a quiz) can hinder student learning, so be sure to think through the positives, negatives, and the goals of the quiz before securing it. There is no way (in class or online) to guarantee that students aren’t cheating, but to maximize quiz security there are various ways you can apply your quiz settings and availability.
Below are is a list of quiz settings and information on how they can be used to maximize your quiz security. For more information on this topic see the following webinar – Feel Secure about Your Relationship with Quizzes
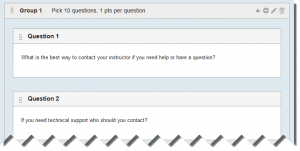
Question Groups – Create question groups to randomize quiz questions. The larger the number of questions in the question group (compared to the number randomly being picked for the quiz) the more secure the quiz. If there are a limited number of quiz questions and all of them are needed for the quiz then question groups can still be used to randomize the order of the questions. By using question groups it is unlikely that students will get the same questions or the same questions in the same order.
Shuffle Answers – This is a checkbox option under quiz settings and will randomize the order of the question’s answer choices. By using “shuffle answers” students may get the same quiz question(s), but their answer options probably won’t be in the same order. **If your quiz question has an answer like “all of the above/below” or “answer A & C” do not use the “shuffle answer” setting.**
Time limit – This is a checkbox option under quiz settings and limits the amount of time students have to take a quiz. When deciding on a time limit try to estimate the average time a student should need to answer each question – taking into account different types of quiz questions. If quizzes are given in a non-proctored environment the time limit can be used to cut down on the amount of time students have to look up question answers and/or share the questions with other students. If a student needs extended test time this can be added per individual student under the Moderate Quiz settings.

Allow Multiple Attempts – This is a checkbox setting that allows students to have multiple attempts to take a quiz. From the multiple attempts Instructors can decide which quiz score to keep: Highest, Latest, or Average. If the number of allowed attempts is left blank, then students will have unlimited attempts that would only be stopped by the “Until” date/time. In general unless there is a large question bank of questions and/or your goal is mastery of the content, multiple quiz attempts does not create a secure quiz environment.

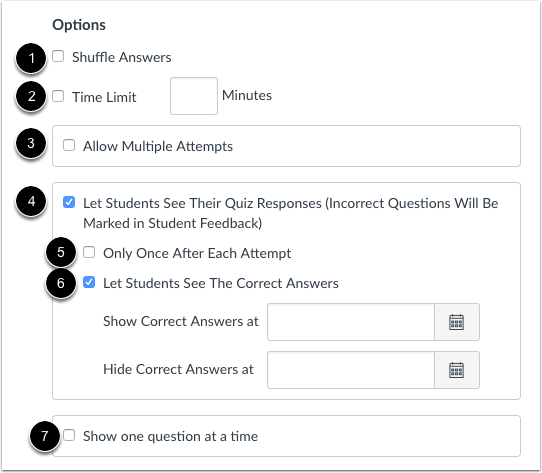
Let Students See Their Quiz Responses – This is a checkbox option under quiz settings and after a student submits a quiz allows them to see (1) the quiz questions & answer options, (2) the answer options the student selected, (3) if they got a question incorrect or partially incorrect, and (4) ALL question feedback. This information will be shown regardless of the due & until dates and even if the correct answers are NOT made available (via the “Let Students see the Correct Answers” setting). For enhanced quiz security leave this box unchecked altogether or leave it unchecked until after the “Due’ and ‘Until’ date(s).
The following options only appear if the “Let Students See Their Quiz Responses” box checked:
Only After Their Last Attempt – This checkbox option only shows up if the quiz is set to allow multiple attempts with a specific number of attempts; this option does not show up if there are unlimited attempts. If this box is checked students will NOT be able to see any quiz results other than the score they got on each quiz attempt until they take the quiz for the last time (as designated by the number of allowed attempts). After they take the quiz for the last time the student will then be able to see (1) the quiz questions & answer options, (2) the answer options the student selected, (3) if they got a question incorrect or partially incorrect, and (4) ALL question feedback. If you are using multiple attempts, this is the best setting to use to keep the quiz secure. Yet, this information can’t be controlled by a date/time, so a student could use all their attempts, get the question information, and then share the information before the due/until date(s).
Only Once After Each Attempt – This checkbox option allows students to see (1) the quiz questions & answer options, (2) the answer options the student selected, (3) if they got a question incorrect or partially incorrect, and (4) ALL question feedback, but only ONCE after they have submitted a quiz. In a proctored environment this is a useful setting because students will get to see feedback from the quiz, but it is only visible immediately after submitting the quiz. If the student goes back to the quiz they will see their score for the quiz, but none of the other quiz information (1-4 above) will be visible.
Let Students see the Correct Answers – This checkbox option allows students to see the correct answers to quiz questions. If this box is checked students will have access to (1) the quiz questions & answer options, (2) the answer options the student selected, (3) which answer option was correct, and (4) all question feedback. For enhanced quiz security the best option is to leave this box unchecked (along with the “Let Students See their Quiz Responses” option) until after the “Due” and “Until” dates and then also limit how long the students can view the correct answers.
Only After Their Last Attempt – this checkbox option under “Let Students see the Correct Answers” only shows up if the quiz is set to allow multiple attempts with a specific number of attempts; this option does not show up if there are unlimited attempts. If this box is checked students will NOT be able to see which answer options were correct until after their last attempt (as designated by the number of allowed attempts). After they take the quiz for the last time the student will be able to access (1) the quiz questions & answer options, (2) the answer options the student selected, (3) which answer option was correct, and (4) all question feedback for as long as designated. For enhanced quiz security the best option is to leave this box unchecked (along with the “Let Students See their Quiz Responses” option) until after the “Due” and “Until” dates and then also limit how long the students can view the correct answers. Note: This setting also overrides the “Show Correct Answers at” date. If you want correct answers to be released or hidden on a certain date/time or do NOT check this box.
Show/Hide Correct Answers at – this option allows students to see the correct answers to quiz questions starting at the designated “show” time and hidden again at the designated “hide” time. The show and hide options can be used independently of each other or together to create a window of when correct answers are visible to students. If one or both dates are provided students will have access to (1) the quiz questions & answer options, (2) the answer options the student selected, (3) which answer option was correct, and (4) all question feedback – during the time frame designated by the show/hide dates/times. For enhanced quiz security the best option is not use this until after the “Due” and “Until” dates and then also limit how long the students can view the correct answers. Note: If you want to use the show/hide correct answers option then do NOT check the “only after their last attempt” box directly above it, it will override your date settings and make quiz answers visible to students after their last attempt.
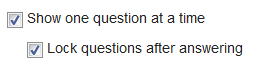
Show One Question At a Time – This is a checkbox option under quiz settings and allows students to only see one quiz question at a time. It is recommended to use this feature in conjunction with the “Lock Questions after Answering” option. Used together, it requires the student to answer each individual question before moving on and prevents students from going back and changing their answer. **Students do NOT like getting one question at a time and especially if they are prevented from going back and changing their answers, so make sure you really want to use this option before implementing.**
Require an access code – This is a checkbox option under quiz settings and prevents students from taking the quiz without the correct code. This feature can be used to make sure students are taking the quiz at a specific time or in a certain location; this works especially well for students who need to take a test in the Testing Center or with a proctor. This setting can also be used if students have started taking an untimed quiz in class (or a proctored environment) and don’t finish it in one class period and need to come back to class to finish it. The Instructor can add (or change) the access code after the quiz has started and it will completely lock the students out of the quiz until the student enters in the new access code.

Filter IP Addresses – This is a checkbox option under quiz settings that can be used to make sure students are taking the quiz in a specific location. This works especially well for students who need to take a quiz in the Testing Center or with a proctor in a secure environment. **To use this option you will need to talk to your Canvas Admins so they can coordinate things.**
Quiz Availability
In general to maximize quiz security it is best to have a quiz open the least amount of time as possible. Below is information on the quiz availability options and how they can be used to enhance quiz security.

Assign to – In courses with multiple sections this feature allows instructors to designate the availability settings by course section or individual student(s). In general, unless you have students in different sections taking the quiz at different days/times, this would be left as “Everyone” (which is the default). This feature can’t be used with students who need testing accommodations or who are in different groups. For students who need different availability than the rest of the class it is recommended to manually unlock the quiz using the Moderate Quiz settings in conjunction with an Access Code.
Due – This is the day and time that the quiz is due. This does not stop students from taking a quiz, but quizzes submitted after the Due date will be marked as late in Speedgrader and in the Gradebook. Recommended practices for quiz security are to not allow students to take a quiz after the Due date; this can be done by making the Due date and Until date the same. If students are allowed to take quizzes after the “Due” date, then leave the “Until” date blank or set to the furthest day/time late submissions are allowed.
Available From – This is the day and time the quiz becomes available to students. Students will not be able to access the quiz before this day and time unless the quiz has been manually unlocked; manually unlocked is available under the Moderate Quiz settings. In general if a student or students are taking the quiz early the time will need to be set to when the first group of students is taking the quiz. This is also when it’s a good idea to use the “Require an Access Code” option to keep the rest of the students out of the quiz until they should have access to it. **If a quiz is not published (has a gray cloud instead of green) then students WILL NOT be able to access or even see the quiz, even after the “Available From” date.**
Until – This is the day/time that the students will no longer be able to take the quiz. If the Until day/time is set beyond the “Due” date” students will still be able to take the quiz until the “Until” date, but it will show up as “late” in SpeedGrader and the gradebook. If a student is in taking a quiz Canvas will auto-submit the quiz at the “Until” date/time regardless of whether the student is in taking the quiz or not. If there is no “Until” date set then the quiz will not auto-submit until the end of the course. For enhanced security instructors should set the “Until” date to be the same as the “Due” date because it prevents students from taking the quiz after it is due. Yet, this can also cut students off in the middle of taking the quiz because the “Until” date will automatically submit the quiz.
Important Message: Quiz availability (dates/times) have NOTHING to do with whether a student can view their quiz results. The ONLY way to stop students from viewing their quiz results is to have the “Let Students See their Quiz Responses” and “Show which answers were correct” boxes UNCHECKED. If you want students to initially see their quiz results, these boxes can be checked and set to close once you no longer want students to view the quiz results.
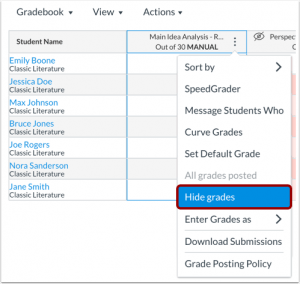
Preventing Students from Viewing Quiz Scores
The only way to prevent students from viewing their quiz score at the end of a quiz is to hide the quiz scores before the students take the quiz. Please note though, hiding an assignment will override your other quiz settings related to quiz feedback. Here’s where you can hide grades for a quiz or set up a grades posting policy.
Students will not see any quiz feedback including their responses to questions or the correct answers. Instead students will only get this message (see image below).

Once the quiz is hidden, students will be able to see/access quiz feedback based on the the quiz settings.
For more information on how to mute or unmute quizzes see the following guides – How do I mute or unmute an assignment in SpeedGrader? & How do I mute or unmute an assignment in the Gradebook?


