Research has long supported the effectiveness of active learning strategies. What is active learning? It is an umbrella term used to describe classroom techniques in which students must participate in a tangible way in their own learning, as opposed to passively attending to a lecture or other presented material. Sometimes it involves groups of students working together (e.g., think, pair, share); in other cases they work individually to engage with the material (e.g., minute papers).
Overwhelming Evidence Supports Active Learning in the Classroom
You may be very familiar with the idea of active learning, but perhaps you are less well-acquainted with the research that supports its use. As recently noted by Davidson and Katopodis (2022) in Inside Higher Ed, according to “an often-referenced meta-study of more than 225 separate studies, active learning is more effective for every kind of student, in every discipline, than the traditional lecture model or the question-and-answer guided discussion method” (para. 1). Want to review some of the evidence yourself? Freeman et al. (2014) published the meta-analysis just referenced. More recently, Dewsbury and colleagues (2022) reported that active and inclusive learning techniques improved grades and reduced equity gaps in introductory biology courses, supporting previous findings by Theobold, Hill, Tran, and Freeman (2020) with STEM majors. Finally, Deslauriers et al. (2019) offered this interesting study that tackled resistance to active learning. They discovered that students in their research objectively learned more with active strategies but perceived that they learned less. Thus, instructors may wish to explain why they use these teaching approaches and what evidence tells us about the benefits for students.
Practical Implementation of Active Learning across Classes and Disciplines
As with any teaching approach, gradual implementation at a pace comfortable to the instructor and students is often wise. There are dozens and dozens of active learning strategies you can try, so there are opportunities to use these across disciplines and whether your classes are large or small, introductory level or advanced. Using active learning also does not mean abandoning lecture – in fact, it can be interspersed between shorter stretches of lecture that fit better with our typical attention span (e.g., about 10 minutes). What follows are links to practical resources to get you started.
A lot of students shudder at the thought of group assignments, and with good reason. A poorly-designed group assignment can be painful for the students involved and for the instructor. That being said, well-designed and properly scaffolded group activities have numerous positive effects on student learning. In a quality collaborative learning activity, students develop a deeper student understanding of course content as they learn from and teach their peers. Additionally, these activities can foster a sense of community between students and make academic dishonesty much less likely, as the group setting adds a built-in network of accountability. In terms of academic rigor, group assignments don’t necessarily need to be easier than individual exercises, but students shouldn’t be unequally yoked when they work collaboratively. One way to circumvent this issue is to have teams develop a group charter, like this example group charter (Word document)created by Kate Farley (UWGB) in which students decide on their roles and commitments before beginning a project.
Provide purpose. Make sure students know why they are doing the project and why it’s important that they work in groups.
Provide support. Make sure students have the tools they need (technological and otherwise) to complete the project.
Set ground rules with clearly defined milestones and timelines. If you allow students to create the ground rules and milestones for their own group, they are more likely to take ownership of the project and ensure the schedule is doable for them.
Provide opportunities for peer and self-evaluation: Evaluation and reflection helps students effectively hold themselves and each other accountable for the results of their collaboration.
If you’re familiar with the concept these features might sound an awful lot like the teaching with transparency framework. If that concept is unfamiliar to you, you can learn more about it here.
Many instructors and educational developers have begun giving new consideration to specifications grading, contract grading and/or labor-based grading and how they may help support more equitable assessments and grading policies. One potential benefit to these approaches is that it allows instructors to maintain a series of low-stakes assessments without overburdening students with criteria-heavy weekly assignments that can feel like “busy-work.”
In Specs- and labor-based grading, you can retain well-aligned formative assessments and activities, but alleviate some of the anxiety that these may provoke amongst students (e.g., their focus is on the outcome versus their grade)—particularly if you provide students some choice in which assessments students may complete or revise.
In his book on contract grading, Asao B. Inoue argues that labor-based grading contracts support anti-racist and social justice-oriented assessment that enhance equity in the writing classroom. Other scholars have made similar arguments about contract-based and specifications grading, all of which provide more agency to students and remove the emphasis on “grading” and “grades.” Though there are some differences between these approaches, we encourage you to worry less about those, and focus more on whether there are elements to these approaches to grading that may work well for your class. Here are some of the core elements of “ungrading” that you may wish to consider:
Assignments and activities are all graded as satisfactory/unsatisfactory (or acceptable/not yet, etc.).
Instructors provide very transparent about what constitutes acceptable work for each assignment. In labor-based grading systems, effort is central; for specifications grading, instructors often use standards that align with work that might garner a “B” in traditional schemas.
Students are allowed to revise unacceptable work at least once.
Students have some agency or choice in the assessments/assignments they complete for the course or even for each unit/module. “Bundles” of assessments and/or grading contracts are still linked to learning outcomes.
If you’re intrigued by the possibilities offered by these approaches to grading, consider reading a bit more about each before you make a decision. Check out this presentation from UNC Wilmington’s CTE for a brief overview of these alternative grading formats.
If you are considering contract-based grading, expand the box for “Grading/Learning Course Contracts Questions” below for some sample contract grading language. This blog post is worth a look, too. A quick Google search will yield a number of grading contracts made and shared from instructors elsewhere; here is just one example you may consider adapting.
What course is the contract for? Are the decisions appropriate for that context, audience, purpose?
How might teacher identity and identities of students impact contract grading?
What assignments, behaviors, and/or labor requirements are included in the tiers?
Thinking in terms of importance (essential vs optional), do you agree with placement on those tiers?
Build up? (C start) or Begin high? (A start) What are the benefits of each?
Is this contract negotiated with students?
Is peer review and self-assessment discussed?
How does the instructor present/ explain this to students, if at all?
Does this contract appear to be embedded into the culture and/or assignments of the course? In what ways does this respond to a larger teaching philosophy?
Is “rigor” addressed? If so, how?
Is student labor on assignments accounted for? (see Asao Inoue)
What are the choices in length, tone, language, naming?
What design choices did the teacher make? (for example, is the contract part of the syllabus)
What degree of flexibility do you perceive, and are “violations/ negotiations/ surprises” addressed?
How does/doesn’t this contract address the needs of traditionally high-achieving and low-achieving students according to your perception?
How might the contract potentially further the working relationship with students? Students relationships to one another?
How does the contract make you feel?
Questions for Composing
What are the goals and outcomes of the course?
How might I/ we account for teacher and student identity?
What assignments, behaviors, and/or labor requirements actually help students learn and how are those incorporated into the class? [defamiliarize learning]
Which of those are absolutely essential and what could be optional? [for making tiers or designing optional projects]
Build up? (C start) or Begin high? (A start)
Am I ready to negotiate this contract with students?
How might I incorporate peer and self-assessment (process steps)?
How do I plan to present/ explain this to students (and colleagues, and admin)?
How do I plan to embed this in our classroom/ program culture? In what ways does this respond to a larger philosophy?
How do I talk about “rigor”—do I even include that in my rationale?
Do I account for student labor and if so then how? (see Asao Inoue)
What should I do in terms of length, tone, language for the syllabus/ contract?
What design choices did the teacher make? (for example, is the contract part of the syllabus)
What degree of flexibility should I offer, and should I discuss violations, incorporate negotiations?
How does/doesn’t this contract address the needs of all students?
How does the contract potentially further my working relationship with students? Students relationships to one another?
How do I hope students feel after reading?
Don’t Let the Canvas Gradebook Stop You
As you contemplate each of these approaches, CATL can help you deal with navigating the Gradebook so that doesn’t hold you or your students back should you wish to use a form of labor-based, specs, or contract grading.
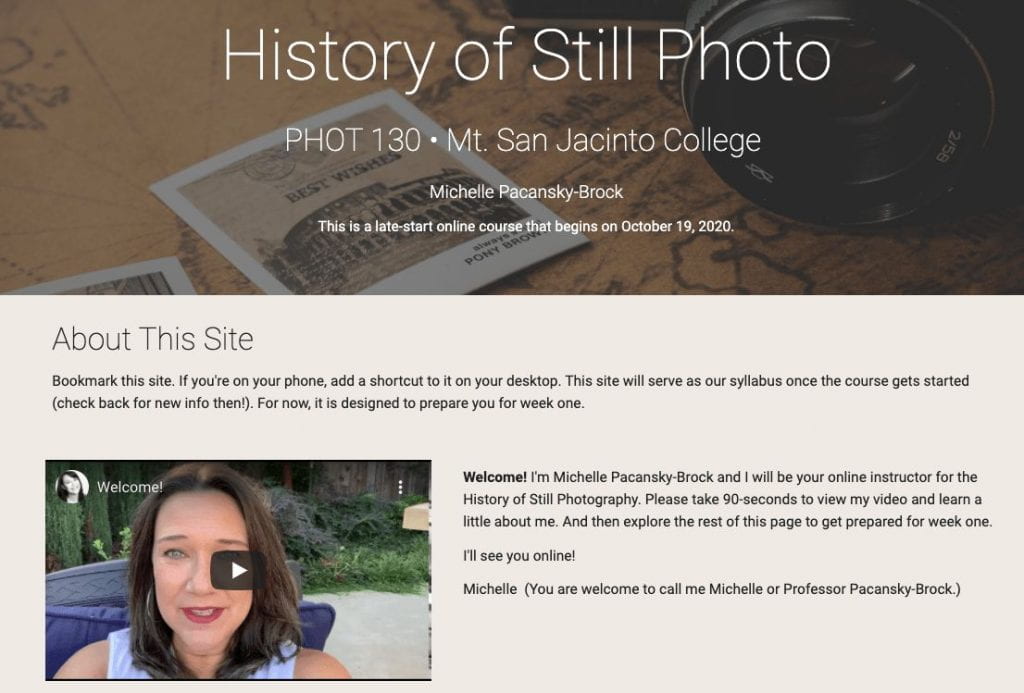
At times, the syllabus can feel like a relic from a different age of academia: a formal, lengthy document that reads like a legal contract and lacks personality. In an attempt to make syllabi more engaging and student-friendly, some instructors have come up with clever ways of reimagining their syllabi. One example of this is the liquid syllabus.
What is a liquid syllabus?
Michelle Pacansky-Brock’s liquid syllabus from her Fall 2020 photography class.
As a part of her effort to humanize her teaching methods, Michelle Pacanksy-Brock—author, instructor, and faculty mentor for California Community Colleges—decided to redo her syllabi. She saw her syllabi as an opportunity to set the stage for an inclusive and positive learning environment, both in terms of language and format. Applying these concepts, she developed a new online syllabus for her photography class using Google Sites. Pacansky-Brock has branded this style of syllabus as a “liquid syllabus”, in which the word “liquid” refers to the fact that these syllabi are easy to access online and interact with, even on mobile devices.
As defined by Pacansky-Brock, a liquid syllabus is usually:
Public (accessible online without needing to log into a university account and often available to students before class starts)
Mobile-friendly (resizes responsively based on a user’s device)
Engaging (includes an instructor video and possibly other forms of media)
Visually pleasing (clearly organized with stylistic touches)
The purpose of a liquid syllabus is to serve as a welcoming and encouraging introductory resource for students, while still fulfilling the requirements of a traditional syllabus.
Is creating a liquid syllabus worth the time and effort?
A liquid syllabus is no doubt a bit of extra work, but the research seems to support that creating a liquid syllabus is a great investment in terms of equitable teaching. Here are a few features of a liquid syllabus that you might consider implementing in your own syllabi.
Close equity gaps among your students.
A student checking her smartphone as she walks around campus.
By building your syllabus with a mobile-friendly, web-based tool, you are increasing access for your students. It’s no secret that students in higher education are more likely to have access to a smartphone than a personal computer. A mobile-friendly syllabus is easy to interact with on a smaller screen because it resizes automatically, unlike a PDF or Word doc, which are difficult to read on mobile devices due to sizing constraints.
Liquid syllabi also put a heavy emphasis on inclusive language. When writing a syllabus, it is best to avoid making assumptions about your students’ background knowledge. Transfer students, non-traditional students, international students, and first-generation college students may not be familiar with institution-specific terminology or higher education lingo in general. Try to avoid using abbreviations for your content area, your department, buildings on campus, etc., unless they are clearly defined in the syllabus. Also consider providing some student-centered contextual language before syllabus resources and policies.
As you rework your syllabus, think about ways you can make your language more encouraging. When it comes to classroom expectations, you might reframe your statements to focus on what students should do for success, rather than what they shouldn’t (e.g., instead of saying “academic dishonesty will be punished”, you could say “I encourage academic integrity”). By turning commands into invitations, the overall tone of your syllabus shifts from contractual to welcoming.
Welcoming Language: Examples of Commands vs. Invitations
Commands
Invitations
“You must complete makeup work to receive credit.”
“Feel free to complete makeup work to earn credit.”
“You are allowed to…”
“You are welcome to…”
“I only accept…”
“I encourage you to…”
“Late work receives a 40% reduction.”
“Late work is eligible for up to 60% of original points.”
Show students who you are.
An example of an instructor welcome video that has been captioned and embedded with a transcript player on the Syllabus page.
Most liquid syllabi also include an introductory video made by the instructor. In an online environment, instructor presence is particularly crucial for student feelings of connectedness, and a welcome video can be a great way to help meet that need. Cheer on your students and let them know that you are there to help them succeed. You can also use this as an opportunity for your students to get to know you a little bit—for example, you could introduce your pet on camera or briefly share about one of your hobbies.
Visual impact makes a difference too. In another study, students expressed more interest in taking a course when the syllabus was graphic-rich as opposed to purely textual. A syllabus doesn’t have to look cold and boring—it can be colorful, welcoming, and even playful, so get creative with your design. After you’re done, check things over to make sure your syllabus still meets accessibility guidelines. Add alt text to your images and captions to your videos as needed.
How can I create a liquid syllabus?
There are a variety of tools you can harness to develop a liquid syllabus. Like Pacansky-Brock, you could use a free website builder like Google Sites to get started. Or, if you feel comfortable using WordPress, you could also build your own site with UWGB domains. You can even use the Syllabus page right in Canvas. If you’d like to try making a liquid syllabus but aren’t quite sure where to start, CATL has developed a template in Canvas which you can have imported into a course by emailing CATL your course URL(s). No matter which tool you choose, keep in mind accessibility and ease of access for students.
Do you have other ideas or suggestions for how to reinvent the syllabus? Share with us how you are transforming your syllabi by dropping a comment below or sending us an email at catl@uwgb.edu! We’d love to hear from you.
We’ve all been there: someone told you to finish that thing, and you remember seeing the file somewhere a few weeks ago, but you just can’t remember where you saved it. Or when it’s due. Or maybe even what it was called. Maybe it was this file titled “download_040521”? No wait… maybe download_064053?
Now imagine yourself in that same situation, but you’re a student. Between unclear file names, multiple methods of communication, and so many places information can be posted, it can be frustrating to keep track of all the details in an online class. That’s where organization and consistency in how you use Canvas can save your students a lot of headache and you from the burden of answering a dozen emails a day from confused students. In fact, in a recent survey conducted by UW-La Crosse, students cited clear organization in Canvas as one of the most important things their instructors did that helped them during their Fall 2020 classes. Read on for some suggestions on getting more organized in Canvas so you can help your students be more successful in your classes.
Organizing Course Content
When teaching online, an important consideration is how to arrange and present your content. For maximum clarity and visibility, we recommend organizing your content in modules on the home page. Students are generally used to working through online content sequentially, so arranging modules chronologically with the first week/unit at the top is ideal. You could also arrange your course’s modules in reverse chronological order, publishing the most recent one at the start of each unit/week, so the current module is always at the top of the page. If arranging your content chronologically doesn’t seem like a good fit for your class, you could also try grouping content in modules by project instead.
Modules can be rearranged by clicking and dragging the stacked dots in the top left corner.
Once you have decided how you would like to set up your modules, consider the order in which the content within the modules appears. The first item in a module is nearly always a page. This page should provide students with the context they need to successfully read/watch the necessary materials and complete the necessary activities for the week or unit. You can also use this page to provide an introductory paragraph with other necessary contextual information, as well as the learning objectives or goals for the unit/week. Depending on the depth of the material, you may also consider breaking this information down into multiple pages.
For example, your overview page in each module might include:
Introduction
Briefly introduce the materials and concepts covered in the module.
Provide any necessary background information students may need to know before engaging with the "meat" of the content.
Make sure all readings are accessible—PDF scans of physical textbooks, for example, are not usually readable by e-readers unless they have been OCR-scanned.
A quick way to check: can you copy and paste the text?
Try to break down lectures into shorter, more digestible videos. Studies have shown that 6—9 minutes may be the sweet spot, and a conversational tone is equally important (Brame, 2016).
After the overview page, add any relevant Canvas activities to the module, such as discussions, assignments, and quizzes, all with appropriate, descriptive and consistent names. If you are using a weekly or unit-based module system, only add the activities that will be due that week/unit. In general, all Canvas assignments, discussions, and quizzes should also have due dates assigned to them in Canvas, as this will add the item to students’ to-do list and calendar in Canvas. These due dates, combined with adding those activities to the appropriate module, will let students see at a glance what is due by the end of the week or unit.Keep the content in the modules simple and high-level in terms of information—save the specifics for the assignment, discussion, or quiz details.
Linking Related Materials
It may be tempting to link all your readings, resources or other materials for a unit in the modules on the home page, but the more content students see in the module, the more overwhelmed they will feel. Instead, it is a good idea to keep materials related to each project, assignment, or other activity in the activity description itself.
With Canvas’s Rich Content Editor, which is what you use to edit the descriptions of assignments, quizzes, and discussions,you canadd links to files (documents that you have uploaded to the files area), content within Canvas (published pages, discussions, assignments, etc.) and external URLs (online articles or other websites that have content or activities you would like students to engage with). You can also embed videos that you have created (Kaltura/My Media videos) or videos from other sources that support embed codes (YouTube, Vimeo, etc.). Use this to your advantage by linking all relevant materials needed for completing an activity in the description for said activity. After you’re finished, it’s a good idea to check over the links in your course with Canvas’s link validator tool to make sure you don’t have any broken links.
Demonstration of how to link a file with the Rich Content Editor.
It’s not enough to just add links, however. Any materials that you would like students to engage with also require clear, concise instructions for what you would like students to do with the content that you’ve linked.
Here are some questions to consider when you are adding materials to your assignments, discussions, and other areas of Canvas:
What is the material?
Use the exact name of the article or video, or a clear, concise description for the inline text when you create a link.
What would you like students to do with the material, and to what degree?
For an article, for example, is your intention for students to skim it? Do a close read? Annotate it? Take detailed notes?
How much of the material is relevant to the activity?
Include page numbers for readings and timestamps for videos, when applicable.
This information also allows students to better gauge the amount of time they will need to complete an activity.
How does this material relate to the objective of the activity?
Provide instructions on how you would like students to apply what they have learned/accomplished from the linked material to the activity.
Decide if you want students' use of the material to be open-ended or specific (e.g. for a discussion, do you want students to submit a free-form reflection on the reading, or answer specific discussion questions?).
Consistency is Key
However you decide to organize your course, it’s important to keep things as consistent as possible from week to week or unit to unit. This includes:
File naming conventions
Assignment/discussion/quiz naming conventions
Layouts on pages
Layouts in modules
When, where, and how students can find the instructions for an assignment/discussion/quiz
When, where, and how students are to submit an assignment/discussion post/quiz
You’ll find that students will become quickly habituated to doing things a certain way, so if you change up, for example, the location in which students can find the weekly PowerPoint slides, it will likely disrupt students’ learning and cause unnecessary confusion and frustration. Studies have shown that consistency in course design is one of the keys to student success in an online environment (Swan, et al, 2000).
Other Ideas
Have you found other creative and effective ways to organize your course content in Canvas? Let us know by dropping a comment below! Or perhaps there’s something you read about here that you’d like some help implementing in your own course—consider emailing us at catl@uwgb.edu or filling out our consultation request form to chat with a CATL member.
The content of this post has been adapted from CATL’s Pandemic to Online Teaching course from January 2020.