Turnitin: Beyond Plagiarism Review

A feature highlight for Canvas this week is Turnitin. Although most instructors may be familiar with this tool as a plagiarism checker, it has additional impactful uses within the classroom. While checking for plagiarism is important to ensure academic integrity in student work, Turnitin can also function as a powerful feedback tool and as a self-assessment tool.  

According to several studies, feedback helps to further develop a learner’s cognitive abilities. Wisniewski, Zierer, and Hattie (2020) discuss how various forms of feedback have become a focus in teaching and the practice of teaching in recent years. The most impactful forms of feedback are task- and process-oriented feedback or formative feedback. Both provide students with information not only on how well they’ve met specific goals of an assignment or assessment, but also on how to improve their strategies for achieving those goals in the future.  

While feedback may not have a large impact on behavioral outcomes for learners, self-assessment and reflection activities do. Combining both feedback and self-assessment activities within an ongoing assignment opens up communication pathways within the classroom and may also help increase motivation in the learning environment. Feedback and self-assessment can also turn mistakes and errors into teaching moments for synchronous and asynchronous classes. As Terada (2020) points out both within and outside of the classroom, making and learning from errors is an integral part of the learning process. And Turnitin is one tool which can help provide those teaching moments. While we are familiar with the similarity reports produced by Turnitin, and often have used these reports for plagiarism review, studies show that Turnitin similarity reports can also be used for self-assessment. Chew, Ding, and Rowell (2013) in particular focus on how the similarity reports generated by Turnitin can be used by students to review and assess drafts of their own work or their peers’ work. With its integration in Canvas, Turnitin can be used both synchronously and asynchronously for all course modalities.  

Within the UWGB Canvas instance, Turnitin is paired with the Assignment feature and can be used in conjunction with peer review so that students can receive both a similarity report for self-assessment as well as receive formative feedback from both their peers and instructors. The Canvas SpeedGrader works with Turnitin to allow for suggestions, edits, and general comments to be provided in written, audio, or video format. For best results, a Turnitin Assignments can be paired with a Rubric, allowing students to both see the criteria for the assignment and review their drafts and feedback based on how well they met those criteria. Best practice would be to incorporate course outcomes within the rubric. This will provide transparency between instructor and students in setting and achieving overall course goals as well as expectations of the student.

To build out a Turnitin Assignment in Canvas, follow these directions.

  1. First, in your course site, navigate to the Assignments tab in the course navigation menu on the left side of the screen and click on Assignments.
  2. Next, click the + Assignment button in the upper right corner to create a new Assignment and then give the assignment a name.
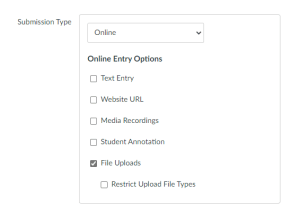
  3. In the assignment Editing window, scroll down under settings and select the Online submission type, and then check the File Uploads option. This will cause a new setting option to appear called Plagiarism Review.
  4. The Plagiarism Review setting is default set to “None.” Change it to Turnitin. Turnitin is now enabled on the Assignment.
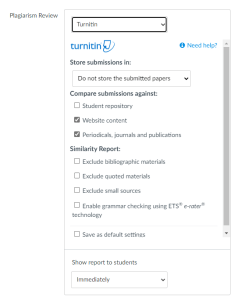
  5. To ensure draft submissions are not stored in a repository, change the setting under "Store submissions in" to Do not store the submitted papers. 
    • This setting is important for assignments that allow for multiple draft submissions. Not storing drafts into a repository means that subsequent drafts of the same assignment will not be flagged in the similarity report.
  6. Next, you can toggle on and off the different content types you want draft submissions to be compared to (student repository, website content, or periodicals, journals, and publications). 
  7. Below that, you can select what to exclude from the similarity reports generated by Turnitin. 
  8. You can also set the number of submissions to be "unlimited.”
    • This setting will allow students to resubmit drafts several times to the same assignment. For self-assessment it may be good to allow students to submit multiple drafts to review their similarity reports. Just remember to select “Do Not store the submitted papers” under the repository settings so students do not get flagged for work done on a previous draft of the same assignment.
  9. Lastly, click the button in the bottom right corner to Save and Publish your Turnitin Assignment.

Here is a general guide from Canvas discussing how to add or edit details in an assignment.

Cold Lunch & Hot Topic Follow-up: To Record or Not to Record

To Record or Not to Record? 

That appears to be the question many of us are asking ourselves.  

COVID has accelerated the presence of remote learning technology in the classroom. Much of this technology allows for videoconferencing and video recording. For many of us videoconferencing has become a normal part of the workday as we use Teams and Zoom for classes and/or meetings. This increased use and comfort of working with technology has translated into our teaching and learning, so the question is more of a should we record instead of a can we record. 

Comfort with recording, however, does not require us to implement that technology in the classroom. As you decide what to do for your class, CATL would encourage you to think first about pedagogy and content before considering technology. 

The purest and simplest answer is to be consistent with the modality of your class. The reality, though, is that our students have become accustomed to recordings being available  because we have offered recordings to support learning as part of our response to COVID. As we move away from that emergency approach to teaching, some students may still expect class recordings to be readily available regardless of the modality if they miss a class now for illness, family obligations, or work.  

Perhaps this point has merit, however, there are a few limitations we would suggest you consider before you make your final decision regarding whether to record or not record your classes.  

It may be easy to record a class meeting if you are in one of the classrooms that has all the equipment necessary to support videoconferencing or lecture streaming. Virtual classrooms that are completely run in Teams or Zoom are also easy to record. Before you hit the record button, though, you need to be mindful of your pedagogy. If your classroom is not equipped with cameras and microphones, it may seem like using our GBIT provided laptops, smart phones, or a DE cart could be a solution. But such a solution is limited by technology. We have all been in meetings this semester where the audio and video focused on one person or access to information shared in the meeting was limited. Recording with our laptops, DE carts, or personal phones creates a limited, potentially inequitable learning experience.  

If you rely on active learning, large class discussions, or significant periods of Q&A in your class, passively watching a recording of the video may not yield a comparable learning experience for your students. The CATL Team has curated a few ideas to consider offering students who must miss a class meeting which can be viewed below.  

If you elect to record a specific class meeting to accommodate a student absence, please follow best practices in video sharing, as well as guidelines for FERPA. Vanderbilt University’s Center for Teaching provides a good starting point to consider as you design and deliver Effective Educational Videos. In a recording, you can elect to pause or remove student conversations in class, but remember that if students’ images, names, or voices are captured in the video, you should limit access to the video to that one class. The Department of Education provides guidance a FAQ on Photos and Videos that should help with determining how best to manage FERPA concerns with class recordings.  

Finally, if these conversations have led to thoughts about your class modality and whether you should change it for a future term, please consult with your Chair. They, in consultation with the Associate Deans and Associate Provost, can help you with any policy questions you might have about the UWGB modalities. 

Strategies to Deal with Student Absences and Makeup Work 

  • At the beginning of the semester, create semester-long small groups of students and encourage them to communicate with each other about sharing notes from class. You can create a Canvas Discussion group for students to interact or post photos or links to their class notes.
    • You can also encourage students to coordinate amongst their group and share what strategy for note taking is most effective and ask students to create a plan for sharing class notes when a group member has missed a class.
    • You can use Hypothesis to create a shared note-taking document that is assigned to these small groups (e.g., post your module PowerPoint slides as a group Hypothesis PDF document for possible annotating).
  • If students are working on a group project and one of their members is missing, have one student in the group be a notetaker to fill in their missing member on what the group accomplished during class. The student who missed class and group work time will know of any important decisions that were made and be aware of tasks they need to complete to make up for the missed work time.
    • You could even require students to complete a group charter at the beginning of the group project to establish group member roles, expectations, and communication methods.
  • Have students do research to find scholarly resources, videos, or web resources that supplement the topics and materials covered during the days they missed. Ask for a brief summary of the source or sources. Bonus: you may learn of a few new resources to share with the class.
  • If your class includes reading assignments, ask students to submit a reading journal to share their observations and questions regarding assigned reading content. The reading journal serves both to meet participation for in-person class and an opportunity to engage with students about the content shared and discussion questions they may have asked if in class.
  • If you track attendance or incorporate participation points in your course, consider creating a Canvas Discussion Board where students can respond to prompts as a make-up activity if they miss class.
  • If a student missed class, and you require them to complete an alternative assignment to make up for the in-class absence, use the “Assign to” feature in Canvas to assign just the absent student(s) the make-up activity.
  • Administer your exams and quizzes through Canvas. Doing so can make it easier for students to make them up if they miss an exam day. Canvas quiz features like shuffling answer options or using question banks can also help prevent cheating if you are concerned about a student taking the quiz later than the rest of the class.
  • If you use Power Point slides for lectures or in-class instruction, consider posting them to Canvas. You can share the slides before or after class. A best practice for slides is to have limited text that students fill in with notes, as note-taking is an important part of studying and learning.
    • As a bonus for sharing your slides with the class, some students might like to print off the slides in advance and use the paper copy for taking notes during the lecture, which will also be helpful for studying later.
  • Consider supplementing your face-to-face instruction by regularly sharing brief videos (and/or audio and text resources) in Canvas that review “muddiest points” from class meetings or work through additional example problems. This type of material can be videos you create yourself or videos you have discovered on a public site (YouTube, etc.). Doing this can aid students who missed class and reinforce the learning of students who were present.
    • In general, short, targeted videos tend to be more effective than full lecture recordings and as a bonus you can reuse the material from term to term.
  • Consider using in-class digital activities which can be completed synchronously or asynchronously.
    • For example, a Hypothesis annotation activity or a collective note-taking document can be used during in-class instruction but can also be completed by a student after the fact, allowing them to see their peers' contributions as well.
    • Another example is the use of a PlayPosit video with embedded questions. PlayPosit Broadcast can be used to let students interact with the video synchronously in class, or you can create a lightbulb activity to be completed before or after a course or for an asynchronous course.

Taking the Guesswork Out of Grades: Canvas Features for Grade Transparency

If you’ve been teaching for a while, “transparency” is probably a buzzword you’re accustomed to hearing by now. In several CATL resources, we’ve highlighted the Transparency in Learning and Teaching (TiLT) framework, which is designed to help instructors clearly communicate the purpose, task, and criteria of a learning activity. In this article, however, we’ll be covering some other ways you can incorporate transparency in your course, as well as the features built into Canvas that will allow you to do so. In each section we will highlight how these features are beneficial to both you and your students. When students and instructors are on the same page regarding grades, it can alleviate a lot of potential problems and unnecessary stress.

Set Up a Grading Scheme

When you create your syllabus, one of the pieces that you need to include is a grading scale, or how you plan on correlating grade percentages with letter grades. Instructors can generally decide which percentage range to set for each letter grade as long as they use UWGB’s A-AB letter scale; however, some departments or programs may have a set grading scale.

Regardless of what scale you use, it is best practice to set up a grading scheme in Canvas that matches what you have in your syllabus. This will tell Canvas what overall letter grade to display in your Canvas gradebook when a student’s overall score falls within a certain percentage range (e.g., AB: < 92% to 89%).

The View/Edit Grading Scheme menu in Canvas; the sample grading scheme is broken down by percentage ranges and uses an A-AB pattern
An example of a potential grading scheme in Canvas

How it helps students: Setting a grading scheme will give students a better idea of what their overall letter grade in the course is at any point during the semester.

How it helps you: Establishing your grading scheme in Canvas will make it easier to see at a glance how your students are doing in your class, which is helpful for submitting Navigate360 progress reports. Using a Canvas grading scheme is also a necessary step if you plan on using the “sync to SIS” feature for sending final grades to SIS.

Regularly Enter Grades, Including Work Submitted Outside of Canvas

Most courses have some activities or metrics that factor into grading that don’t include an actual student submission in Canvas, such as participation points or in-class activities. To record these grades in Canvas, you will need to set up no-submission Canvas assignments, which are assignments that create a column in the Canvas gradebook where you can simply enter students’ scores. Though many instructors wait until the end of the semester to enter these scores, updating them on a weekly or biweekly basis will help keep you and your students on track. For recurring points like participation, you may wish to lump together points by week or unit (e.g., create an assignment for “Week 1 Participation,” “Week 2 Participation,” etc.).

Three weekly participation point gradebook columns in Canvas with various scores filled in
An example of how you might set up weekly participation grades in Canvas

How it helps students: Factoring these grades into your course as you go will help students get a more well-rounded picture of where they stand in your class. It also makes the importance of regular participation and attendance more evident to students.

How it helps you: Regularly entering or updating scores for things like participation will prevent the headache of entering them all at the end of the semester. It can also give you a sense if there are students that may need an intervention from a professional advisor due to poor attendance (in these cases, you can issue an hoc Navigate360 attendance alert for students of concern).

Enter Zeroes for Missing Work

One of the most deceptive parts about grades in Canvas is that, by default, missing work does not negatively impact a student’s overall grade in a Canvas course. When calculating the total grade of a student, Canvas ignores any assignment for which no grade has been entered, regardless of due date. The result of this is that students with missing work may see a grade in Canvas that is artificially inflated. To combat this, you can manually enter zeroes for missing work on a regular basis, but Canvas also has two features that can automate part of the process.

Set a Canvas Late Policy

You can set a late work policy in Canvas so that all missing submissions will be automatically set to “zero” after a due date has passed. If enabled during an active course, it will also retroactively apply “zeroes” to all missing work from past assignments. Note that the late policy only affects assignments in which students need to submit something in Canvas (Canvas quizzes, graded discussions, and assignments with the “online” submission type).

The Canvas gradebook settings with the "late policy" tab selected; a box is checked and the default grade for missing submissions is set to "0"
The Canvas gradebook settings menu where you can set a late policy

Set Default Score as “Zero”

For individual assignments, including “no submission” and “on paper” assignments, you can set the score of all students without a graded submission to “zero” with just two clicks by setting zero as the assignment’s default grade. This is especially important to do at the end of the semester, but you can do it throughout the semester whenever you have finished grading submissions for an assignment that is past due.

How it helps students: Students will be able to see how their missing work impacts their overall grade, preventing any “gotchas” at the end of the semester where a student finds out their actual grade is much worse than that what Canvas would have them believe.

How it helps you: Before exporting final grades to SIS at the end of the semester, it is crucial that all missing work is set to “zero” to ensure that grades are accurate. Both the “late work policy” feature and the “default grade” feature remove some of the labor of entering those zeroes manually. Using these features will also ensure more accurate midterm grades, should you choose to post them.

Other Considerations

While the suggestions above apply to nearly every instructor and course, regardless of pedagogical style or modality, the following features may or may not apply to your own courses.

If you have final grades broken down by weighted percentages in your syllabus, you can set up your gradebook to follow the same weighting scheme with a few extra steps of setup. Start by creating assignment groups and then setting those groups to be weighted based on percentage. By using weighted assignments groups, you can be confident that the way things are weighted in your syllabus matches what’s in your gradebook.

Using rubrics to assess student work is a great strategy for grading transparency because it allows students to see exactly what criteria you are assessing them with and what they are expected to do to receive a satisfactory grade. While you can add a rubric as a Word doc to an assignment or discussion description, you can also create your rubrics right in Canvas and use them for grading. You can fill out Canvas rubrics in SpeedGrader to optimize your grading workflow, plus if the rubric has points, Canvas will calculate the point total automatically.

Many online assessment tools like Canvas quizzes, PlayPosit bulbs, and textbook quizzing integrations have the option of including both auto-graded questions, like multiple-choice, and manually graded questions, like essay questions. The problem arises when a student completes an auto-graded quiz and then sees a score that is artificially lowered only because the instructor has not yet graded some questions. Besides regularly keeping up with grading these types of manually reviewed questions, it might also be helpful to include a note in the assessment description so students are aware that their quiz score will not be accurate until you have had a chance to review and update their scores. If the quiz is tied to a Canvas gradebook column, you can also choose to set the assignment's grades to be manually posted so that students do not see grades until you have had a chance to review them.

Questions?

You can get 24/7 support from Canvas by live chat, phone, or email by clicking the “Help” button in the Canvas global navigation menu bar on the left side of any page in Canvas. They are the experts on all of these features in Canvas and can help walk you through the steps if you have questions.

As always, CATL is also here to help as well. If you want to discuss the features above or any other strategies for making your grading more transparent, fill out our consultation request form to schedule a meeting with a member of the CATL team.

What’s in a Name? Tips for Learning & Using Students’ Names in Class

Research tells us that learning and using students’ names in class has benefits for belonging and engagement, both of which are associated with positive educational outcomes. Instructors also know, however, that it can be quite a challenge to learn dozens and, in some cases, even hundreds, of student names in a semester. There is no one easy solution, but here are some different strategies you might consider, along with a healthy dose of reviewing and rehearsing. 

  • Use the classic standby table tent method. Provide card stock or thick paper and bold markers. Pass materials out and ask students to make a nameplate that they use for class each day. You can even collect them and pass them back to students each day for the first couple of weeks if having to return them helps you learn names. 
  • Call the roll and consider doing it on more than the first day. You can even explain to students that you are doing so because you genuinely want to work on learning and correctly pronouncing their names. Ask them to correct mistakes you make. Write phonetic pronunciations next to names on your roster. They may appreciate your efforts at getting to know them even if it takes a few minutes of class time.
  • Ask students to complete a course survey for you and submit it in Canvas as an assignment. Have them provide their preferred name, correct pronouns, and a typed-out phonetic pronunciation of their name as some of the items. Include other questions that help you learn a bit about them, so you can associate that with their name. You can invite them to include a photo if they feel comfortable doing so. 
  • Take pictures in class. Have students write their names in large letters on a full sheet of paper. Ask them to hold it up, and then take photos of groups of students in the classroom. Practice reviewing the images before class each day. You should offer students the choice to opt-out of this exercise because they may have legitimate cultural, safety, or other reasons for not wanting to participate. 
  • Remember that your class rosters in SIS include photos, and you can print rosters to take to class with you that include thumbnails of those images. You can also use the rosters to practice learning names. Do keep in mind, though, that the photos are typically first-year student ID pictures and may not be accurate representations of your students today 
  • Assign students to visit your office for just a couple of minutes to introduce themselves to you. It may help you learn names, assist them in finding your office and make them more likely to seek you out when they have questions.  
  • Spend time before class speaking individually with students. Try calling them by name or ask them to provide or remind you of their name as a part of the conversation.  
  • Be aware that UW-Green Bay does have a preferred name policy, and students can request to have their preferred name on class rosters, in Canvas, and in email. If you have a student in class who requests you use an entirely different name than is currently on your roster, let them know that there is a mechanism to ask for a name change in many of our systems.   
  • Teaching online? Ask students to share an image and description of their real or fictional dream vacation destination, favorite food, or a favorite book to a discussion board to introduce themselves. Although you may not have to memorize names in asynchronous online classes in the same way you do when teaching face to face, getting to know your students from the start of the semester and encouraging interaction among them is important.
  • Pair students and ask them to interview each other and introduce each other to the rest of the class in a virtual or interactive video class. It can help you and the students learn names and increase comfort with the breakout rooms and cameras before you engage in content-focused conversations.  


Enhance Course Videos with PlayPosit in Mere Minutes

If you’ve been tuned in to the CATL blog or Teach Tuesday newsletter at all over the past year, you’ve likely gained at least a passing understanding of what PlayPosit is. CATL staff have been eager to share our excitement about what this interactive video platform can do to boost learner engagement in courses at UW-Green Bay! PlayPosit is a very powerful and flexible tool, and that can make it seem intimidating to many instructors. While you can spend hours in the PlayPosit designer crafting your masterpiece video experience, in truth, some of the most impactful uses of PlayPosit can be implemented by instructors in 10 minutes or less! In this post, you will find a few examples of how you can leverage PlayPosit in simple ways that will give you immediate feedback from students, reinforce key concepts, and provide opportunities for your students to interact with you and collaborate with each other, all by using your pre-existing course videos.

Get Instant Feedback from Your Students

Screenshot of a PlayPosit bulb with an interaction that asks students for immediate feedback on the video

One of the simplest and most effective uses of PlayPosit is adding a prompt at the end of a video where students can submit any questions or feedback on the content. Adding one “free response” interaction at the end of each course video can help you continuously monitor the “pulse” of the course and get immediate feedback from students on their understanding of the content. You can ask students to identify the muddiest point of the video for them and the resources and actions they need to better understand it. This type of metacognitive question can help students better identify the concepts that will require the most study to master. If you teach a large lecture class where the labor of parsing student responses would not be sustainable, you can instead add one or more “Poll” interactions to gain a quantitative insight of your students’ perception of their understanding of the content in each video. This poll data can help direct your planning of class time and additional resources for review.

Reinforce Key Concepts with Quiz Breaks

Another simple use of PlayPosit is to insert a “quiz” question at an important checkpoint of a video to help reinforce a key concept that has just been covered. Adding quiz breaks to your video can help students solidify their comprehension of the material and keep their active attention throughout the video (Szpunar et al., 2013). PlayPosit offers several interaction types suitable for this purpose: Multiple Choice, Check All, Free Response, and Fill in the Blank. Consider adding a question at the end, at a logical break near the midpoint of the video, or anytime the video shifts gears from one topic to another. You can give students multiple (or unlimited) attempts to answer correctly and (optionally) add a small point value to the assigned PlayPosit video to give your students extra incentive to engage with the content on-schedule.

Collaboratively Annotate a Video

Screenshot of the “Template Gallery” in the PlayPosit designer

PlayPosit’s “discussion” interaction type can be used to facilitate an exercise that asks students to watch a video and post to a class-wide discussion board that is built into the video player. In addition to videos in your personal Kaltura My Media library, instructors can incorporate public YouTube and Vimeo videos into their PlayPosit activities, so consider this use case if you use any YouTube or Vimeo videos as required viewing in your course. Through PlayPosit’s Template Gallery, you can quickly add a single customizable discussion interaction that students can post to throughout the entire duration of the video.

Students can use the discussion interaction to collaboratively annotate the video to add their interpretations, cite criticism or link to pertinent online resources, and pose their own questions for class discussion. Each comment posted in the discussion is timestamped with the position of the video at which the student paused and submitted the comment. Students and instructors can select the timestamp on a post to immediately jump the video player to that moment of the video and make threaded replies to build off each other’s contributions. PlayPosit discussions are a great way to get a class to go on a deep exploration of a short video or clip that warrants repeated viewings.

Maximum Impact, Minimal Time

Each of the use cases described in this post involves using PlayPosit to add only one or two interactive elements to a course video. If you already use videos in your course, you can create any of these in under 10 minutes! Watch the video below to see the process from start-to-finish in under 3 minutes:

These PlayPosit enhancements to your course videos can give you big returns on just a little bit of time invested. Teaching with asynchronous videos doesn’t have to feel like lecturing into the void when you build formative exercises directly into the videos and give students ways to provide you with immediate feedback each time they watch a video. You’ll get a clear picture of which students are engaging with your video content, and, since you’ve turned the video watching experience into an active one, your students will be more likely to engage and stay engaged with course videos.

We hope these examples will spark you to take the first step to using PlayPosit in your courses. CATL is happy to provide consultations both to instructors who are looking to get started with PlayPosit as well as instructors who have already taken their first steps and are now inspired to build beyond the fundamentals and create interactive video masterpieces. Fill out our consultation request form to schedule a time to meet with a CATL team member or reach out to us at catl@uwgb.edu with your questions and ideas!