When provided with a task, almost invariably, some students will overlook or ignore provided instructions, skip past foundational lessons, and end up taking their own “creative” approach to completing it. While some students can find success going their own way, when a student misses instructions, they often end up making life harder for themselves and their instructor. When teaching with Canvas, you have access to tools that can help add order to how students progress through your lessons, instructions, and assignments. When you organize and present your content in modules, you gain the ability to add requirements that require each student to view and/or interact with specified course items before they can progress and access items positioned further down in the course module order. You can ensure that your students’ route to an assignment goes through the important scaffolding pages. While they are not a panacea and should be applied with careful thought so that they act as a guide and not an unnecessary obstacle for students, implementing module requirements can help prevent students from starting a task before they have engaged with preparatory lessons and activities.
Forcing top-to-bottom progression within a module
Within a single module you can use requirements to force students to progress through that module in top-to-bottom order. These requirements can help enforce that students, for example, view a page with important instructions before they can access and submit to an assignment. To set up a module with requirements that students must complete in order, click the module header’s Options icon, then click Edit to open the Edit Module Settings menu. In this menu, select + Add Requirement to begin adding your first requirement to the module and reveal additional options. Enabling the Students must move through requirements in sequential order checkbox will lock each module item until all the requirements above that item in that module have been completed. This forces students to work through the module requirements in top-to-bottom order. You then need to add requirements to the module. You will need to add one requirement for each module item students need to complete in order.
You add a requirement by selecting + Add Requirement, and then you configure a requirement by making selections in two drop-down menus. In the left drop-down menu, select the module item to which you want to add the requirement. In the right drop-down menu, select how the students must complete that requirement. Depending on the type of the module item, this second drop-down menu will show several options (click each option below to expand it and reveal suggested uses):
Requires students to open the item and then click a Mark as done button at the bottom of the page. If you use this type of requirement, make sure to provide students with instructions for marking items as done. Students can overlook the button and feel stuck if they’ve never encountered this requirement before.
Only used for Discussions and Pages that are set to allow students to make edits. Students will satisfy this requirement once they have posted a reply in the Discussion or saved an edit to the Page. Avoid picking this requirement for pages which can only be edited by Teachers, as students will not be able to complete the requirement.
Requires the student to make an Assignment submission, make a reply in a graded Discussion, or complete a Quiz attempt.
Adding a requirement for each module item that contains important information or a required task will ensure students engage with the content in your intended order.
Locking a module until the previous module has been completed
Requirements can also be leveraged to lock an entire module until the student completes the requirements of one or more modules above it. Controlling module-to-module progression is done with the additional step of adding module prerequisites. You can add one or more prerequisites to a module through the same Edit Module Settings menu where you add requirements. When adding a module prerequisite, you select an entire module that appears above the module you are currently editing. Adding one or more prerequisites to a module will prevent a student from accessing all content in that module until they have completed the requirements of each module that is set as a prerequisite. Any module that is selected as a prerequisite must contain at least one requirement—Canvas needs to know the criteria for completing that module and satisfying the prerequisite. A module that is selected as a prerequisite but has no requirements will have no effect on course progression.

Here is an example of how you can set this up in a course. Let’s say that the content in Module 1 is so fundamental to the content in Module 2 that you want to prevent students from viewing anything in Module 2 until they’ve fully engaged with the content in Module 1. Imagine that both Module 1 and Module 2 contain a Page, a Discussion, and an Assignment. Your first step in forcing students to complete Module 1 before accessing Module 2 is to edit Module 1 and add three requirements:
- Module 1 Page – view the item
- Module 1 Discussion – contribute to the page
- Module 1 Assignment – submit the assignment
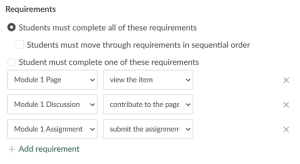
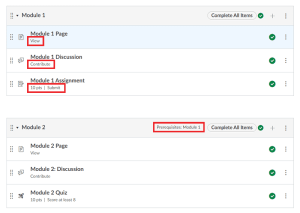
Adding these requirements tells Canvas how to determine whether a student has completed Module 1: a student has completed Module 1 once they have viewed the Page, made a reply in the Discussion, and submitted to the Assignment. The next step is to edit Module 2 and add a prerequisite, selecting Module 1 as the prerequisite module. That is all that is needed to force students to complete Module 1 before accessing Module 2; it is not necessary to add any requirements to Module 2 unless you plan to use Module 2 as a prerequisite in a subsequent module. You may still want to add requirements to Module 2 just for the additional visual guidance and feedback they provide to students.
Use Cases
There are many creative ways you can leverage module requirements and prerequisites to exercise control over the flow of your course. Here are a few illustrative use cases (click each to expand it):
You can set up requirements within a single module to have students complete a pretest quiz before going through the module content and then take a post-test quiz after completing the module content. This process could help you evaluate the effectiveness of your instruction and/or apply a metacognitive approach to help students gain awareness of their learning and gaps in their knowledge. To create this setup, add a pretest quiz at or near the top of a module and a post-test quiz at or near the bottom of the module and put lesson content and additional formative assessment activities in between the two quizzes. Edit the module to add a requirement to each module item (including requirements to “submit” to each of the two quizzes) and enable the Students must move through requirements in sequential order checkbox. Students will need to progress through the module in top-to-bottom order, first taking the pretest at the top of the module, then engaging with the content, and finally taking the post-test at the bottom of the module. You can set your pretest quiz to be a “Practice Quiz” so that scores are not added to the gradebook.
Even if you don’t need to force a linear progression through your course modules, adding requirements to your modules automatically adds visual feedback that helps to communicate expectations to students and helps students track their own progress through the course. Any module item that is used in a module requirement will display its requirement underneath its title within the module. This is a simple automatic piece of visual feedback that can help students keep track of their tasks. Students also see additional indicators of their progress. After a student completes a requirement, the module item is marked with a green checkmark to signal completion. If a student has started a module but has not yet completed all its requirements, that module’s header is marked with a red circle; once the student completes all of a module’s requirements, this indicator changes to a green checkmark. Instructors can monitor student progress through module requirements by clicking the View Progress button located above the first module of the course.
The visual feedback provided by module requirements adds a light element of gamification to your course, turning each module into a list of sub-missions to be completed. Requirements can be further leveraged to add game-based learning elements to your courses. Use requirements to set minimum scores on low-stakes quizzes that allow multiple attempts and unlock harder “levels” of your course once a student achieves the target score. You can further add the Canvas Badges (Badgr) integration to your course to award “achievements” for the completion of modules and (optionally) enable an anonymous leaderboard to foster competitive motivation among students.
Conclusion (Prerequisite: Read All Above Sections)
We hope this blog post has given you a sense of how and when you can use module requirements in your Canvas courses. When used thoughtfully, module requirements are an effective tool for encouraging students to move through your course in the sequence you intended. Recall from your past teaching that assignment or a module in a course where students got off-track because they somehow managed to miss vital information that was right there for them. Next time you teach that course, try employing requirements to funnel students through that important supporting content before they can start work on the assignment. If you have an idea for employing module requirements in your Canvas course and would like to discuss how to best put it together, please reach out to catl@uwgb.edu or request a CATL consultation to meet with a member of the CATL team!