Using Zoom for Facilitating Small Group Activities

Small group activities are a key part of face-to-face learning, but they are also particularly useful in virtual classroom learning environments. Many active learning activities like think-pair-share and collaborative document annotation work well in Zoom using a feature called breakout rooms 

Breakout Rooms Overview 

The Breakout Rooms button on the Zoom controls toolbar
The Breakout Rooms button in the Zoom meeting toolbar. If you don’t see this button, click the three dots (…) on the right side of the toolbar and then select “Breakout Rooms” from the options.

Breakout rooms are used to split Zoom participants into smaller groups and place them in separate sessions where they can only hear and see their fellow group members until they return to the main room. During this time you could have students discuss a question, brainstorm solutions to a problem, or read an article with their small group. As the host, you can join and leave any of the breakout rooms as you please, which may be useful for checking how students are doing or clearing up any questions the group may have. 

Like any small group activity, breakout rooms work best when they have a clear purpose. Before you consider using breakout rooms in your virtual class sessions, consider the intention of the activity. Provide your students with clear instructions on what they are supposed to do during their breakout group time. It might be helpful to give students a concrete goal for their discussions as well. For example, you could have the groups nominate a notetaker to jot down important points from their conversation and then verbally summarize their group’s discussion when they return to the main room with the entire class.  

Creating Breakout Rooms 

Once you have decided on how you want to conduct your group activity, you can use that information to inform what settings you’d like to use for breakout rooms. First, you will want to learn about the basics of creating and managing Zoom breakout rooms. You have three main options for assigning students to breakout rooms:  

  • You can manually assign students to breakout rooms. 
  • You can automatically (randomly) assign students to breakout rooms based on the number of rooms you want (Zoom will show you how many participants per room in the bottom left corner of the pop-up window). 
  • You can let students choose which breakout room they want to join.  
"Create Breakout Rooms" pop-up menu
The pop-up window you see after clicking on the “Breakout Rooms” button, along with the three options for assigning participants.

Once you have selected which method you will use to assign students to their breakout rooms, you can click the blue “Create” button in the bottom-right corner of the pop-up window. This will set up your breakout rooms, but it will not start them yet. 

If you are using Zoom’s default settings for breakout rooms, you can click “Open All Rooms” to start the breakout rooms. Once you are ready for your students to return to the main room, simply click the red “Close All Rooms” button.  

Breakout Room Options and Features 

The breakout rooms "Options" pop-up menu
Clicking on the word “Options” in the breakout room menu will provide you more settings to customize your breakout rooms.

Zoom has a variety of features and options for breakout rooms. In this guide, we will include a few that are particularly useful for facilitating group activities. You can adjust breakout room settings before you open the rooms or even while the rooms are open.  

To open the breakout room options, click the word “Options” (or the gear icon on Mac) in the bottom-left corner of the breakout rooms menu. The first option, “Allow participants to choose room” will let students move between rooms, despite their original room assignment. The second setting, “allow participants to return to the main session at any time”, allows students to rejoin the main room where you, the host, will be unless you are visiting a breakout room. This could be useful if students need to “pop in” and ask you a question. If the third box is unchecked, students will be prompted to move to their assigned room once you open breakout rooms. If you would like students to be moved to breakout rooms automatically, you can check the third box. 

"Broadcast Message to All" pop-up text box
You can send all breakout rooms a message in chat with the “Broadcast Message to All” button.

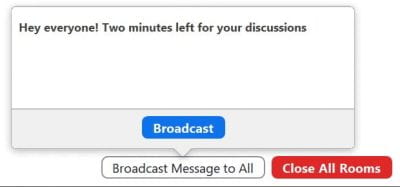
Once your breakout rooms are open, it may be useful to provide your students with additional reminders or instructions. You can use the “Broadcast Message to All” button at the bottom of the breakout room menu to send a message to all groups, such as a warning on how much time they have left to discuss.  

You can also set a countdown timer from the breakout room settings. By default, when you close breakout rooms participants will see a 60-second countdown in which they will be prompted to move back to the main room. At the end of the minute, any remaining participants will be moved back to the main room automatically. You can adjust or eliminate this countdown from the breakout room settings as well. 

If you plan on using breakout rooms multiple times throughout a session, you can re-open the rooms at any time by clicking on the “Breakout Rooms” button in the toolbar and then the “Open All Rooms” button. This will put students back in the same breakout groups as before. If you wish to create new breakout groups (either of a different size or just to have students work with new peers), click the button that says “Recreate” instead. This will let you set the parameters for a new set of breakout rooms. 

Questions? 

For most technical questions, please contact Zoom support or the UWGB Help Desk. If your questions pertain to the Zoom Canvas integration, your best point of contact is dle@uwgb.edu. Lastly, if you have general questions about how you can use Zoom to support your teaching, we always welcome you to email the CATL inbox (catl@uwgb.edu) or schedule a consultation with a CATL memberThe best way to become familiar with breakout rooms is to practice, so grab a few fellow instructors and give it a go, or set up a consultation with CATL where we can act as your pretend students. 

Using Zoom for Class Meetings

Planning on using Zoom for a virtual classroom course? There’s a lot of great documentation out there on Zoom and the Zoom Canvas integration, but sometimes it’s hard to figure out how to get started. To help you out, we’ve collected some Zoom guides and repackaged them in a way that covers the basics for instructors—scheduling a meeting, sharing the meeting info, things to consider before your first meeting, running a meeting, and recording a meeting.

Scheduling a Meeting

If you’re using Zoom for virtual classroom sessions, we recommend setting up your meetings in Canvas. The Zoom Canvas integration can be accessed from the “Zoom” link at the bottom of your course’s navigation menu on the left side of your screen, and then from there all you need to do is click the “Schedule a New Meeting” button, enter your meeting details, and then click “Save.” For weekly class sessions, you’ll want to make sure that you select the “recurring meeting” checkbox when scheduling your Zoom meeting.

When you schedule a new meeting in Canvas, the Zoom integration automatically creates course calendar events and student To-Do list reminders for each occurrence of the meeting. There are a variety of other meeting settings you can set as well. This Zoom guide can help you learn more about all the meeting setting options.

The "Zoom" link in the Canvas course navigation menu.
The Zoom integration in Canvas is accessed from your course’s navigation menu on the left side of the screen.

Sharing the Meeting Info with Your Students

After you set up your meeting, we recommend sharing the meeting info in the first module of your course so it will be easy for students to find. Simply click on your meeting in the Canvas integration, the Zoom web portal, or the application, click the button or link that says “Copy invitation”, and then paste that information into a page in your first module. Another option is to copy the “join link” and add that link in the first module as an external URL (make sure to check “Load in a new tab” when adding the link). We have a recording of a “Teaching with Zoom” session if you would like to see a video walkthrough of setting up a Zoom meeting in Canvas and posting the link in your course, along with our recommendations on which meeting settings to use.

A sample Zoom meeting link in a Canvas module
Your Zoom link can be added to a module as an external URL. You can also copy the meeting info into a page and put that page in your first module.

Before Your First Meeting

If a student previously registered for a personal Zoom account using their UWGB email address, they may see the error “user does not exist” when they try accessing Zoom through your Canvas course. The way to resolve this issue is to have all your students log into the UW System Zoom web portal once before they start accessing Zoom from Canvas. The Zoom Web Portal is linked on the UWGB homepage, at the bottom of the tab that opens when you click the “Menu & Search” button in the top-right corner of the page.

University of Wisconsin Zoom web portal sign-in page
The landing page for the UW System Zoom web portal. Encourage your students to sign into Zoom here before your class’s first Zoom meeting.

Once logged in, students that previously had an account with their UWGB email will be prompted to switch their account to UW System’s license. This knowledgebase article provides more details and complete instructions that you can send to your students. After a student has completed these steps, it may take a few hours for the update to occur, but once complete, your students should have no issues accessing Zoom through Canvas.

Running Your Zoom Meeting

To start your meeting, simply join with the blue “Start” button next to your meeting listing in Canvas, the Zoom web portal, or the Zoom application. While running your session, the controls will be at the bottom of your screen. Here you can toggle on and off your mic and camera, send and read messages in chat, share your screen, start breakout rooms, and more. This Zoom article details the features of each button on the host controls toolbar.

Zoom toolbar
The host controls of Zoom’s toolbar.

One feature of Zoom that you might consider using for small group discussions and increased interactivity between your students is Zoom breakout rooms. You also might want to look into using Zoom’s polling feature during class as an easy way to keep students engaged and gauge their understanding of the content.

When the meeting is done, click the red “End” button. As host, you will be given two options: “Leave Meeting” or “End Meeting for All”. Leaving the meeting means that the meeting is still “running” and students can continue talking or leave at their own discretion. Zoom meetings need a host, so you will be asked to assign a new host if you leave the meeting in this way (unless there is already a co-host present). Ending the meeting for all will immediately end the meeting for everyone—the host, any co-hosts, and participants.

Recording Your Meeting

If you wish to record your class sessions, you can automatically set up recordings from the meeting’s settings or you can manually start and end the recording during the session. Meeting recordings can either be saved to the cloud (online storage) or locally (to your computer). We recommend saving your recordings to the cloud as they can easily be accessed and shared in Canvas through the Zoom integration and also prevent the storage on your computer from being quickly depleted.

Zoom Canvas integration
When you set up your Zoom meetings through a Canvas course, you can also view and manage your Zoom cloud recordings for those meetings from the Zoom integration in Canvas.

When you set up your Zoom meetings through a Canvas course, you can also view and manage your Zoom cloud recordings for those meetings from the Zoom integration in Canvas.

Meeting cloud recordings are unpublished by default, which means only you, the instructor, can see them. If you would like your students to be able to view the recordings from within the “Cloud Recordings” tab of the Zoom integration in your Canvas course, you can manually publish your session recordings by clicking the “Publish” toggle next to each one.

Questions?

For most technical questions, please contact Zoom support or the UWGB Help Desk. If your questions pertain to the Zoom Canvas integration, your best point of contact is dle@uwgb.edu. Lastly, if you have general questions about how you can use Zoom to support your teaching, we always welcome you to email the CATL inbox (catl@uwgb.edu) or schedule a consultation with a CATL member.

Request a Consultation

A coffee mug and a laptop on a table. On the laptop there is a Zoom meeting with blurred tiles of people's faces.

Zoom vs. Microsoft Teams – Which Should You Use?

One of the decisions many instructors will have to make this year is which video conferencing platform they will use for virtual sessions, office hours, and other meetings that may take place remotely. UWGB currently supports two platforms for video conferencing—Microsoft Teams and Zoom. (In case you missed it, UW System decided not to renew their contract with Collaborate Ultra, choosing instead to start a license with Zoom this year.) A question CATL often gets is “which video conferencing platform should I use?”. Since the basic features of video calls with Teams and Zoom are nearly identical, it mostly comes down to personal preference, but we’ve still outlined a few considerations below to help you make your decision.

Ease of Use

Zoom and Teams are pretty equitable in terms of the internet bandwidth required, though Zoom also allows attendees to call in by phone if they have problems connecting to a meeting over the internet. With both applications, you can schedule and join meetings through either a desktop application or in your web browser, as well as on mobile through their respective iOS/Android apps. Zoom has an extensive overview of which features are available on each platform and Teams has a similar comparison chart here. For both platforms, the desktop application will usually provide the best performance and the widest range of features.

In terms of interface, Teams and Zoom are similar but have some key distinctions. Teams’ call features are found in a toolbar along the top of your screen that remains fixed. Zoom has a toolbar that is at the bottom of the screen by default but can be dragged to other locations, such as when sharing your screen. Both toolbars are equipped with features like chat, nonverbal feedback cues (such as virtually raising or lowering your hand to be called on), and breakout rooms. If you would like to explore the features of each of these programs further, here is Microsoft’s help portal for Teams, and here is Zoom’s help center where you can browse thousands of articles, videos, and user threads to find the answers to your questions. You can also contact the UWGB help desk for further support or browse the UWGB IT knowledge base.

Canvas Integration

Compared to Teams, Zoom definitely has a more robust Canvas integration. Teams’ integration allows you to schedule a meeting with the Rich Content Editor in Canvas, but not much else. With Zoom, you can schedule your class sessions, view upcoming meetings, and review recordings all from within Canvas. Note that there are some advanced meeting settings that can only be adjusted from the Zoom web portal, such as creating polls before the start of the meeting.

If you plan on sharing session recordings with students, the workflow is also much more streamlined with Zoom than with Microsoft Teams. With Zoom you can publish recordings in Canvas with one click, whereas with Teams you will need to find the recording in your OneDrive and then copy the share link for the file.

With both Zoom and Teams, we recommend copying the meeting join link and sharing it on a page or linking it in a module near the top of your course home page so students can find it easily inside Canvas.

File Sharing and Collaboration

While Zoom is perhaps the winner when it comes to simple video conferencing, if file sharing and collaboration are integral to your class, that’s where Teams really shines. Microsoft Teams is built for project management and collaboration, so making a Team for your class might be useful if students will need to regularly share and collaborate on documents or projects together. As a Microsoft product, Teams is also integrated with applications like PowerPoint, Word, and Excel, making it very easy to share documents like these inside and outside of video meetings.

Still Undecided?

If you’re still not sure which tool is better for your course, we always welcome you to schedule a consultation with a CATL member. We can discuss how you plan on using video conferencing in your course and help you decide which one might be better suited for meeting the needs of both you and your students.

Request a Consultation

College Student Mental Health: What Instructors Should Know

Article by Kris Vespia

As a counseling psychologist who is an active teacher and a scholar in the area of college student mental health, I pay particular attention when I hear my teaching colleagues express concern about seeing more students in emotional distress. I am also keenly aware that these student issues do not only present in university counseling centers. They also reach into classrooms and instructor offices. Instructors, though, typically have no formal training in how to respond. How are we as educators to best react when a student self-discloses a trauma during class and begins to cry while other students stare awkwardly at their desks? Or when an advisee softly admits in an individual meeting that they have been thinking about suicide? Or when a student emails to ask for an extension because they are struggling to adjust to their new medication for Bipolar Disorder?

I have had many more conversations about these topics since the pandemic began. I hear from faculty who say they are seriously concerned about student mental health and feel both an obligation to act and tremendous uncertainty about what to do. Layered on top of that uncertainty undoubtedly is the additional strain instructors have also been under, leaving them less able to expend the emotional labor involved in such situations. I am hoping this blog will serve three purposes: a) to provide some context for the mental health issues instructors are seeing, b) to give some preliminary tips for working with students in distress or with mental illness diagnoses, and c) to offer a repository of the mental health resources available to UW-Green Bay students so you can make referrals and consult, as needed.

First, let’s talk context. You should know that you are likely seeing an increase in student distress, but that is not a new phenomenon. College student mental health needs were critical long before the COVID-19 pandemic. A few statistics may help. Almost 20% of Americans have a diagnosable mental illness, and the most common time of initial onset for many of those conditions is traditional college age (National Institute of Mental Health/NIMH, 2021). In fact, the highest prevalence rates of mental illness overall and of serious mental illness specifically are between the ages of 18 and 25 (NIMH, 2021), and that distress appears to have increased over the last decade or more. For example, CDC data show that suicide is the second leading cause of death for young people, and suicide rates among those aged 10-24 increased over 57% from 2007 through 2018 (Curtin, 2020). Looking at college students specifically, results from two large, national datasets show moderate to severe anxiety and suicidal ideation almost doubled between 2012 and 2017-18 (Duffy, Twenge, & Joiner, 2019). Perhaps not surprisingly then, even though national statistics suggest the majority of people with mental illness (including college students) do not seek treatment, across 150 universities throughout the U.S., counseling center use still went up an average of 30-40% during a 5-year period in which overall student enrollment increased by only 5% (Center for Collegiate Mental Health, 2018).

The COVID-19 pandemic has only made a challenging situation worse. The American Psychological Association (2021) has worked to document emotional and behavioral responses with their Stress in America survey, and they found adults between 18 and 23 (“Gen Z” adults) were the most likely age group to report decreased mental health as a result of the pandemic. On another national survey of 32,754 college students conducted in Fall 2020, substantial numbers reported some degree of depression (39%) and/or anxiety (34%) on answers to a mental health screening questionnaire (Eisenberg, Lipson, Heinze, & Zhou, 2021). And, you are not alone in your perceptions: surveyed faculty from 12 institutions across 10 states also said (87% of them) that students’ mental health had either “worsened” or “significantly worsened” in the pandemic (Lipson, 2021).

I also want to stress that statistics do not tell the whole story. What likely matters more to instructors is that mental illnesses have substantial deleterious consequences for individual human beings – human beings they know and care about. Those effects might include significant pain and distress, negative impacts on relationships, and reduced ability or even inability to function effectively in school or at work. These conditions are not something a person can “snap out of” or a sign of personal weakness or failure. Too many sufferers, however, believe those myths (U.S. Department of Health & Human Services, 2017). Mental illnesses are instead legitimate, sometimes very serious medical conditions; most are quite treatable, but those treatments can take significant time to bring relief. Consider this example. We use the word “depression” casually in everyday conversation as though it is simply a passing mood state. True diagnosed depressive disorders, though, are ranked by the World Health Organization (2017) as the leading cause of disability globally. Blue Cross Blue Shield (2018) has published data that also suggest people with Major Depressive Disorder (MDD) have health care costs that average more than twice that of other consumers (i.e., more than $10,000 annually compared to over $4000) due to the costs of treating depression itself and its associated co-morbidities. More importantly, people with MDD and other mental illness diagnoses are more likely to die by suicide, which is the ultimate reason to take these conditions seriously.

In the midst of this sobering picture, there is good news. You can do quite a bit to help as a faculty member with some pretty simple actions. You are also never alone in these situations, and you and our students have wonderful campus and community resources at your disposal. You can view and print a full list here, and specific tips for instructors are included below.

Tips and Resources for Instructors

Click each tip to expand the accordion and read more.

Many students with mental health concerns have symptoms that impact their coursework. In fact, in the national survey of 30,000+ college students mentioned earlier, 83% of them indicated their academic performance had been adversely affected by their mental health in the previous month (Eisenberg et al., 2021). There are countless ways this can happen; let me highlight just a few possibilities. Major Depressive Disorder has a long list of symptoms, but beyond the potentially debilitating emotional impact, a few other common indicators include difficulty concentrating, insomnia or hypersomnia, substantial fatigue, and recurring thoughts of death. Imagine trying to read a textbook page when you are: exhausted from lack of sleep, feeling as though it takes every ounce of energy you have simply to put one foot in front of the other, reading the same words over and over without processing them, and focusing extensively on repeated thoughts of worthlessness or death. As another example, individuals with PTSD may deal with intrusive flashbacks or be so hypervigilant to small noises in the classroom as potential threats that they don’t process instructors’ words. Bipolar I Disorder can come with depressive lows, but we know it also involves manic episodes characterized by grandiosity, racing thoughts, and highly impulsive behavior. This student might start and finish a 15-page paper in one all-nighter and find in the morning that the words they thought were genius at 4 am are only pages of true gibberish. Finally, consider the student with an eating disorder who spends hours each day thinking obsessively about food, exercising compulsively, or hiding their binge and purge behaviors from others – or imagine the person suffering from schizophrenia who occasionally hallucinates and is completely preoccupied with voices in their own head during class time. You should know that of the UWGB students who have official disability accommodations, the greater numbers are for psychiatric, not physical, conditions. And the students with accommodations are likely only a very small fraction of those struggling with mental health concerns. That having been said, a student may be suffering substantially, and you will have no clue. We most frequently cannot “see” mental illness or know when it is happening, and stigma prevents many from self-disclosing. You have likely worked with, been friends with, or loved someone with a mental illness and never known it. People can be very skilled at hiding both physical and emotional pain.

We can help all students, including those who have a mental illness or who are experiencing acute emotional distress, by demonstrating that we: a) understand students’ multiple roles and responsibilities, b) welcome student communication, and c) have a willingness to be flexible. These three things will likely result in students feeling supported and seeking assistance when necessary. Empathy and flexibility can look like and be many things for different people, and it doesn’t have to mean being “warm and fuzzy” or granting every student’s request. If it helps, the greatest problem I tend to encounter is convincing students to accept extensions or an Incomplete because “it isn’t fair to others,” they “didn’t know they could ask,” or they “should be able to handle things on their own.” You may also be surprised by who the students in emotional pain are because they may be doing quite well in your class, but as the oft-quoted meme goes: “Just because someone carries it all so well doesn’t mean it’s not heavy.” If we offer some flexibilities to all students, we don’t need to worry about challenges associated with identifying those most in need. Here are some small but specific examples.

  • Sleep hygiene is very important to mental wellness, and yet we inadvertently encourage late nights or “all-nighters” with default deadline times of 11:59 pm in Canvas or by using early morning times instead. Why not use 5 or even 7 pm?
  • I know instructors who give students one “mental health day” each semester that they can take for any reason and then make up the work another day.
  • Similar to the mental health day, instructors can provide students a “free pass” good for one penalty-free late assignment.
  • Reconsider asking for a “doctor’s note” to justify extensions or absences. Students without insurance may not be able to see a doctor, and not all insurance covers mental health care.
  • Course content can be extremely distressing to students for unpredictable reasons. I do not use so-called “trigger warnings.” Instead, I inform students that I can’t predict what might elicit distress, but all students are free to leave the classroom or stop watching a video in online courses if that happens. They can check in with me later about whether or how to make up the work.
  • Be willing to consult with the Dean of Students, Student Accessibility Services, or Counseling services in the Wellness Center about academic flexibilities for specific students, as needed. Flexibility and compassion are important, but there are times when the most compassionate thing we can do is to encourage a student to take time away to work on their health before returning to school.

Amy Henniges and I worked to create a list of resources for all four campuses, as well as the local crisis lines for each community. They are now located on The Wellness Center website. Review and then bookmark or print this list for future reference. Share the ones for your campus in your syllabus or on the course Canvas site with a note encouraging their use.

Remember that you are not alone when dealing with student mental health concerns. Here is some information, along with some tips, you may find helpful.

Facts to keep in mind…

  • You do not have a confidential relationship with students in the way counselors do. If a student talks to you about suicide, that is something you can and should share with a professional. You also have state mandates to follow related to reporting child abuse and sexual assault.
  • You will not “put the idea in their head” if you ask someone whether they are having thoughts about suicide. A common reaction to that question is the person feeling relieved to share with you.

Strategies for Helping and Consulting

These strategies cover everything from emergencies and urgent situations to proactive strategies to reach all students in your classes.

  • Emergencies: As noted on the resource list provided, in a true mental or physical health emergency, you should call 911.
  • It is possible to call the Wellness Center’s Counseling services and/or Dean of Students Office to ask if someone is available to physically see or virtually meet with a student and explain the situation (if it’s not a 911 emergency, but you still feel the student needs to talk with someone urgently or at least that day). On the Green Bay campus, I’ve even occasionally just walked a student from my classroom to one of those offices. On the Manitowoc and Sheboygan campuses, you can also call the Agnesian number and ask about an appointment that day or for a counselor who can talk by phone.
  • If I’m in a situation where the student is with me (e.g., in my office), and I want to consult about the best resources for them or see if a counselor is available to talk with them, I typically call in front of the student. I want to be transparent and have them know I’m not “talking about them behind their back.” Of course, there can be times when that would not be appropriate.
  • In non-urgent, non-emergency situations, you can complete a “Students of Concern” Report on the Phoenix Cares website. The Behavioral Intervention Team or CARE Team will follow up on the situation. If you are unsure about whether to file a report, call the Wellness Center’s Counseling services or Dean of Students Office, explain the situation, and ask.
  • If something happens after business hours (e.g., a night class) where you feel the student needs to talk to someone, but it’s not a 911 emergency, you can use the community 24/7 crisis line or, in Sheboygan and Manitowoc, you can speak to a counselor at Agnesian 24/7 by calling that number. You can consult with these services for suggestions about what to do, and you can also call and hand the phone to the student.
  • If you are anxious about what to do or afraid you will make a situation worse, even if it seems like it’s a minor issue, find a colleague you trust. Better yet, ask the student about an employee on campus they trust. There’s nothing wrong with telling a student you are concerned about them and want to help, but you want to call someone or bring someone else into your office so that you can all figure out a good plan together.
  • Feel free to raise the issue of counseling or support if a student isn’t asking for your help but mentions stress or personal difficulties in passing. If you encourage and normalize counseling (e.g., “we all need support from time to time”; “people see counselors for everyday problems, not simply for mental illness treatment”), that may make a real difference.
  • Consider professional development in mental health issues. We will have a new opportunity on campus in fall 2021: Kognito trainings. Kognito uses simulated experiential role-plays specific to universities so students, faculty, and staff can encounter and practice in different scenarios. The initial At-Risk Simulation modules are designed to help us: a) recognize and identify signs of distress in self, peers, and students; b) communicate effectively to support someone in distress; c) understand support options; d) effectively refer people to resources; and e) self-reflect and apply strategies for resilience.
Knowing these few tips and resources may help you if you ever encounter an instance when you need to act, whether as an instructor or in the context of your personal life.

About Kris Vespia

Headshot of Kris VespiaKris Vespia is a Professor of Psychology and the Interim Director of CATL for 2021-22. She has published in the areas of mental health services on college campuses, cultural diversity and mental health, and career development. She is also interested in the mental health literacy of college students and the general public.