The Canvas Rich Content Editor (RCE) is an editor for Canvas pages, assignments, discussions, quizzes, and announcements. If you’ve ever edited a Canvas page or added a description to an assignment, you’ve already used it! The RCE allows you to add and format text, insert photos and videos, and link web content in many areas of your course.
Table of Contents
- Why Should I Use the Rich Content Editor?
- How Can I Use the Rich Content Editor to Make My Content More Accessible?
- More Detailed Information
Why Should I Use the Rich Content Editor?
The Rich Content Editor puts many powerful tools right in the fingertips of instructors. Besides allowing you to compose text, it also makes adding images, videos, documents, and links to many areas of your course incredibly easy. By using the RCE to keep relevant materials together in the same area, your students will also feel more confident in what they need to use and when. Consider how you might implement the following practical applications of the Rich Content Editor in your own course:
- Link files in assignment descriptions. Avoid confusion from students over what materials are relevant to an assignment by linking them right in an assignment description. If your instructions reference a reading, link your PDF where you mention it. If you would like students to fill out and submit a Word doc you created, include a link to the file and then there will be no confusion over which file to use.
- Update your course materials right in Canvas. Sometimes you may decide to change the details of a project or another course element. Rather than digging through your computer files to update a document and then reuploading it to your course, consider copying the instructions into the appropriate assignment, discussion, or page in your Canvas course where you can easily edit them anytime.
- Make your course content easy for your students to access. Use the RCE to create your course content in Canvas pages instead of uploading Word or PowerPoint files. Creating your content within Canvas will ensure that your students can access it on all devices and ensure that the ability to view your content isn’t dependent on the installation of specific software. It will also prevent students from having to juggle many tabs and windows at once to switch between downloaded files and your Canvas course.
- Use videos in new areas of your course. If you’ve taught online, you’ve almost definitely had a video embedded on a page before, but did you know you can also use the RCE to add videos to announcements, discussion threads, and even quizzes? If you’re one that prefers to communicate through speaking rather than written text, consider adding a video to your next announcement (while still including transcripts or a written overview for accessibility).
How Can I Use the Rich Content Editor to Make My Content More Accessible?
Use Built-In Text Formatting
The Rich Content Editor is a great tool for making your course content more readable. It is recommended that you format your text using Canvas’s built-in text styles from the dropdown menu in the Rich Content Editor. For example, Header 2 and Header 3 are great for page headers, while Paragraph is perfect for body text. Using these text styles will keep the appearance of your content consistent across your course, plus the text will scale correctly when a user zooms in on their browser. Canvas formatting also helps screen readers determine which parts of the text are headers and which are body text.
Add Alt Text to Images
Adding alt text to images is another best practice for making your course more accessible. Alt text provides a description of images that is readable by those that use screen readers. When you upload a new image with the Rich Content Editor, add a brief description in the Alt Text field.
Use the Accessibility Checker
The Rich Content Editor also comes equipped with a built-in accessibility checker that runs some basic checks and makes recommendations to improve the accessibility of the content you are editing.
More Detailed Information
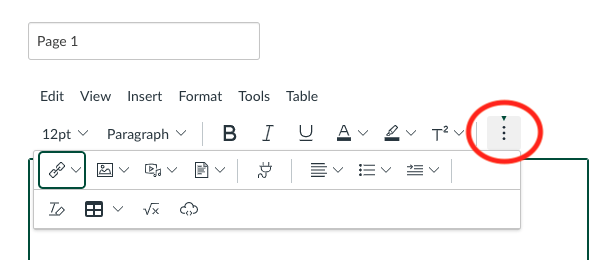
Reveal Additional Tools with the More Button
To see additional features, click the three stacked dots in the top right corner of the RCE toolbar. Depending on the size of the window in which you have Canvas open, more or fewer tools will be hidden behind this “More…” button.
Navigate Options with the Menu Bar
There is a menu bar at the very top of the Rich Content Editor. From this menu bar you can:
- Cut, copy, paste, and undo with the Edit menu
- Toggle between rich text and HTML view with the View menu
- Insert various types of media, as well as tables and equations
- Format your text
- Explore external Tools (this is also where you will embed Kaltura videos)
- Manage Table properties
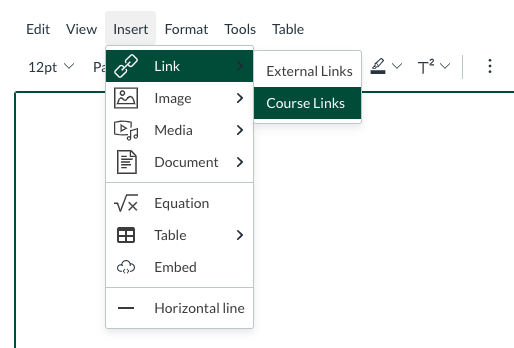
Link Content Through the Menu Bar or Toolbar
Course content and external content can be linked through the menu bar or toolbar. Photos, documents, URL links, and course content links can be added through the “Insert” menu or the toolbar buttons with icons that match those found within the Insert menu.
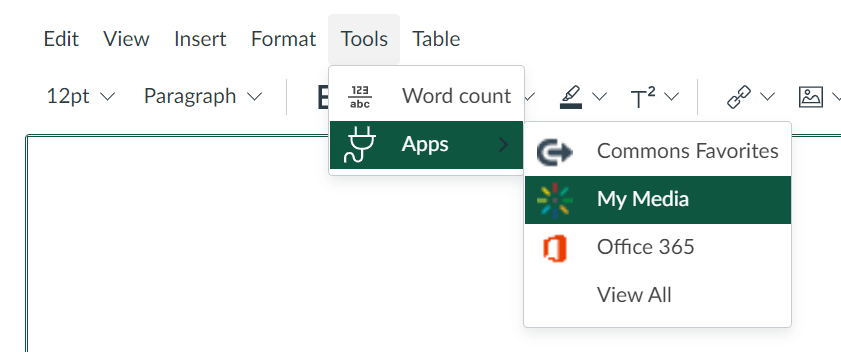
Access Third-Party Tools Through the Menu Bar or Toolbar
Office 365 content and Kaltura/My Media content can be embedded with their respective buttons in the RCE toolbar.

Other third-party tools like YouTube, Vimeo, and Films on Demand can be accessed through the “Apps” button with a plug icon. You can also access all external tools by going to Tools > Apps > View All in the menu bar. After you use a tool for the first time, it will appear under “Apps” without having to click “View All”.
If You Can’t Find What You’re Looking For…
To help you navigate this menu system, we’ve linked instructions below for some common features. Note that the process for each of these is the same whether you are using the RCE in a page, an assignment, a discussion, etc.
- How Do I Add and Modify Text in the Rich Content Editor?
- How Do I Embed Kaltura (MyMedia) Videos in the Rich Content Editor?
- How Do I Add an Image in the Rich Content Editor?
- How Do I Add Hyperlinks to External URLs in the Rich Content Editor?
- How Do Add a Link to Course Content (Assignments, Quizzes, etc.) in the Rich Content Editor?
- How Do Add a Link to Course Files (Word Docs, PowerPoints, etc.) in the Rich Content Editor?