Hands of students completing a cloud-shaped puzzle which reads "Online Collaboration"

Up and Running with Remote Group Work

A Case for Group Work

Group work can elicit negative reactions from instructors and students alike. Often enough, students groan about doing it and instructors dread grading it. The process is ripe for communication breakdowns resulting in stress from both perspectives. On top of this, the digital learning environment tends to compound these issues. Why then is group work so prevalent?

The answer is that, when done well, group activities help foster engagement and build relationships. Collaborative work helps students develop important skills like effectively articulating ideas, active listening, and cooperation with peers. Collaborative assignments correlate strongly with student success positioning them as one of eight high-impact practices identified by the Association of American Colleges and Universities. Making group work a worthwhile experience for students requires extra consideration and planning, but the positive gains are worth the effort.

Designing Group Work for Student Success

How can we design collaborative activities that are a quality learning experience for students? Scaffolding makes sure students are confident in their understanding of and ability to execute the activity. UW-Extension has created a helpful guide on facilitating group work that outlines three key suggestions to get you started. First, be sure students understand the purpose of the activity, in terms of what they are supposed to learn from it and why it is a group activity. Second, provide support so students have the necessary tools and training to collaborate. You are clear how and when students are to collaborate or provide suggestions. You ensure students understand how to use the needed technologies. Finally, providing opportunities for peer- and self-evaluation can alleviate frustrations of unequal workload by having students evaluate their own and their peers’ contributions. As challenges arise, guide groups toward solutions that are flexible but fair to all members. When embarking on group projects, be prepared to provide students with guidance about what to do when someone on the team is not meeting the group’s expectations.

One example of this as you design your group projects is to ask yourself whether it’s important students meet synchronously. If so, how might you design the project for students with caregiving responsibilities or with full-time or “off hours” work schedules? These students may not be able to meet as regularly or at the same time as other students. You might also consider whether all students need to hold the same role within the group, or if their collective project be split up based on group roles.

Consider how the group dynamics can impact student experiences. Helping students come up with a plan for group work and methods of holding one another accountable promotes an equitable learning environment. Consider any of these tools to help your students coordinate these efforts:

Assessing Group Work

Equitable, specific, and transparent grading are crucial to group-work success. The Eberly Center for Teaching Excellence of Carnegie Mellon University has a great resource on how to assess group work, including samples. This resource breaks grading group work down into three areas. First, assess group work based on both individual and group learning and performance. Include an individual assessment component to motivate all students to contribute and help them to feel their individual efforts are recognized. Also assess the process along with the product. What skills are you hoping students develop by working in groups? Your choice of assessment should point to these skills. One way to meet this need is to have students complete reflective team, peer, or individual evaluations as described above. Finally, outline your assessment criteria and grading scheme upfront. Students should have clear expectations of how you will assess them. Include percentages for team vs. individual components and product vs. process components as they relate to the total project grade.

Tools for Working Collaboratively

Picking the right tool among the many of what is available is an important step. First, consider how you would like students to collaborate for the activity. Is it important that students talk or chat synchronously, asynchronously, or both? Will students share files?

The following suggestions include the main collaboration tools supported at UWGB. Click to expand the sections for the various tools below.

If you are interested in learning more about any of these tools, consider scheduling a consultation with a CATL member.

Canvas discussions are one option for student collaboration. Operating much like an online forum, discussions are best suited for asynchronous communication, meaning students can post and reply to messages at any time, in any order. If you have groups set up in Canvas, you can create group discussions in which group members can only see one another’s posts. You can also adjust your course settings so that students can create their own discussion threads as well.

Hypothesis is a Canvas integration that lets instructors and students collaboratively annotate a digital document or website. Hypothesis annotation activities can be completed synchronously, such as over a Zoom call, or asynchronously on students' own time. Activities can be created for either the whole class or for small groups and are a great way for students to bounce around ideas about a text or reading. 

Office 365 refers to the online Microsoft Office Suite, including Word, PowerPoint, and Excel. Students can work collaboratively and asynchronously on projects using online document versions of any of these software, which updates changes in nearly real time. Microsoft Office 365 has partial integration with Canvas, allowing students to set up and share Office documents from within Canvas using the Collaborations feature. Students will have to log in to Office 365 through their Canvas course before they can use most features of Canvas and Office 365 integration.

Zoom is one of two web conferencing tools supported by the university, the other being Teams. The Zoom Canvas integration allows instructors to set up meetings within a Canvas course. Students can then access meeting and recording links from within the Canvas course. As such, it is generally easy to for students to access and use. One downside to Zoom is that it is a purely synchronous meeting tool, so students will have to coordinate their schedules or find other ways of including members that may not be able to attend a live meeting. Students that wish to set up meetings amongst themselves are not able to set up meetings with the Canvas integration, though they can use the Zoom desktop app or web portal and their UWGB account.

Microsoft Teams is a collaboration tool that combines web conferencing, synchronous and asynchronous text communications (in the form of chat and posts), and shared, collaborative file space. Microsoft Teams also has partial integration with Canvas, meaning students and instructors can create and share Teams meeting links within the Rich Content Editor of Canvas (in pages, announcements, discussions, etc.).

Putting It into Practice

When we ask students to work collaboratively, it’s important we reveal the “hidden curriculum” by building in the steps they should take to be a successful team. As a starting point, asking students to answer these questions helps clarify the work of the group:

  • “Who’s on the team?”
  • “What are your tasks as a group?”
  • “How will you communicate?” (Asynchronously? Synchronously?)
  • “How will you ensure everyone can meet the deadlines you set?”
  • “If or when someone misses a meeting, how will you ensure that everyone has access to the information they’ll need to help you all complete the project on time?”
  • “When will you give each other feedback before you turn in the final assignment?”

For a ‘bare bones’ group assignment, take the above considerations on designing and assessing groupwork into account and create a worksheet for the student groups to fill out together. Create a Canvas group assignment to collect those agreements, assign it points that will be a part of the whole project grade, and set the deadline for turning it in early so that students establish their plan early enough for it to benefit their group. Scaffolded activities that give students enough structure and agency is a delicate balance, but these kinds of guided worksheets and steps can help students focus their energy on the project, assignment, or task once everyone is on the same page.

Let’s keep the conversation going!

Do you have some tried and tested strategies for helping students coordinate and complete group work online? Send them our way by emailing: CATL@uwgb.edu or comment below!

An example of a Teams dashboard.

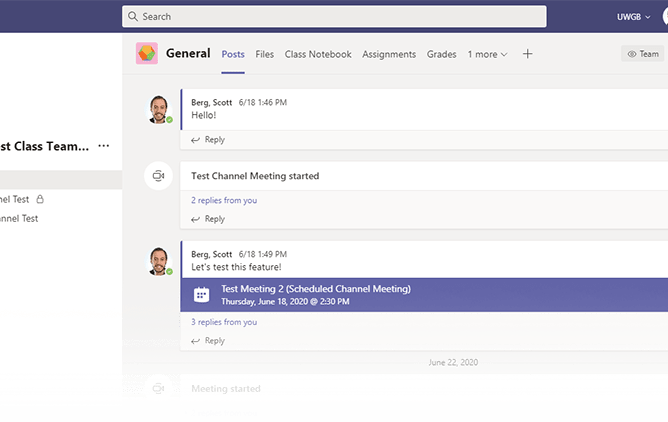
Microsoft Teams for Courses

Table of Contents

  1. Microsoft Teams Overview
  2. Ideas for Using Teams in Your Course
  3. How to Create a Team for Your Class
  4. How to Add a Link to Your Class Team in Your Canvas Course
  5. How to Add Public and Private Channels to Your Class Team
  6. How to Schedule Teams Meetings for Synchronous Class Sessions
  7. Using the Files Tab to Share and Collaboratively Edit Files
  8. Adding Tabs to Your Team’s Channels
  9. Teams Resources for Students

Microsoft Teams Overview

Microsoft Teams is an online collaboration platform that incorporates a wide range of features, including video conferencing, file sharing, instant messaging, and integrations with many other Microsoft 365 tools. Microsoft is actively developing Teams, and new features are being added to the program regularly. Microsoft is also aggressively marketing Teams for educational use and has developed many Teams features that directly compete with features commonly found in Canvas and other learning management systems. For example, the “Assignments” and “Grades” tabs of a class team are redundant with the equivalent Canvas features and if you are using Canvas in your course, these Teams features should largely be ignored at this time. In terms of being a fully featured learning management system, Teams has a long way to go to catch up to Canvas, so we recommend using Teams to augment your Canvas courses instead of using Teams as the primary platform for your online courses. This guide is intended to give an overview of the features of Teams that can be useful in teaching your courses, how to create and set up a team for your class, and how your class team and Canvas course can be used together to serve the instructional needs of your course.

Ideas for Using Teams in Your Course

  • Use the video meetings feature of Teams to hold synchronous class sessions or office hours.
  • Host course files and allow your students to share their own documents and collaborate on them in the “Files” tab of a class team.
  • Set up private channels in a class team to create a space where your small groups can communicate and share files for group work.
  • Add a Microsoft Planner tab to a class team to track progress on long-term projects.

How to Create a Team for Your Class

Here are basic instructions for creating a team for your class and inviting your students:

  1. Open the Microsoft Teams application and select Teams from the app bar.
  2. Click the Join or create team button in the top right of Teams.
  3. Hover your mouse over the “Create a team” tile and click the Create team button.
  4. Select Class.
  5. In the Create your team screen, type in your class’s name as you would like it to appear in Teams in the Name field. You may add a description if you would like. Click Next.
  6. Next, you are taken to the Add people screen where you will invite your students and other teachers to the class team. The quickest method to add your students is to use your course’s email distribution list. Type in the name of your course distribution list, then click Add.
  7. If you would like to add another teacher to the class team, click the Teacher tab, search for the teacher by their email address, then click Add.
  8. Click Close to finish adding users to the team.

Learn more about creating a class team from the Microsoft Teams for Education guide.

Please NOTE: Student enrollments in your class team do not continually sync with SIS. To reflect course adds/drops that have taken effect after creating your team, you must manually update your class team’s membership by following these instructions:

How to Add a Link to Your Class Team in Your Canvas Course

Once a student has been added to a team, the team will automatically show up in the list of teams found in their Microsoft Teams application. It can still be useful to include a direct link to your class team in your Canvas course to help students locate it or quickly open Teams from Canvas. Here is how to find a link to your team from within Teams and make it available in Canvas:

  1. Open Microsoft Teams and navigate to your class team.
  2. Click the More options button (“…”) next to the team name, then click Get link to team.
  3. Click Copy.
  4. Either paste the link into a page in your Canvas course, or use the Redirect Tool in Canvas to add a link to your class team right to your Canvas course’s navigation menu. While setting up the Redirect Tool with a Microsoft Teams team link, you must enable the option to Force open in new tab.

How to Add Public and Private Channels to Your Class Team

Channels in Microsoft Teams are organizational subunits within a team that can be used to organize collaboration activities surrounding different topics, projects, or small groups. Each channel has its own series of “tabs.” By default, each channel will have its own “Posts” tab for asynchronous discussion and “Files” tab for file sharing and collaborative editing. Each channel can be further customized with the addition of new tabs. Every team comes with a “General” channel to start; additional channels may be added by the instructor. Channels can have “Standard” privacy, meaning they can be seen by anyone in the team, or channels may be set up with “Private” privacy, meaning only designated people in the team can access that channel. Creating additional standard channels can be useful for organizing collaboration around topics or projects. Private channels can be created to facilitate small group work. Here is how to create a new channel in your class team:

  1. Open Microsoft Teams and navigate to your class team.
  2. Click the More options button (“…”) next to the team name, then click Add channel.
  3. Enter a Name in the “Channel name” field and, optionally, enter a Description in the “Description (optional)” field.
  4. Select the desired privacy setting in the “Privacy” drop-down menu:
    • To create a standard channel visible to your whole team, select Standard- Accessible to everyone on the team.
    • To create a private channel that will only be visible to specific students, select Private – Accessible only to a specific group of people within the team.
  5. If you are creating a standard channel, click Add to finish creating the channel.
  6. If you are creating a private channel, click Next. Add members to the private channel by typing their names within the “Search for students” field and clicking the Add button. Once the students have been added, click the Done button to finish creating the channel.

Learn more about creating channels in your class team from the Microsoft Teams for Education guide.

How to Schedule Teams Meetings for Synchronous Class Sessions

Extensive documentation for scheduling Teams Meetings outside of a class team can be found on the UWGB KnowledgeBase. Once you have created a team for your class, you can quickly invite all students to synchronous video Teams meetings by scheduling a channel meeting for your team:

  1. Open Microsoft Teams and select Calendar from the app bar.
  2. Give your meeting a title in the “Add title” field.
  3. Enter the dates and times for the meeting’s start and end. If setting up a recurring meeting, enter the date and time for the first meeting occurrence.
  4. To create a recurring meeting, change the selected meeting recurrence drop-down menu choice from “Does not repeat” to the desired pattern. For a class that meets multiple times in a week, choose the Custom option, set it to repeat every 1 Week, and select the desired days of the week. Set an end date to stop the meeting recurrence at the end of the semester. Click Save to add the custom recurrence pattern to your meeting.
    Scheduling a teams meeting to reoccur
  5. In the “Add channel” field, enter the name of class team and select the channel in which you’d like to hold the meeting (choose either General or another channel you have created in that team). Once you save the meeting, a post will be created that advertises this meeting in that team channel’s Posts tab, and all members of that channel will be invited to the meeting and have it added to their calendars.
  6. Enter in any meeting details in the meeting body. You could include expectations for student participation or agenda items to this field.
  7. In the top-right of the New meeting window, click Send to create your meeting and send the invitations to the class team’s channel members.

Learn more about scheduling and joining Teams meetings from the Microsoft Teams for Education guide. If you’d like to know more about using breakout rooms during your class Teams sessions, you can read Microsoft’s guide on breakout rooms.

Using the Files Tab to Share and Collaboratively Edit Files

The Files tab of the General channel of a class team in Teams has an additional feature that is not present in other non-class teams. That feature is the Class Materials folder. The contents of the Class Materials folder can be viewed by the class team’s students and teachers, but only teachers are able to add, edit, and delete the files. Students have read-only access to the Class Materials folder and its files. Use the Class Materials folder to distribute materials to students that you do not wish them to edit.

Students are able to add files and edit any existing files outside of the Class Materials folder of a channel’s Files tab.  Any type of file can be hosted in a team, but Word, Excel, PowerPoint, and OneNote files have the added ability to be edited with live collaboration. Multiple users can have the same Word, Excel, PowerPoint, or OneNote document open at the same time and make their changes side-by-side. You could leverage this feature during both synchronous class sessions and for asynchronous assignment work. Combine this collaborative editing feature with private channels to facilitate small group work in your course by giving your student groups a place to privately share and collaborate on files.

To learn more about the powerful file-sharing features of Teams, please see the Microsoft Teams for Education guide.

Adding Tabs to Your Team’s Channels

Additional tabs can be added to each channel of your class team. Tabs can be used to “pin” recently accessed documents, websites, and other tools to your channel for easy access. To add a tab to a channel, simply click the “+” button at the end of the list of tabs and, from the Add a tab menu, select the tool you wish to add from the menu.

Adding a tab in Teams

Learn more about adding additional tabs and apps to Teams in this Microsoft Support guide, and find out more about some of the tabs you can add to a team channel on this guide page.

Teams Resources for Students

Here are some resources you can provide to your students to help them find their way around Microsoft Teams:

An Online Core

What is an online core?

An online core is the center around which your course pivots between the face-to-face and distance environment. Even if you are teaching fully online, you are likely bringing a face-to-face course to the online environment. The purpose of the online core is enable all your learners to achieve full course citizenship regardless of how they are able to participate. There are three elements to the core: communication, content, and assessments.

Communication refers to the ways in which your learners will connect with you and with their fellow students.

Content is the “what” your class is trying to teach. It includes the ideas, skills, and knowledge your course is trying to convey to learners. Content also implies a medium: readings, videos, podcasts, etc.

Assessments refer to the summative – high-stakes, graded – and formative – lower stakes, informal – ways that you will know that students have achieved their learning outcomes.

At the core of the online core

Equivalence is central to the online core. With a course’s essential statement and objectives/learning outcomes in mind, all students should have an equivalent experience. For example, watching a lecture online that other students experienced face-to-face is an equivalent experience if you also build in a way for the online students to ask questions, get clarification, and interact with activities that the face-to-face students experienced, such as a think-pair-share. A core is about building citizenship in your class for all students. While not all students will access your course in the same way, they should have the ability to participate fully. Having multiple means for representing key course concepts means that students who aren’t able to attend or have poor internet connectivity will be able to have at least one way to access course content that is workable for them. From an instructor’s point of view, having multiple means to access content shifts the relationship with the student. Where before the student unable to attend may have seemed like an obstacle to surmount or a problem to solve, now they have become a full member of the class.

This seems really overwhelming… how can I make this manageable?

It is true that adding multiple means of representation, expression, and engagement to all course elements is a daunting (and probably foolish) task. Rather than tackling everything in your course, we recommend that you adopt a “plus-1” approach. Coined by Thomas Tobin and Kirsten Behling, the plus-1 approach encourages instructors to think of the “pinch points” or elements that will disproportionately inhibit the experience of learners in a course. Then add another means of representation, expression, or engagement to shore up those pinch points.

During this continued time of COVID and related precautions, we encourage you to adapt the plus-1 approach to think about all the learning environments your course will serve (face-to-face, mask-to-mask, online, synchronous online, etc.) and look for places where universal design can alleviate the sting of your pinch points.

For example, what would happen if students could not attend a synchronous online session? Perhaps you could add in a way for students to download and watch your video (multiple means of representation) and participate in the class discussion through Canvas (engagement).

How do I add a “plus-1” element?

One way to answer this question is to go to the National Center for Universal Design website which has examples for how to meet the benchmarks for representationexpression, and engagement. These can be useful in brainstorming ways that will work in your class to add universal design elements.

Another way to answer this question is to ask your colleagues and CATL for recommendations.

Types of cores

Not all cores will be the same. At one end of the spectrum will be courses where a face-to-face element is central to the experience of the class. First-year experience classes try to introduce students to the campus itself. Lab courses rely on manipulating specialized equipment. Ensembles build their sound on the blending of voices or instruments. The core for these courses will consider how to make the best use of the physically distant face-to-face environment; how to do as much work online to maximize the face-to-face time; and how to pivot online should we experience another shutdown like last Spring.

At the other end of the spectrum are those classes which do not necessarily require face-to-face interaction. For these classes, it will be important to move the course’s center of gravity to the online environment.

Many courses will fall somewhere in the middle between these two poles. Regardless of the listing in the schedule of classes, building your content, communication, and assessments online will give you maximum flexibility to deal with whatever comes our way this fall.