Using Zoom for Office Hours

Whether your course is held completely online, face-to-face, or somewhere in between, offering your students the opportunity to meet for office hours remotely rather than just in person is a great way to offer additional flexibility and help meet your students’ needs. With its robust Canvas integration, Zoom is a solid choice for virtual office hours. Using Zoom for office hours is mostly the same as setting up a meeting for a virtual class session, though there are a few additional options you may wish to consider. 

Enabling the Waiting Room 

For office hours, we highly suggest enabling the waiting room in your meeting settings. When the waiting room is enabled, it means that each attendee will have to be manually let into the Zoom meeting by you, the host. This gives you more control of who joins the call and when, and you can prevent a student from “popping in” and accidentally intruding on a private meeting. 

Security options for Zoom meetings
The waiting room is one of the options you can select in the “Security” section of your meeting settings. You can require both a passcode and the waiting room, if you desire.

Setting Up a Recurrence 

If you have office hours at the same time each day and each week, you can set up a recurring meeting just like you would for virtual sessions. Let’s say you have office hours from 11 a.m. to 1 p.m. on Tuesdays and Thursdays. You would set your recurrence to “weekly”, check Tuesday and Thursday, set the start time as 11 a.m., and set the duration to two hours. The start and end dates of the recurrence would be the first and last days of the semester. When you set up your office hours through the Zoom Canvas integration, this will also populate the Canvas calendar with these meeting times. 

"When", "duration" and "time zone" settings for Zoom meetings; the meeting is set to start at 11 a.m. for a duration of 2 hours. Recurrence is checked and set to "weekly", with Tuesdays and Thursdays checked. The end date is set to May 9, 2022.
Sample office hour recurrence settings based on the scenario described above.

But what if your office hours don’t occur during the same time slot each day, such as 8 to 10 a.m. on Mondays and 1 to 3 p.m. on Thursdays? You could set up two recurring meetings, one for Mondays and one for Thursdays. In this case, you will want to make sure your two meeting links are clearly labeled with the day of the week so students don’t mix them up. You could also set up a single recurring meeting and ignore the fact that the meeting time for one of the two days is incorrect—the link will still work outside of the designated time slot, but it does mean that it will also list the incorrect time on the Canvas calendar and in Zoom. 

In these cases, another solution is to create a recurring meeting with “no fixed time”, which can be set from the “recurrence” dropdown menu when adjusting your meeting’s settings. This will create an open-ended meeting link that won’t expire for 365 days. Note that “no fixed time” meetings will not show up on the calendar in Canvas, though you could still manually add your office hours to the Canvas calendar and your Outlook calendar. 

The "recurring meeting" box is check in the Zoom settings and the recurrence dropdown is set to "no fixed time"
Recurrence settings can be managed under the “Time Zone” section of your meeting settings in the Zoom Canvas integration.

Questions? 

For most technical questions, please contact Zoom support or the GBIT Service Desk. If your questions pertain to the Zoom Canvas integration, your best point of contact is dle@uwgb.edu. Lastly, if you have general questions about how you can use Zoom to support your teaching, we always welcome you to email the CATL inbox (catl@uwgb.edu) or schedule a consultation with a CATL member.

Using Zoom for Class Meetings

Planning on using Zoom for a virtual classroom course? There’s a lot of great documentation out there on Zoom and the Zoom Canvas integration, but sometimes it’s hard to figure out how to get started. To help you out, we’ve collected some Zoom guides and repackaged them in a way that covers the basics for instructors—scheduling a meeting, sharing the meeting info, things to consider before your first meeting, running a meeting, and recording a meeting.

Scheduling a Meeting

If you’re using Zoom for virtual classroom sessions, we recommend setting up your meetings in Canvas. The Zoom Canvas integration can be accessed from the “Zoom” link at the bottom of your course’s navigation menu on the left side of your screen, and then from there all you need to do is click the “Schedule a New Meeting” button, enter your meeting details, and then click “Save.” For weekly class sessions, you’ll want to make sure that you select the “recurring meeting” checkbox when scheduling your Zoom meeting.

When you schedule a new meeting in Canvas, the Zoom integration automatically creates course calendar events and student To-Do list reminders for each occurrence of the meeting. There are a variety of other meeting settings you can set as well. This Zoom guide can help you learn more about all the meeting setting options.

The "Zoom" link in the Canvas course navigation menu.
The Zoom integration in Canvas is accessed from your course’s navigation menu on the left side of the screen.

Sharing the Meeting Info with Your Students

After you set up your meeting, we recommend sharing the meeting info in the first module of your course so it will be easy for students to find. Simply click on your meeting in the Canvas integration, the Zoom web portal, or the application, click the button or link that says “Copy invitation”, and then paste that information into a page in your first module. Another option is to copy the “join link” and add that link in the first module as an external URL (make sure to check “Load in a new tab” when adding the link). We have a recording of a “Teaching with Zoom” session if you would like to see a video walkthrough of setting up a Zoom meeting in Canvas and posting the link in your course, along with our recommendations on which meeting settings to use.

A sample Zoom meeting link in a Canvas module
Your Zoom link can be added to a module as an external URL. You can also copy the meeting info into a page and put that page in your first module.

Before Your First Meeting

If a student previously registered for a personal Zoom account using their UWGB email address, they may see the error “user does not exist” when they try accessing Zoom through your Canvas course. The way to resolve this issue is to have all your students log into the UW System Zoom web portal once before they start accessing Zoom from Canvas. The Zoom Web Portal is linked on the UWGB homepage, at the bottom of the tab that opens when you click the “Menu & Search” button in the top-right corner of the page.

University of Wisconsin Zoom web portal sign-in page
The landing page for the UW System Zoom web portal. Encourage your students to sign into Zoom here before your class’s first Zoom meeting.

Once logged in, students who previously had an account with their UWGB email will be prompted to switch their account to UW System’s license. This knowledgebase article provides more details and complete instructions that you can send to your students. After a student has completed these steps, it may take a few hours for the update to occur, but once complete, your students should have no issues accessing Zoom through Canvas.

Running Your Zoom Meeting

To start your meeting, simply join with the blue “Start” button next to your meeting listing in Canvas, the Zoom web portal, or the Zoom application. While running your session, the controls will be at the bottom of your screen. Here you can toggle on and off your mic and camera, send and read messages in chat, share your screen, start breakout rooms, and more. This Zoom article details the features of each button on the host controls toolbar.

Zoom toolbar
The host controls of Zoom’s toolbar.

One feature of Zoom that you might consider using for small group discussions and increased interactivity between your students is Zoom breakout rooms. You also might want to look into using Zoom’s polling feature during class as an easy way to keep students engaged and gauge their understanding of the content.

When the meeting is done, click the red “End” button. As host, you will be given two options: “Leave Meeting” or “End Meeting for All”. Leaving the meeting means that the meeting is still “running” and students can continue talking or leave at their own discretion. Zoom meetings need a host, so you will be asked to assign a new host if you leave the meeting in this way (unless there is already a co-host present). Ending the meeting for all will immediately end the meeting for everyone—the host, any co-hosts, and participants.

Recording Your Meeting

If you wish to record your class sessions, you can automatically set up recordings from the meeting’s settings, or you can manually start and end the recording during the session. Meeting recordings can either be saved to the cloud (online storage) or locally (to your computer). We recommend saving your recordings to the cloud as they can easily be accessed and shared in Canvas through the Zoom integration and also prevent the storage on your computer from being quickly depleted.

Zoom Canvas integration
When you set up your Zoom meetings through a Canvas course, you can also view and manage your Zoom cloud recordings for those meetings from the Zoom integration in Canvas.

When you set up your Zoom meetings through a Canvas course, you can also view and manage your Zoom cloud recordings for those meetings from the Zoom integration in Canvas.

Meeting cloud recordings are unpublished by default, which means only you, the instructor, can see them. If you would like your students to be able to view the recordings from within the “Cloud Recordings” tab of the Zoom integration in your Canvas course, you can manually publish your session recordings by clicking the “Publish” toggle next to each one.

Questions?

For most technical questions, please contact Zoom support or the GBIT Service Desk. If your questions pertain to the Zoom Canvas integration, your best point of contact is dle@uwgb.edu. Lastly, if you have general questions about how you can use Zoom to support your teaching, we always welcome you to email the CATL inbox (catl@uwgb.edu) or schedule a consultation with a CATL member.

Request a Consultation

An example of a Teams dashboard.

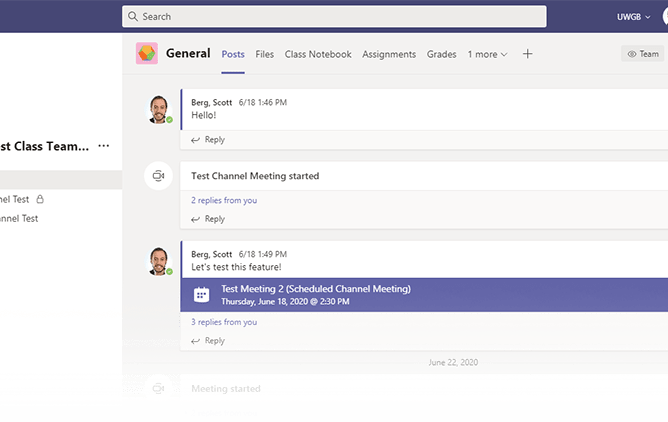
Microsoft Teams for Courses

Table of Contents

  1. Microsoft Teams Overview
  2. Ideas for Using Teams in Your Course
  3. How to Create a Team for Your Class
  4. How to Add a Link to Your Class Team in Your Canvas Course
  5. How to Add Public and Private Channels to Your Class Team
  6. How to Schedule Teams Meetings for Synchronous Class Sessions
  7. Using the Files Tab to Share and Collaboratively Edit Files
  8. Adding Tabs to Your Team’s Channels
  9. Teams Resources for Students

Microsoft Teams Overview

Microsoft Teams is an online collaboration platform that incorporates a wide range of features, including video conferencing, file sharing, instant messaging, and integrations with many other Microsoft 365 tools. Microsoft is actively developing Teams, and new features are being added to the program regularly. Microsoft is also aggressively marketing Teams for educational use and has developed many Teams features that directly compete with features commonly found in Canvas and other learning management systems. For example, the “Assignments” and “Grades” tabs of a class team are redundant with the equivalent Canvas features and if you are using Canvas in your course, these Teams features should largely be ignored at this time. In terms of being a fully featured learning management system, Teams has a long way to go to catch up to Canvas, so we recommend using Teams to augment your Canvas courses instead of using Teams as the primary platform for your online courses. This guide is intended to give an overview of the features of Teams that can be useful in teaching your courses, how to create and set up a team for your class, and how your class team and Canvas course can be used together to serve the instructional needs of your course.

Ideas for Using Teams in Your Course

  • Use the video meetings feature of Teams to hold synchronous class sessions or office hours.
  • Host course files and allow your students to share their own documents and collaborate on them in the “Files” tab of a class team.
  • Set up private channels in a class team to create a space where your small groups can communicate and share files for group work.
  • Add a Microsoft Planner tab to a class team to track progress on long-term projects.

How to Create a Team for Your Class

Here are basic instructions for creating a team for your class and inviting your students:

  1. Open the Microsoft Teams application and select Teams from the app bar.
  2. Click the Join or create team button in the top right of Teams.
  3. Hover your mouse over the “Create a team” tile and click the Create team button.
  4. Select Class.
  5. In the Create your team screen, type in your class’s name as you would like it to appear in Teams in the Name field. You may add a description if you would like. Click Next.
  6. Next, you are taken to the Add people screen where you will invite your students and other teachers to the class team. The quickest method to add your students is to use your course’s email distribution list. Type in the name of your course distribution list, then click Add.
  7. If you would like to add another teacher to the class team, click the Teacher tab, search for the teacher by their email address, then click Add.
  8. Click Close to finish adding users to the team.

Learn more about creating a class team from the Microsoft Teams for Education guide.

Please NOTE: Student enrollments in your class team do not continually sync with SIS. To reflect course adds/drops that have taken effect after creating your team, you must manually update your class team’s membership by following these instructions:

How to Add a Link to Your Class Team in Your Canvas Course

Once a student has been added to a team, the team will automatically show up in the list of teams found in their Microsoft Teams application. It can still be useful to include a direct link to your class team in your Canvas course to help students locate it or quickly open Teams from Canvas. Here is how to find a link to your team from within Teams and make it available in Canvas:

  1. Open Microsoft Teams and navigate to your class team.
  2. Click the More options button (“…”) next to the team name, then click Get link to team.
  3. Click Copy.
  4. Either paste the link into a page in your Canvas course, or use the Redirect Tool in Canvas to add a link to your class team right to your Canvas course’s navigation menu. While setting up the Redirect Tool with a Microsoft Teams team link, you must enable the option to Force open in new tab.

How to Add Public and Private Channels to Your Class Team

Channels in Microsoft Teams are organizational subunits within a team that can be used to organize collaboration activities surrounding different topics, projects, or small groups. Each channel has its own series of “tabs.” By default, each channel will have its own “Posts” tab for asynchronous discussion and “Files” tab for file sharing and collaborative editing. Each channel can be further customized with the addition of new tabs. Every team comes with a “General” channel to start; additional channels may be added by the instructor. Channels can have “Standard” privacy, meaning they can be seen by anyone in the team, or channels may be set up with “Private” privacy, meaning only designated people in the team can access that channel. Creating additional standard channels can be useful for organizing collaboration around topics or projects. Private channels can be created to facilitate small group work. Here is how to create a new channel in your class team:

  1. Open Microsoft Teams and navigate to your class team.
  2. Click the More options button (“…”) next to the team name, then click Add channel.
  3. Enter a Name in the “Channel name” field and, optionally, enter a Description in the “Description (optional)” field.
  4. Select the desired privacy setting in the “Privacy” drop-down menu:
    • To create a standard channel visible to your whole team, select Standard- Accessible to everyone on the team.
    • To create a private channel that will only be visible to specific students, select Private – Accessible only to a specific group of people within the team.
  5. If you are creating a standard channel, click Add to finish creating the channel.
  6. If you are creating a private channel, click Next. Add members to the private channel by typing their names within the “Search for students” field and clicking the Add button. Once the students have been added, click the Done button to finish creating the channel.

Learn more about creating channels in your class team from the Microsoft Teams for Education guide.

How to Schedule Teams Meetings for Synchronous Class Sessions

Extensive documentation for scheduling Teams Meetings outside of a class team can be found on the UWGB KnowledgeBase. Once you have created a team for your class, you can quickly invite all students to synchronous video Teams meetings by scheduling a channel meeting for your team:

  1. Open Microsoft Teams and select Calendar from the app bar.
  2. Give your meeting a title in the “Add title” field.
  3. Enter the dates and times for the meeting’s start and end. If setting up a recurring meeting, enter the date and time for the first meeting occurrence.
  4. To create a recurring meeting, change the selected meeting recurrence drop-down menu choice from “Does not repeat” to the desired pattern. For a class that meets multiple times in a week, choose the Custom option, set it to repeat every 1 Week, and select the desired days of the week. Set an end date to stop the meeting recurrence at the end of the semester. Click Save to add the custom recurrence pattern to your meeting.
    Scheduling a teams meeting to reoccur
  5. In the “Add channel” field, enter the name of class team and select the channel in which you’d like to hold the meeting (choose either General or another channel you have created in that team). Once you save the meeting, a post will be created that advertises this meeting in that team channel’s Posts tab, and all members of that channel will be invited to the meeting and have it added to their calendars.
  6. Enter in any meeting details in the meeting body. You could include expectations for student participation or agenda items to this field.
  7. In the top-right of the New meeting window, click Send to create your meeting and send the invitations to the class team’s channel members.

Learn more about scheduling and joining Teams meetings from the Microsoft Teams for Education guide. If you’d like to know more about using breakout rooms during your class Teams sessions, you can read Microsoft’s guide on breakout rooms.

Using the Files Tab to Share and Collaboratively Edit Files

The Files tab of the General channel of a class team in Teams has an additional feature that is not present in other non-class teams. That feature is the Class Materials folder. The contents of the Class Materials folder can be viewed by the class team’s students and teachers, but only teachers are able to add, edit, and delete the files. Students have read-only access to the Class Materials folder and its files. Use the Class Materials folder to distribute materials to students that you do not wish them to edit.

Students are able to add files and edit any existing files outside of the Class Materials folder of a channel’s Files tab.  Any type of file can be hosted in a team, but Word, Excel, PowerPoint, and OneNote files have the added ability to be edited with live collaboration. Multiple users can have the same Word, Excel, PowerPoint, or OneNote document open at the same time and make their changes side-by-side. You could leverage this feature during both synchronous class sessions and for asynchronous assignment work. Combine this collaborative editing feature with private channels to facilitate small group work in your course by giving your student groups a place to privately share and collaborate on files.

To learn more about the powerful file-sharing features of Teams, please see the Microsoft Teams for Education guide.

Adding Tabs to Your Team’s Channels

Additional tabs can be added to each channel of your class team. Tabs can be used to “pin” recently accessed documents, websites, and other tools to your channel for easy access. To add a tab to a channel, simply click the “+” button at the end of the list of tabs and, from the Add a tab menu, select the tool you wish to add from the menu.

Adding a tab in Teams

Learn more about adding additional tabs and apps to Teams in this Microsoft Support guide, and find out more about some of the tabs you can add to a team channel on this guide page.

Teams Resources for Students

Here are some resources you can provide to your students to help them find their way around Microsoft Teams: