The purpose of this document is to provide some guidance for instructors regarding the use of classrooms equipped to record and live stream class sessions. The document is not mean to replace the level of personal assistance that instructional technologists and designers can provide.
Please use the tabs below to navigate between topics.
What is being recorded, and how can it be enabled for a class
Watch this video for a 15-minute demo that explains and demonstrates how these classrooms are set up to work with the Kaltura Classroom software to stream and record your classes and read below the video for our text-based guide.
https://mediaspace.wisconsin.edu/media/Kaltura+Classroom+Demo+v2/1_3m1u0nu5
By default, the Kaltura Classroom software used in these rooms is set up to record and stream whichever video source is being projected in the classroom (PC, Doc Cam, Laptop, etc.). Video from the camera mounted in the back of the classroom will be included in the recording of the class, but it will not be part of the live stream.
To have your class sessions automatically recorded and live streamed for the entire semester, please email dle@uwgb.edu as soon as possible and no later than one week before the start of the class to request the scheduling of the automatic recording and streaming of your class. In your request, please include the name of each class you would like recorded and streamed, the scheduled days and times of each class, and the room in which each class is scheduled.
Starting, Pausing, and Stopping Recordings
You must be logged into the classroom computer for the recording to start. Your class recording will automatically start recording at your class's scheduled start time. If you log into the computer before class begins, you will see the Kaltura Classroom software and a countdown to when the recording will begin.

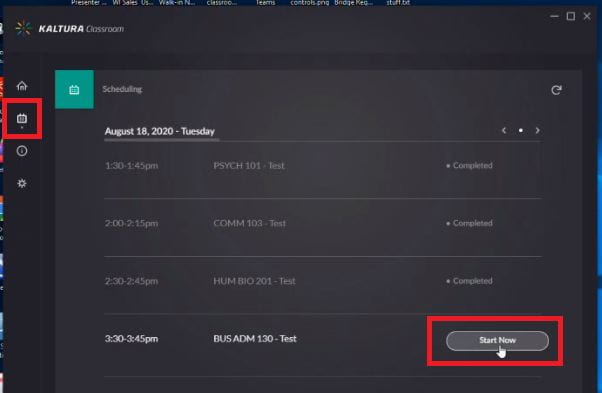
It is possible to begin the recording early. This can be completed through the SCHEDULING area (calendar icon) of the software, not via the large red "Start Recording" button visible when the software first opens. The large red "Start Recording" button is used for ad hoc recordings only. To start a scheduled class recording early, from the scheduling screen, hover your mouse cursor over the "Starting in X min" button next to your scheduled time, and click the button once it says "Start Now." If you log into the computer after your class's scheduled start time, the recording will automatically start once you are logged in and the recording application loads. It is not possible to start a scheduled recording more than 10 minutes early.
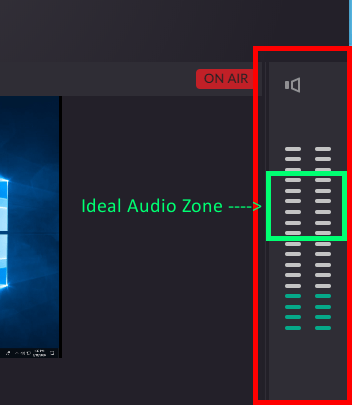
While preparing to record, do not forget to wear the wireless microphone and switch the microphone bodypack's power on. The microphone is stored in a drawer under the PC and the other classroom equipment in the instructor's desk. If the microphone's battery meter reads two or fewer segments (out of 5), before your class, please swap the AA rechargeable batteries with those in the battery charger in the drawer. Please verify that the software is picking up the microphone audio by saying a few words and looking for movement in the Kaltura Classroom application's audio meter. The meter should "bounce" as you speak. If necessary, use the room system's touch panel to adjust the mic volume so that the top of the metered audio bounces into the ideal audio zone depicted below as you are speaking (i.e. set it not too soft, yet not too loud).
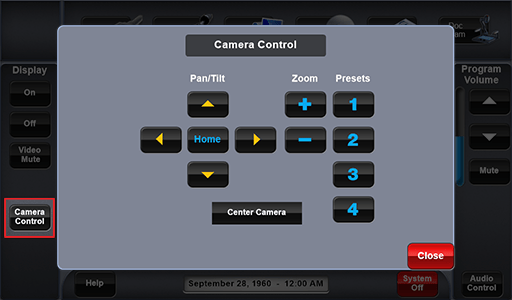
Before your recording begins, examine the software's video preview windows to make sure that the program is capturing your projected video source and that the camera shot is adjusted to your specification. To focus on your teaching and not the technology, we recommend using one camera shot that will work for the entire class. If you like to roam the front of the room as you teach, zoom out to a wider shot that encompasses the front of the room so you do not walk out of the camera frame. If you prefer to teach from behind a podium or desk in a semi-stationary position, zoom in to a tighter camera shot to better transmit your body language and mouth movements. To adjust the camera shot, use the "Camera Control" menu on the room's touch panel controls.
To pause your recording, click the red pause button from the Kaltura Classroom recording software. To resume the recording, click the same button. If you minimized the software, click on it from the bottom of Windows to show the software again.
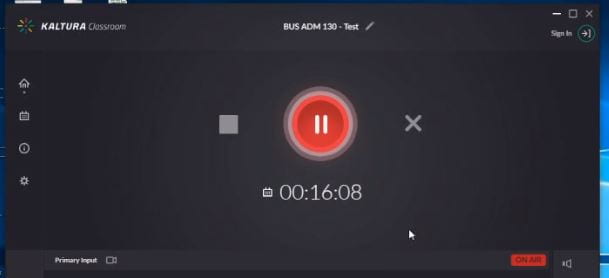
Just like your class will automatically start recording, it will automatically stop recording at the scheduled end time of your class. You may end the recording early if you need to by clicking the square "stop" button. If you are ending class early, please make sure to stop the recording before logging off of the classroom computer.
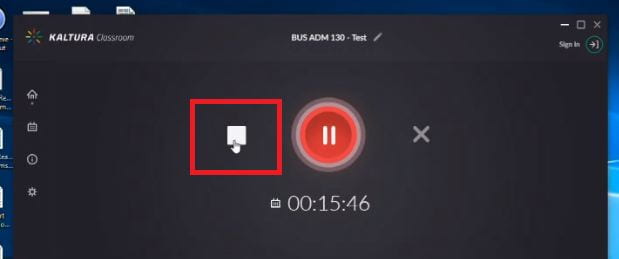
You can also extend the recording by 5 minute increments. Once your scheduled recording has less than 10 minutes remaining, a + (plus) button will become visible near the timer. Clicking the plus symbol will allow you to extend your recording time by 5 minutes. You will not be able to extend your recording into the next class period. Please be considerate of any incoming class and make sure you leave the room in time for them to set up for their class and recording.

Pausing or stopping a recording early will cause the Kaltura Classroom application to prompt you to log in to your account. You will not need to log in to the application if you are simply letting the recording start and stop automatically. To log in:
- In the "Select Organization" drop-down menu, select UW-Green Bay.
- Click Go.
- Enter your UWGB email and password.
- Click Login.
Once your recording is finished, it will automatically upload to the My Media server. You may immediately log off of the computer after stopping the recording, but please do not shut down the computer, as the computer needs to remain on for the upload to complete. At the end of class, please switch off the wireless microphone and return it to the drawer in the instructor desk.
If you're reading this, you're likely at least a little bit concerned with engaging students in your class who are participating across attendance options. Those students are probably accustomed to learning in-person and unfamiliar with some of the challenges that classes that exist outside of a particular classroom can pose. That may take the form of self-motivation and discipline, preparedness, and persistent engagement throughout the course. It is important to keep in mind that students in remote attendance are still the same students that you would normally have in-person, and will require the same encouragement, support, and feedback that you would normally provide.
As students engage with the content and activities within your course, you may want to consider how some of the course components translate to different student attendance options. The video below includes Dr. Patricia Donohue's advice for instructors tackling this challenge (~1:30).
But what does a translation from in-person instruction to synchronous or asynchronous look like? We've adapted a table from the School of Social Work at the University of Buffalo to attempt to illustrate the role different instructional modalities can have on different aspects of a course.
| Seated | Remote | Online | |
|---|---|---|---|
| Pacing |
Class-paced |
Class-paced |
Class- and self-paced |
| Self-Management Scaffolding | Mostly limited to how assignments are structured Supported in classroom lectures | Provide suggested prep times that map closer to the scheduled class time, i.e., suggest that students do work certain days of the week. | Provide content pathways, with some reminders and allow students more flexibility |
| Content Delivery |
On-campus, together Lecture/guest lecture Assess learning with face-to-face questions. |
Synchronous and asynchronous mix Online lecture/guest lecture Assess learning with synchronous polling tools (examples) |
Primarily asynchronous Online lecture/guest lecture recording Assess learning with quizzes/assessments Occasional synchronous sessions |
| Experiencing Content | View/listen to multimedia together, read stories/accounts and process together; discussions/activities to experiment with content | Best to do synchronously: view/listen to multimedia, process material immediately following viewing/reading; discussions/activities to experiment with content through use of breakout rooms and class role plays. | Links to multimedia, discussions, guided activities, group work self-organized outside of class. |
| "Practicing" Content | Small groups in class, demonstrations in class, deconstructing a process in class, real time parallel process |
Combination of synchronous and asynchronous Small groups using breakout rooms, demonstrations, large and small group skills practice and/or development of action steps Give time for tasks and report out as a group. Explain how small groups will be formed and disbanded during class time. Visit breakout rooms to ensure the group is on task. Alert students on how to ask questions when in breakout rooms Instructor can give prompts and suggestions using private chat features |
Use of online tools to demonstrate the execution of content (e.g., VoiceThread, flipgrid, podcasts) and hold synchronous activities in small groups and larger class during occasional live sessions Give time for tasks and explain how report out will happen. Explain how small groups will be formed and disbanded. Alert students on how to ask questions when in breakout rooms Instructor can give prompts and suggestions using private chat features |
| Self Awareness |
Easier to gauge presentation and use of self via reflection, anticipation, and real time discussion Real time processing of triggers, conflicts, and disclosures |
Synchronous discussion with prompts, anonymous polling, self-check surveys Real time processing of triggers, conflicts, and disclosures optimal, but may happen outside of synchronous session and need to be brought back to synchronous class |
Synchronous or asynchronous self-check surveys, journals, role plays Anticipation of and planning for triggers (highly emotional material), conflicts (group assignments), and disclosures (lived experience) through self reflection activities |
| Student Prep |
Follow syllabus, remind of upcoming work in live classes Occasionally check email and/or LMS announcements |
Instructor-based reminders/prompts via email, synchronous class reminders, Canvas Reminder to read email and check LMS announcements routinely |
Reminders built into the structure of course. Encourage group connection places for whole class Expectation set to routinely monitor email and check LMS announcements |
| Instructor Prep | May be able to “go with what you know,” play it more by ear, bring copies of activity instructions to class last minute, follow syllabus for the most part and provide extra context in class |
Plan out agenda and activities, keep to time frames, mix up delivery format to prevent cognitive overload. May be able to plan week to week Ensure students have all material referenced before the session-minimize need for internet exploration during live class |
Think out when to schedule interactions, assignments, exploration. When will students most benefit from what kind of synchronous engagement? Use this time wisely for activities. Provide self-directed content paths in modules for students to do at their own pace. Label these paths consistently from week to week and from document to document |
| Assignments General |
Explained during class, time for questions. Submit during class. Grading time frame explicit and general feedback given in class session |
Explicit due date, time and where to submit. Synchronous reminders and time for questions built in. All seated assignments can be replicated online with additional detailed instruction and prompts about how to use technology. Discussion board or chat where students can post questions for instructor Grading time frame and method (track changes, voice thread) explicit, and general feedback given synchronously during live class as it applies to whole group. |
Explicit due date, time and where to submit. Prerecorded instructions and announcement/email reminders. All seated assignments can be replicated online with detailed instruction, may be able to improve assignments through use of technology. Discussion board forum where students can post questions for the instructor. Grading time frame and method (track changes, voice memo) explicit and posted with assignments. General feedback put in announcement or email. |
| Schedule |
May be more flexible- easier to assess where students are and collaboratively make adjustments in real time, as students are often more vocal about needs or make more use of informal check-ins. |
Due dates and agenda for completion of learning activities. Some flexibility with collaborative agreement- provide clear opportunities for check-ins to discuss progress to see if adjustments are needed. |
Complete syllabus so students can plan their whole term across classes in advance. Prerecorded instructions on scheduling related to workload. Due dates with flexibility for students who might be dealinging with challenging life circumstances related to learning content during the week (i.e., weekends are often the time they can do classwork). |
| Netiquette |
Minimum: Ensure that use of technology is professional; use social media and other technology thoughtfully and professionally. Client confidentiality applies online and in other digital spaces. Know the ethical professional standard for technology use (NASW Technology Standards). Keep your online presence ethics focused. |
Must explain with examples (orientation to any software). Instructor models as students may be new to these tools Include everything that would be in seated class. |
Instructor models, students expected to be using basic technology tools (school required minimum is explicit). Include everything that would be in seated class. |
| Technology | Minimum: upload syllabus to blackboard | Minimum: Give easy-to-find links to live class, readings, etc. Promote student self-regulation through frequent reminders and consistent structures. Provide hyperlinks-as few steps as possible as to not overwhelm. | Promote self-regulation through consistent structures. Provide links and consistency in terms. (Journals vs reflections; quizzes, vs assessments, etc.) |
| Social Presence |
Students visit in informal spaces, between classes- also formally in breakout groups, informally before and after classes. Encourage students to share ideas/good questions with others. Having class together in physical room facilitates connection around shared interests. |
Give students formal and informal time to spend together – e.g. in breakout groups give time for students to get to know each other, be playful together. Assign small group activities/projects in class during breakout groups (2-3 students). Encourage students to share (via email/post) ideas/good questions (and answers) with others. Use what is presented in synchronous space for connection (ie:, they have a pet, train outside their window, polls) to connect around shared interests. Continuity between classes (i.e.,end class with an activity and begin the following class reconnecting in the same small group). |
Create specific discussion areas for students to have non-course related conversations) and/or use surveys to get a sense of shared interests. Assign small group activities/projects outside of class (2-3 students). Encourage connection through group apps and other social media. Suggest students share questions, ideas, and solutions with one another. |
| Teacher Presence | Show up in class, give thorough and detailed feedback on assignments |
Provide good structure for class, facilitation, respond to emails, formative and summative feedback. Thorough, detailed and timely feedback on assignments. Polling tools can allow for anonymous feedback in real time. Build in connection with instructor through assignments (i.e., require connection with instructor, instructor approval on a research topic, share draft with instructor). |
Use multiple ways to reinforce teacher presence (e.g., video messages, emails, etc.) between synchronous meetings. Meeting w/each student near the start of term individually or in group(s) to build community. Build in connection with instructor through assignments (i.e., require connection with instructor, instructor approval on a research topic, share draft with instructor). |
| Cognitive Presence | Students are engaged in class discussions, appear to have read the material, incorporate learning in papers, ask thoughtful questions, etc. | Students show up and are engaged in online synchronous discussions, are prepared, incorporate learning in papers, ask thoughtful questions that demonstrate they read the material, etc. | Students show up and are engaged in online synchronous and asynchronous discussions, are prepared, incorporate learning in papers, pose thoughtful questions in synchronous and asynchronous spaces etc. |
| Instructor Accessibility |
Office hours |
Virtual office hours Best way to contact Expectation of availability and response timeframe- may “hang out” until everyone leaves the synch room each week. |
Virtual office hours Best way to contact Expectation of availability and response timeframe. May send survey asking students whether they want a meeting at multiple points in term, give a way to sign up to promote a sense of accessibility. |
| Exams/Quizzes | In class or take home, may review together in class. | May be timed, perhaps during the live class session. |
Timed assessments with multiple attempts Test pools Open and close access to exams Release of results after all test-takers are finished |
| Giving feedback – especially critical feedback | For continuity, consider comments online on uploaded assignments using SpeedGrader or using comment features in Word, etc. |
Comments online on uploaded assignments using SpeedGrader or using comment features in Word, etc. |
Comments online on uploaded assignments using SpeedGrader or using comment features in Word, etc. |
Consider how your lecture will fit into the technology we have available. Do you roam around a lot? Like to write on the whiteboard? Want another reason to worry about how you dress? Like to engage your students in an active discussion?
- Stay within the camera’s field of vision. Roaming around and moving off of your “mark” will create a recording in which you don’t appear present, like a disembodied voice.
- Repeat questions. The microphone will only reliably pick up your voice. If you engage your students in question and answer sessions, students watching the live stream or recording will only hear half of the discussion. Be sure to repeat questions.
- The video recording won’t show the whiteboard. Consider using the doc. cam or annotating on the computer (two things that can be recorded) instead of using the whiteboard.
- Clothes. Avoid clothes with small, repetitive patterns such as houndstooth or pinstripes. They can appear blurry or jittery on camera, especially when viewed in a small window. You may also want to avoid wearing black or white near your face. Black clothing can create shadows and age skin, while white can wash out skin. Jewel tones show up well on camera.
- Watch your recordings, note your performance, and learn from any mistakes. If students generally struggled with a concept which became evident later (exams, etc.), consider going back and reviewing your lecture(s) on the topic.
- Provide detailed instructions for accessing and playing lectures at the beginning of the course, preferably in class and in Canvas. Don’t assume your students know how to access the recordings or live stream.
- Beware what you record. If you're recording your sessions, it is illegal to show copyrighted materials in class. Clips under 10 minutes are fine, but full-length videos cannot be recorded. Contact the library for more information on copyright.
- Group work. See this document for some ideas.
- "Attendance." It will be difficult to gauge who is attending synchronously, and tedious to verify video viewership. One alternative is to ask students to post a reflection on a class period's or week's worth of class time via Discussions in Canvas (enable "must post first" and disable student editing). Allow them to read each others' responses after posting, but skip the reply requirement.
The easiest way to make both the live stream and recordings available to students is through Canvas. The classroom system will automatically put the recordings into My Media, which is accessible within Canvas. The live stream link, which you will receive via email, could be pasted into Canvas via an External URL or in a Page or Announcement.
However you decide to make the live stream link available, students can click on the link to watch the stream. Students will only need their web browser or smart device. There will be a placeholder video player before the live stream begins. There's an approximately 20 second delay between the stream and real time. The same view link is used for each live stream throughout the semester. After the recording is finalized, that session's recording exists as a separate entity in My Media and can be made available wherever the instructor chooses to place the recorded video.
To make recorded content available:
- log into Canvas
- create or edit a "Page" in Canvas (this method also works when editing Announcements, Discussions, or Assignment and Quiz instructions).
- when editing the text, click on rainbow pinwheel Kaltura logo in the toolbar. My Media is available there.

- Click on "Embed" from within the new window for whichever video you want to make available to students. You can then save the Page the video is embedded in.
Another way to make videos available: Media Gallery
If you'd rather not embed videos in pages, like above, there's also a tool that can be added to your Canvas course navigation called Media Gallery. It's basically an area in your course where you could make all of your selected My Media content available to students. The Media Gallery is hidden from your students by default, and must first be enabled in the Canvas course's navigation settings.
Where is the wireless microphone?
The mics, batteries, and battery charger are stored in a pull-out drawer under the PC and the other equipment in the instructor's desk. If you do not turn on and wear the wireless microphone, no audio will be recorded. NOTE: Remember to turn off the mic and return it to the drawer at the end of class.
What do I do? Do I hit the big red button?
No. Within 10 minutes of the start of class, you should see a countdown near the left-edge of the program. The recording will start automatically at the scheduled class start time. The big red button would start an "ad-hoc recording" which would be stopped when the scheduled recording begins. Scheduled recordings can be started early from the Scheduling menu (accessed by clicking the calendar icon).
I don't see a countdown to my scheduled recording.
You can check the "calendar" page to see the day's agenda. If you do not see your class, you can use the big red record button to start an ad hoc recording. The countdown will not appear until 10 minutes before your scheduled class start time. Please contact us at DLE@UWGB.EDU if this happens so they can get the class scheduled.
Can I live stream the camera input instead of the projected content?
Yes! Before your live stream and recording begins, you may override the default video input settings and set the camera source as the Primary Input that is live streamed. Please watch this video to learn how to manipulate these video input settings in a few quick clicks. You may not switch the live streamed source from projected content to the camera (and vice versa) during your live stream.
The system default settings are loaded each time you log into the classroom computer, so you must adjust the input settings before each class session in which you would like to stream the camera instead of the projected content.
I'm having trouble logging in.
Instructors log in with their UWGB email and password. If you can still not login, there may be an issue with the software installation and it will have to be updated. Notify the helpdesk of the issue.
A student watching live sees the main video in the small picture-and-picture box and the large player area is black.
This is a known issue. Kaltura currently only supports streaming one input. Students can change their player layout while watching with a few quick clicks. Please reference https://uknowit.uwgb.edu/105503.
Can I sanitize the mics?
The alcohol wipes can be used on the microphones. Just avoid wiping the small display on the mic bodypack and the top of the mic element (the silver grille or foam windscreen).
I don't want it to record/stream.
After the recording/stream starts, you may press the "X" to cancel the recording/stream. If you do not want to use the system for the semester, please email DLE@UWGB.EDU and we will cancel the scheduled events for the class.
I can't find the Kaltura Classroom Application or I lost it.
If you "X-ed" out the application, it minimizes to the "system tray" (near the time in the lower right of the Windows desktop). Look for the square green Kaltura Classroom icon and click it to unhide the app.
How do I share my recordings/stream link?
Please see the "Making live streams and recordings available to your students" tab of this guide. You should have also received an email with instructions from DLE@UWGB.EDU. Contact DLE@UWGB.EDU if you cannot find your live stream links.
Can I get an overview?
The information on the rest of this page (tabs) can get you started with considerations and best practices. For an overview of the rooms and how they work, you can also view this webinar recording.
Can I use Zoom or Microsoft Teams in these rooms?
Using Zoom or Teams in these rooms instead of Kaltura Capture is possible but requires extra knowledge of the equipment and a few extra steps before the start of each class. Using videoconference software in these rooms requires closing out of Kaltura Capture completely and selecting the proper audio and video devices in the videoconference software settings. We've created a room-by-room list of which devices you'll need to select and published it on the UWGB KnowledgeBase. CATL held a special webinar on advanced strategies for building student interactions into the stream watching experience and how to "hack" the equipment in the rooms for use with videoconferencing software. Watch the webinar recording here.