Transparency and Student Success: Time-Saving Small Changes

At the recent Instructional Development Institute (IDI) 2023 Conference, our community came together to discuss the topic of student success. One common theme discussed was how instructors and staff can help students succeed in college. An answer that came up repeatedly within various sessions was to adjust our course design methods. While making changes to a course can seem a daunting task, supporting student success does not have to involve doing a large-scale course overhaul. Instead, making small, sustainable changes to a course or even to individual activities and assessments can help increase the chances of student success within the classroom. These small changes are also an easier and more realistic lift for instructors, and some of them can even be time saving overall. In this blog post, we will explore some examples of how including the transparency in learning and teaching (TiLT) framework and proper scaffolding can help reduce confusion and barriers between instructors and students when engaging with learning materials. 

One of the easiest ways to include the TiLT framework within your course is to include detailed instructions for activities and assessments. Provide clearly written and detailed instructions to students on why an assignment is being given, what tasks students must do to complete the assignment or assessment, and what criteria will be used to grade their work. Assignment and assessment descriptions can be broken down into three clearly defined categories. ‘Purpose,’ ‘Task,’ and ‘Criteria for Completion’ or similarly named categories can help guide students through activities. At the end of the day, using the TiLT framework to make the “why” and “how” of your assignments and assessments more transparent to your students can also save time for you by reducing the number of emails or messages you receive from students asking for clarification. 

Another way to easily incorporate TiLT is the inclusion of scaffolding using low-stakes assignments and assessments. Smaller scale, low-stakes assessments or assignments can scaffold towards a final summative assessment. By breaking the process up into smaller, more manageable chunks, students can more easily track deadlines, which can reduce procrastination. Making these assignments and assessments worth only a few points can also provide incentive to complete them, and act as a buffer towards the final grade. Lastly, scaffolded assignments can also cut down on plagiarism cases, as you will be able to see the student’s work as they progress towards the final deliverable for your course. 

Using Canvas Rubrics to identify and explain assignment and assessment grading criteria and to show students what is required to complete an assessment is a third way to include TiLT within your course. This option can be used for both formative and summative assessments. You can also align rubric criteria to match with the expected outcomes of your course. Choosing to align course outcomes directly with course activities and rubrics also shows transparency in how different course elements will met expected course outcomes. The inclusion of detailed rubrics that match the expected outcomes for module assignments, discussions, or other assessments can help guide students through formative assessments. Rubrics can also show transparency in assessment purpose, goals, and completion in line with the TiLT framework, and are integrated with the Canvas Speedgrader to make grading assignments and assessments based on the rubric faster. 

If you would like to learn more about how to use the TiLT framework to make small, sustainable changes within your own course design, feel free to contact the CATL office through email (CATL@uwgb.edu) or schedule a consultation with us. Interested instructors may also want to sign up for our professional training opportunity LITE 201: Trail Guides when it is offered in the summer. This course will walk you through creating modules, assignments, and assessments using Universal Design for Learning (UDL) and Transparency in Learning and Teaching (TiLT) for your own courses. 

“Required” Reading: Guiding Students Through Your Course with Canvas Module Requirements

When provided with a task, almost invariably, some students will overlook or ignore provided instructions, skip past foundational lessons, and end up taking their own “creative” approach to completing it. While some students can find success going their own way, when a student misses instructions, they often end up making life harder for themselves and their instructor. When teaching with Canvas, you have access to tools that can help add order to how students progress through your lessons, instructions, and assignments. When you organize and present your content in modules, you gain the ability to add requirements that require each student to view and/or interact with specified course items before they can progress and access items positioned further down in the course module order. You can ensure that your students’ route to an assignment goes through the important scaffolding pages. While they are not a panacea and should be applied with careful thought so that they act as a guide and not an unnecessary obstacle for students, implementing module requirements can help prevent students from starting a task before they have engaged with preparatory lessons and activities.

Forcing top-to-bottom progression within a module

Within a single module you can use requirements to force students to progress through that module in top-to-bottom order. These requirements can help enforce that students, for example, view a page with important instructions before they can access and submit to an assignment. To set up a module with requirements that students must complete in order, click the module header’s Options icon, then click Edit to open the Edit Module Settings menu. In this menu, select + Add Requirement to begin adding your first requirement to the module and reveal additional options. Enabling the Students must move through requirements in sequential order checkbox will lock each module item until all the requirements above that item in that module have been completed. This forces students to work through the module requirements in top-to-bottom order. You then need to add requirements to the module. You will need to add one requirement for each module item students need to complete in order.

You add a requirement by selecting + Add Requirement, and then you configure a requirement by making selections in two drop-down menus. In the left drop-down menu, select the module item to which you want to add the requirement. In the right drop-down menu, select how the students must complete that requirement. Depending on the type of the module item, this second drop-down menu will show several options (click each option below to expand it and reveal suggested uses):

Only requires students to open and view the module item. This is a simple requirement well-suited for course Pages.

Requires students to open the item and then click a Mark as done button at the bottom of the page. If you use this type of requirement, make sure to provide students with instructions for marking items as done. Students can overlook the button and feel stuck if they’ve never encountered this requirement before.

Only used for Discussions and Pages that are set to allow students to make edits. Students will satisfy this requirement once they have posted a reply in the Discussion or saved an edit to the Page. Avoid picking this requirement for pages which can only be edited by Teachers, as students will not be able to complete the requirement.

Requires the student to make an Assignment submission, make a reply in a graded Discussion, or complete a Quiz attempt.

Requires students to earn at least the minimum score on the graded item, which you designate when setting up the requirement. This type of requirement works well with Quizzes that allow multiple or unlimited attempts.

Adding a requirement for each module item that contains important information or a required task will ensure students engage with the content in your intended order.

Locking a module until the previous module has been completed

Requirements can also be leveraged to lock an entire module until the student completes the requirements of one or more modules above it. Controlling module-to-module progression is done with the additional step of adding module prerequisites. You can add one or more prerequisites to a module through the same Edit Module Settings menu where you add requirements. When adding a module prerequisite, you select an entire module that appears above the module you are currently editing. Adding one or more prerequisites to a module will prevent a student from accessing all content in that module until they have completed the requirements of each module that is set as a prerequisite. Any module that is selected as a prerequisite must contain at least one requirement—Canvas needs to know the criteria for completing that module and satisfying the prerequisite. A module that is selected as a prerequisite but has no requirements will have no effect on course progression.

Screenshot of the Edit Module Settings menu: “Module 1” is selected as a prerequisite for “Module 2”
Edit Module Settings menu: “Module 1” is selected as a prerequisite for “Module 2”

Here is an example of how you can set this up in a course. Let’s say that the content in Module 1 is so fundamental to the content in Module 2 that you want to prevent students from viewing anything in Module 2 until they’ve fully engaged with the content in Module 1. Imagine that both Module 1 and Module 2 contain a Page, a Discussion, and an Assignment. Your first step in forcing students to complete Module 1 before accessing Module 2 is to edit Module 1 and add three requirements:

  1. Module 1 Page – view the item
  2. Module 1 Discussion – contribute to the page
  3. Module 1 Assignment – submit the assignment
Screenshot of the the Edit Module Settings menu with the example requirements for Module 1 set up
Edit Module Settings menu with the example requirements for Module 1 set up

Adding these requirements tells Canvas how to determine whether a student has completed Module 1: a student has completed Module 1 once they have viewed the Page, made a reply in the Discussion, and submitted to the Assignment. The next step is to edit Module 2 and add a prerequisite, selecting Module 1 as the prerequisite module. That is all that is needed to force students to complete Module 1 before accessing Module 2; it is not necessary to add any requirements to Module 2 unless you plan to use Module 2 as a prerequisite in a subsequent module. You may still want to add requirements to Module 2 just for the additional visual guidance and feedback they provide to students.

Screenshot of two example modules with requirements and prerequisites set up
Two example modules with requirements and prerequisites set up

Use Cases

There are many creative ways you can leverage module requirements and prerequisites to exercise control over the flow of your course. Here are a few illustrative use cases (click each to expand it):

You can require students to acknowledge the policies and essential information contained in your syllabus before they can access the rest of your course by creating a syllabus quiz and setting up module requirements and prerequisites. First, add a quiz to the “Introduction” module at or near the top of your Canvas course and add any number of objective questions to test your student’s knowledge of important syllabus content. Set up the quiz to allow for unlimited attempts and to keep the highest score. Next, edit your “Introduction” module to add a requirement that students score at least X points on the Syllabus Quiz. “X” can be whichever minimum score you deem good enough to allow progress through the course. Finally, edit each subsequent module of the course to add the “Introduction” module as a prerequisite. This setup requires students to take (and retake) the Syllabus Quiz until they score at least X points before they can access any of the content after the “Introduction” module.

You can set up requirements within a single module to have students complete a pretest quiz before going through the module content and then take a post-test quiz after completing the module content. This process could help you evaluate the effectiveness of your instruction and/or apply a metacognitive approach to help students gain awareness of their learning and gaps in their knowledge. To create this setup, add a pretest quiz at or near the top of a module and a post-test quiz at or near the bottom of the module and put lesson content and additional formative assessment activities in between the two quizzes. Edit the module to add a requirement to each module item (including requirements to “submit” to each of the two quizzes) and enable the Students must move through requirements in sequential order checkbox. Students will need to progress through the module in top-to-bottom order, first taking the pretest at the top of the module, then engaging with the content, and finally taking the post-test at the bottom of the module. You can set your pretest quiz to be a “Practice Quiz” so that scores are not added to the gradebook.

Even if you don’t need to force a linear progression through your course modules, adding requirements to your modules automatically adds visual feedback that helps to communicate expectations to students and helps students track their own progress through the course. Any module item that is used in a module requirement will display its requirement underneath its title within the module. This is a simple automatic piece of visual feedback that can help students keep track of their tasks. Students also see additional indicators of their progress. After a student completes a requirement, the module item is marked with a green checkmark to signal completion. If a student has started a module but has not yet completed all its requirements, that module’s header is marked with a red circle; once the student completes all of a module’s requirements, this indicator changes to a green checkmark. Instructors can monitor student progress through module requirements by clicking the View Progress button located above the first module of the course.

The visual feedback provided by module requirements adds a light element of gamification to your course, turning each module into a list of sub-missions to be completed. Requirements can be further leveraged to add game-based learning elements to your courses. Use requirements to set minimum scores on low-stakes quizzes that allow multiple attempts and unlock harder “levels” of your course once a student achieves the target score. You can further add the Canvas Badges (Badgr) integration to your course to award “achievements” for the completion of modules and (optionally) enable an anonymous leaderboard to foster competitive motivation among students.

Conclusion (Prerequisite: Read All Above Sections)

We hope this blog post has given you a sense of how and when you can use module requirements in your Canvas courses. When used thoughtfully, module requirements are an effective tool for encouraging students to move through your course in the sequence you intended. Recall from your past teaching that assignment or a module in a course where students got off-track because they somehow managed to miss vital information that was right there for them. Next time you teach that course, try employing requirements to funnel students through that important supporting content before they can start work on the assignment. If you have an idea for employing module requirements in your Canvas course and would like to discuss how to best put it together, please reach out to catl@uwgb.edu or request a CATL consultation to meet with a member of the CATL team!

Active Learning

What Is Active Learning?

Research has long supported the effectiveness of active learning strategies. What is active learning? It is an umbrella term used to describe classroom techniques in which students must participate in a tangible way in their own learning, as opposed to passively attending to a lecture or other presented material. Sometimes it involves groups of students working together (e.g., think, pair, share); in other cases they work individually to engage with the material (e.g., minute papers).

Overwhelming Evidence Supports Active Learning in the Classroom

You may be very familiar with the idea of active learning, but perhaps you are less well-acquainted with the research that supports its use. As recently noted by Davidson and Katopodis (2022) in Inside Higher Ed, according to “an often-referenced meta-study of more than 225 separate studies, active learning is more effective for every kind of student, in every discipline, than the traditional lecture model or the question-and-answer guided discussion method” (para. 1). Want to review some of the evidence yourself? Freeman et al. (2014) published the meta-analysis just referenced. More recently, Dewsbury and colleagues (2022) reported that active and inclusive learning techniques improved grades and reduced equity gaps in introductory biology courses, supporting previous findings by Theobold, Hill, Tran, and Freeman (2020) with STEM majors. Finally, Deslauriers et al. (2019) offered this interesting study that tackled resistance to active learning. They discovered that students in their research objectively learned more with active strategies but perceived that they learned less. Thus, instructors may wish to explain why they use these teaching approaches and what evidence tells us about the benefits for students.

Practical Implementation of Active Learning across Classes and Disciplines

As with any teaching approach, gradual implementation at a pace comfortable to the instructor and students is often wise. There are dozens and dozens of active learning strategies you can try, so there are opportunities to use these across disciplines and whether your classes are large or small, introductory level or advanced. Using active learning also does not mean abandoning lecture – in fact, it can be interspersed between shorter stretches of lecture that fit better with our typical attention span (e.g., about 10 minutes). What follows are links to practical resources to get you started.

Course Continuity: Resources for Transitioning to Remote Learning

Inclement weather, natural disasters, or other emergencies may lead to an extended loss of in-person class time. CATL has put together some resources below that may help you in planning for the inability to meet in person, and how you may continue to speak with students, guide their learning, and collect assignments and assessments.

Preliminary Planning

When you begin planning for a transition to remote learning, consider what learning objectives you need to cover while your course is not meeting in person. Whether you will be assessing those objectives during the alternative delivery time or when face-to-face meetings resume, you’ll need to consider what instructional materials and activities are needed to help students reach the course goals and objectives in the interim.

Here are some steps you may want to follow when switching modalities on short notice.

  1. Identify learning objectives and subtopics that will need alternative delivery.
  2. Create a course outline and use it as a guide for creating modules in Canvas. If you don’t plan on using Canvas, consider recording your outline somewhere anyway to help keep your courses on track. Sometimes considering what you plan on assessing will help you determine how to structure your outline.
  3. Identify teaching materials that you’re already using that can be easily uploaded to Canvas or delivered to students digitally.
  4. Develop a communication strategy for conveying information that you would normally only mention in class (through email, Canvas Announcements, Microsoft Teams, Slack, etc.).
  5. Identify gaps in teaching materials and consider how you will address them. This might mean the creation of additional documents and resources, recorded lectures, online meetings, etc.
  6. Consider how you’d like to include interactive elements of your class. This could mean video meetings during scheduled class time, asynchronous discussion boards, one-on-one virtual meetings with students, etc.

It’s important to consider that when your students enrolled, they were anticipating a course with a different modality, whether that was face-to-face or some combination of face-to-face and online. As you plan around not being able to meet in-person, consider the following.

  • Students may require additional accommodations that weren’t needed in your face-to-face class. This might mean closed captioning videos, or using screen readers to read digital documents. Also consider that in a large-scale event, the turnaround time for accommodating requests may be delayed.
  • Avoid introducing new tools and technologies mid-semester that create additional barriers for students, such as asking your students to purchase new software programs or publisher access codes.
  • Avoid scheduling “real-time” events outside of times your class was scheduled.

Another important consideration is that your students may be directly impacted by the event. Consider how you can accommodate those requests.

Presenting Information

Record lectures

When you want to record some of your course lectures, think about chunking up your lecture into about 10-minute segments so that students will be able to digest the material in smaller chunks. It is also good practice to consider the “drop-off” rate for students watching videos, which is about at 6–7 minutes. UWGB’s supported tool for recording video lectures is Kaltura. You can use the browser-based Kaltura webcam recorder to record simple webcam videos or the Kaltura Capture application to record a combination of webcam video, audio narration, and content on your computer screen, such as PowerPoint slides. Videos recorded with the Kaltura webcam recorder or Kaltura Capture are uploaded to your Kaltura (My Media) library and can then be embedded in Canvas pages.

Hold synchronous sessions

Synchronous sessions allow you and your students to communicate and view materials at the same time. UWGB supports both Microsoft Teams and Zoom for video conferencing, though Zoom is preferred for class sessions because of its robust Canvas integration. Both tools include many useful features for holding class sessions, such as the ability to screen share and use breakout rooms.

Some caveats to consider:

  • Not all students may have reliable internet access with the bandwidth and stability to support video conferencing. You may wish to check with your students to see if they have any concerns about joining synchronous sessions. You can also share resources about call-in audio-only options for Zoom or Teams.
  • Decide if you would like to record class sessions so students can watch if they are unable to attend, or if you will communicate another method students should use to make up missed class time (getting notes from a peer, referring to lecture notes that will be posted in Canvas, etc.). For students with internet bandwidth issues, streaming a recording (or even downloading it for offline viewing) takes a lot less bandwidth than joining a live video meeting, so you may wish to take this into consideration when making your decision.
  • Ask students to download the Zoom desktop app and log in with their UWGB credentials before joining a Zoom meeting (or the Microsoft Teams app, if using Teams). For students that don’t have access to a computer, you can direct them to the Microsoft Teams and Zoom apps for iOS and Android.
  • Some students might be hesitant to share audio and/or video, so encourage them to ask questions via the “chat” feature or “raise your hand” feature, if they can use audio. If you ask students to turn on their webcams, normalize using virtual backgrounds, as some students may not have access to a private, distraction-free workspace.
  • Inevitably, someone will forget to unmute when speaking, someone will forget to re-mute themselves when there is background noise, and someone will be interrupted by a child or younger sibling shouting in the background or a pet seeking some screen time. Acknowledge that these things will happen, and share a quick laugh when they do.

Upload materials to Canvas

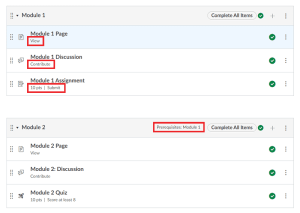
Instructors interested in using Canvas as a central repository for their class can make use of the Home/Modules page to organize materials and store them in one place. This Canvas guide illustrates how to add files to modules in your Canvas course. “Pages” add extra functionality over files since they work like webpages (such as the ability to include hyperlinks, embed images and video, etc.), but need to be created within Canvas instead of via external apps like Word or PowerPoint.

Class Communications

Asynchronous (message board) discussions

Asynchronous discussions, like the Discussions tool in Canvas, allow students to interact with one another around a topic throughout an extended window of time that can span days, weeks, or your entire course.

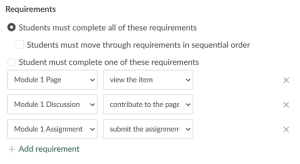
When holding online discussions, instructors often follow one of two paths. The first is more of a monologue, or 1-on-1 question and response, in which students respond to a prompt to show you that they’re familiar with the material. This can be valuable for a knowledge check, but also has value in that students can compare their own knowledge and application to their peers. The requirement that students respond to your prompt is also followed up with a requirement to respond to one or two peer posts.

The second path is more of a true discussion, in that students may pick one of two or more perspectives to support with materials you’ve covered as a class and/or external research. Because there is more than one “correct” answer, this type of discussion can lead to greater back-and-forth between students, and more robust responses from students to one another. To learn more about using the Discussions tool in Canvas, see this Canvas guide.

Chat

Canvas has a built-in chat feature, reminiscent of the early 2000s AOL, MSN, and ICQ instant messenger programs. Consider enabling it in your Canvas course navigation for informal, real-time communication inside of Canvas.

Develop a class communication plan

Your students may not be accustomed to being online students. This may require extra communication on your part to keep everyone on track. Consider developing a weekly schedule to remind yourself when to send out information on the week’s activities, approaching deadlines, motivational messages, class-based feedback, and other timely messages.

Condense or Adapt Materials

Losing in-class meeting time may mean culling something from your course. As you weigh what to condense or cull, consider what content, activities, and assessments are absolutely essential to your course outcomes. Trying to cram everything in will be stressful for you and your students. Consider how you can still help students meet the course outcomes…

  • with less content (e.g., are there slides, content knowledge, readings, in-class activities that are less vital to the course?)
  • with online assessments (e.g., moving face-to-face exams to Canvas)
  • with abbreviated assignments or activities that meet the same outcomes

Getting Help

The following resources are available to you and your students. In the event of a prolonged campus closure, consider communicating available resources to your students through email, Canvas, or whatever means you choose.

  • Your contact information
    Coursework, grading, extensions, extra attempts on online work, course policies
  • Canvas Support | “Help” button in Canvas | (833) 811-3206
    Canvas-related help and technical support
  • Dean of Students | dos@uwgb.edu | (920) 465-2152
    Standard bereavement procedure or the leave of absence bereavement procedure, extended absences, temporary impairments, grievances
  • IT Service Desk | gbit@uwgb.edu | (920) 465-2309
    General technology issues and concerns, including Microsoft Teams and Zoom
  • Student Accessibility Services | sas@uwgb.edu | (920) 465-2841
    Accommodation requests
  • Wellness Center | wellnesscenter@uwgb.edu | (920) 465-2380
    Counseling, consultations, health

As always, CATL is also here to support instructors teaching in every modality, in any situation. Feel free to email us (CATL@uwgb.edu) or request a consultation if you’d like to discuss your questions and concerns about transitioning to remote learning.